Autolayout in interface builder - Xcode 5.1
Other posts in the autolayout series:
They killed clippy.
Interface builder in Xcode 4 was so bad at managing autolayout, and yet autolayout was so good, that it drove me to abandon it entirely and build my interfaces in code. With Xcode 5.1, it appears that most of these wrongs have been corrected.
My previous post on autolayout in interface builder (IB) was basically a list of workarounds and tips on what not to do to upset the fragile system of constraints that you’d created. This post will be about how to work with the editor to get the layout you want.
The first thing to note is that IB won’t create constraints for you automatically any more, and the confusing distinction between system and user constraints no longer exists. Now, when you drag and drop an item onto a view, it just sits there. If you do nothing else at this point, the old auto-created system constraints will be added at run time. If you want to see what these are, you can get the system to add them in for you using the “Resolve Autolayout Issues” menu, of which more later.
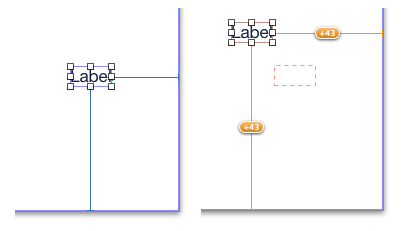
IB also won’t destroy constraints for you when you drag and drop. Instead, if your antics have invalidated previously added constraints, it will give you little warning highlights on the affected constraints, and a small indicator of where the view ought to be:
Major issue #1 with IB (dragging and dropping creates constraints you don’t need, and destroys the constraints you’ve made) is therefore resolved.
Major issue #2, forcing the view in interface builder to have a complete and unambiguous set of constraints, is also removed. IB now has the concept of a design layout and a runtime layout. The runtime layout is the one that has to be complete and unambiguous. Design layout can be whatever you like. The above screenshot is highlighting the differences between the two.
If IB isn’t creating constraints for you automatically, how do you make them? It’s all in this little menu bar at the bottom of the editor, also accessible via the Editor menu from the menu bar:
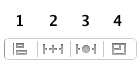
This is what each menu item means / does in summary:
- Align. This is generally useful when multiple items are selected, when it will allow you to align edges or centres, but for single views it can be used to align against the superview’s horizontal and / or vertical centres.
- Pin. This is the new powerhouse of constraint creation. The bulk of your constraints can be added here, with a lot of flexibility. This is where you’d create the user constraints that were so important in Xcode 4.
- Resolve auto layout issues. This has various options to update the positions of your views to match their constraints or vice versa, or to add the system constraints that would previously have been added automatically in Xcode 4.
- Resizing behavior. This controls how resizing operations affect the layout of other objects. There are two options, “Siblings and Ancestors” and “Descendants”, either, neither or both of which can be selected. If you select “Siblings and Ancestors” then all hell breaks loose when you try and resize a view, particularly if it’s pinned to the view controller’s main view. If you select “Descendants”, then changing a view affects the layout of its subviews, which makes a bit more sense. If neither is selected, then only the view you’re adjusting will change.
The automatically added constraints can be just as idiosyncratic as they were in Xcode 4, so I’d always suggest looking at the Pin menu to set things up. Here’s a practical example. Say we want an image view, 150x150, centred horizontally in the view controller and pinned to the top.
Drag an image view onto the empty canvas. It defaults to the full size of the view controller, covering everything. iOS7 is all about edge-to-edge content, after all! Drag it so that it snaps to the top layout guide, leaving room for the status bar.
With the image view selected, open the Pin menu and update the following values:
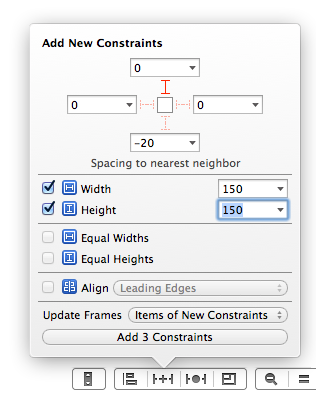
The top part of the menu allows you to create spacing constraints in any direction. You select each direction (highlighting the I-bar in red), then you can either enter a number, use the current number (derived from the current position in the design layout), or choose a standard value. In the drop-down menu you can also choose the item that you’re pinning to - typically the superview, the view controller’s view or layout guides, or a peer view. The options will vary depending on Xcode’s mood, or possibly on the location of the view in question.
Under that are self-explanatory sizing constraints. Under that are three options that are only valid if you have multiple views selected, to allow various alignments to be added.
At the very bottom, you can choose what should happen to your design layout when these constraints are added - either nothing, the frames of items with new constraints, or all frames should be updated. Choose “Items of new constraints” and hit the “Add 3 constraints” button. The image view is now the right size and in the right place vertically, but it’s off to the left and there are warnings about an ambiguous horizontal position.
Bring up the Align menu and create our final constraint:
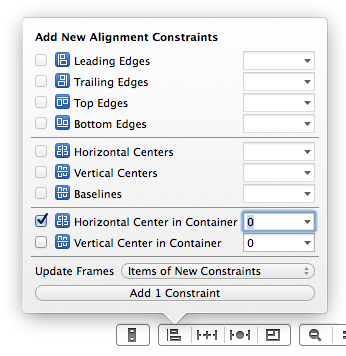
That’s all there is to it. Once you’ve added a few constraints of your own to a view, Xcode won’t attempt to add any more for you relating to that view - you will instead get ambiguity warnings for each layout aspect that can’t be resolved. The yellow warning triangle will appear in the top right of the editor, and each ambiguous item can be selected directly via the drop-down menu that appears from there. You can then either add missing constraints manually or use the “resolve autolayout issues” menu to add them automatically.
If you enjoy the terrifying inaccuracy of drag-and-drop, then one quite useful new feature is the ability to control-drag from one item to another, which brings up a small context-sensitive options window giving you a choice of constraints to create - for example, if you dragged between two views that were next to each other horizontally, it would offer center-Y, top or bottom alignment or horizontal spacing constraints.
If you like to ship without warnings (which you do, right?) then you can now add a constraint and mark it as a placeholder, for situations when you are mixing your layout creation between interface builder and code. This allows you to create a non-ambiguous layout in IB without needing to create an outlet to a constraint for the purpose of removing it straight away in your code and replacing it with something else.
New in Xcode 5.1 (not 5.0) is the ability for full editing of constraints. You can now select any constraint and have access to all of the properties that you would when creating a constraint using constraintWithItem:...: each item and attribute, the relationship type, the constant and finally the multiplier! With this ability it seems like the need for the placeholder constraints mentioned above would be limited to very few situations.
In summary, Xcode 5.1 is worlds better than 4.x, certainly enough to tempt me back into using IB again. For complex layouts then my advice from the previous post still stands: name your views to make sense of the list of constraints and the document navigator. This is done in the Label field of the identity inspector. I would also try to avoid too much drag and drop once you’ve got your content and rough layout added, and rely on creating and editing constraints via the various menus and inspectors. Kudos to Apple for listening to feedback and coming up with a much better way to visually design layouts.