<?xml version="1.0" encoding="utf-8"?>
<feed xmlns="http://www.w3.org/2005/Atom">

  <title><![CDATA[Command Shift]]></title>
  <link href="http://commandshift.co.uk/atom.xml" rel="self"/>
  <link href="http://commandshift.co.uk/"/>
  <updated>2019-04-10T14:24:10+00:00</updated>
  <id>http://commandshift.co.uk/</id>
  <author>
    <name><![CDATA[Richard Turton]]></name>
    
  </author>
  <generator>Jekyll v3.7.4</generator>

  
  <entry>
    <title type="html"><![CDATA[Embedding in scrollviews]]></title>
    <link href="http://commandshift.co.uk/blog/2017/02/01/embedding-in-scrollview/"/>
    <updated>2017-02-01T00:00:00+00:00</updated>
    <id>http://commandshift.co.uk/blog/2017/02/01/embedding-in-scrollview</id>
    <content type="html"><![CDATA[<p>You’ve built a view controller in a storyboard. It started out quite simple, but you added bits here and there and the complexity grew. Now, a new requirement arrives.</p>

<p>We need a text field.
We need another set of content at the bottom.</p>

<p>All of a sudden, your layout won’t fit on the screen any more. You need it to scroll. That’s no problem, all you need to do is select the root view of the view controller, and choose <strong>Embed in… &gt; Scroll View</strong>, right?</p>

<p>Oh. That’s not available when you’re dealing with the root view. So how can you do it? How do you make a non-scrolling view controller scrollable?</p>

<!--more-->

<p>You <strong>don’t</strong> drag a scroll view onto the view, so it’s highlighted, then drop it - that will completely replace your view and all of its contents!</p>

<p>You <strong>can’t</strong> change the class of the root view in the identity inspector to a scroll view - not only does this not work, it also isn’t a good idea, since you still want the root view to be a plain <code class="highlighter-rouge">UIView</code>.</p>

<p>You want to go from this:</p>

<p><strong>View</strong> -&gt; <strong>Contents</strong></p>

<p>To this:</p>

<p>View -&gt; Scrollview -&gt; <strong>View</strong> -&gt; <strong>Contents</strong></p>

<p>You have tons of constraints and outlets linking the contents to the root view, and you don’t want to have to rebuild or reconnect them.</p>

<p>Luckily, there is a way to do it:</p>

<ul>
  <li>If you’ve used the top or bottom layout guides then you’ll need to re-create those constraints against the top or bottom edges of the container instead. Hold alt after control-dragging to show the container instead of the layout guides in the add constraints menu.</li>
  <li>Make sure that you have a solid line of top-to-bottom and constraints so that the scroll view can work out its content height.</li>
  <li>Select the root view in the document outline, then drag it out of the view controller tree and drop it elsewhere in the scene, after the <strong>Exit</strong> segue point, for example.</li>
  <li>The view should have maintained the same size, the contents and constraints will all be there, and the outlets will still be connected.</li>
  <li>The view controller will now be missing a root view. Drag in a UIView, which will fill the scene.</li>
  <li>Drag in a scroll view and pin it to all edges of the root view (don’t use the layout guides, this is a very similar principle to the <a href="http://commandshift.co.uk/blog/2017/01/09/scrollviews-and-stack-views/">previous article</a></li>
  <li>Drag your original view back in so it’s a subview of the scroll view. You’ll see some red, don’t worry.</li>
  <li>Pin the original view to all edges of the scroll view. At this point you’ll still have some layout warnings.</li>
  <li>Pin the original view’s width to that of the new root view (hat tip to <a href="https://twitter.com/calicoding">@calicoding</a> for pointing out that nicer alternative to pinning to the root view’s leading and trailing edges). All of your warnings should now be gone.</li>
</ul>

<p>You’re done - all of your original content is now safely embedded in a scroll view, with constraints and outlets intact.</p>
]]></content>
  </entry>
  
  <entry>
    <title type="html"><![CDATA[Scrollviews and stack views]]></title>
    <link href="http://commandshift.co.uk/blog/2017/01/09/scrollviews-and-stack-views/"/>
    <updated>2017-01-09T00:00:00+00:00</updated>
    <id>http://commandshift.co.uk/blog/2017/01/09/scrollviews-and-stack-views</id>
    <content type="html"><![CDATA[<p>File under: <em>Every time I do this, I forget how to do it, so I’m writing it down</em>.</p>

<p>It’s a common occurrence. You have some content in a stack view, and you want it to be scrollable. Maybe the content in the stack can change or you want keyboard avoidance or whatever. How do you set that up in a storyboard without either IB moaning at you, or the views not coming out right?</p>

<!--more-->

<p>Here’s the view hierarchy you need:</p>

<ol>
  <li>The root view of the view controller</li>
  <li>Your scroll view</li>
  <li>Your stack view</li>
</ol>

<p>The scroll view needs to be pinned to the leading and trailing margins, with a space of zero. It should also be pinned to the top and bottom of the root view (not the layout guides - you’ll need to hold alt down while choosing constraints to get this instead).</p>

<p>This will make your scroll view fill the entire scene. If you have a navigation bar or tab bar then it will sort the insets for you if the option “Adjust scroll view insets” is checked against the view controller (it is by default). This will let your content move behind the bars.</p>

<p>At this point your scroll view will have a size, but it won’t have a content size. The content size comes from the constraints between the scroll view and its subviews.</p>

<p>You pin the top, left, bottom and right margins of the stack view to the scroll view. This tells the scroll view to make its content the same size as the stack. This is fine as far as the height goes (for a vertical stack view, the height is derived from the height of the arranged subviews) but it will have no idea about the width, and will be complaining at you.</p>

<p>To solve that, you need to also pin the leading and trailing edges of the stack view to the superview, which will give it something concrete to decide its width against.</p>

<p>So, here’s the summary of what you need (for a vertical stack view):</p>

<ol>
  <li><strong>Root view</strong></li>
  <li><strong>Scroll view</strong>, pinned to all edges of the <strong>root view</strong> (<em>not</em> the layout guides)</li>
  <li><strong>Stack view</strong>, pinned to all edges of the <strong>scroll view</strong>, and leading and trailing edges pinned to the <strong>root view</strong></li>
</ol>

<p>You’ll need to have content in the stack view for interface builder to cope with all this, too, but that’s about the size of it.</p>

]]></content>
  </entry>
  
  <entry>
    <title type="html"><![CDATA[Fun with Sets]]></title>
    <link href="http://commandshift.co.uk/blog/2016/11/25/fun-with-sets/"/>
    <updated>2016-11-25T00:00:00+00:00</updated>
    <id>http://commandshift.co.uk/blog/2016/11/25/fun-with-sets</id>
    <content type="html"><![CDATA[<p>A Set is a collection of unique members. The uniqueness of those members, in a Swift <code class="highlighter-rouge">Set</code>, is determined by equality (<code class="highlighter-rouge">==</code>). The <code class="highlighter-rouge">hashValue</code> is used to improve performance. This means you can only store values in a set that conform to <code class="highlighter-rouge">Hashable</code>.</p>

<p>To combine two sets, you use the <code class="highlighter-rouge">union</code> method. Consider the following groups of numbers:</p>

<div class="language-swift highlighter-rouge"><div class="highlight"><pre class="highlight"><code><span class="k">let</span> <span class="nv">someInts</span> <span class="o">=</span> <span class="kt">Set</span><span class="p">([</span><span class="mi">1</span><span class="p">,</span> <span class="mi">2</span><span class="p">,</span> <span class="mi">3</span><span class="p">])</span>
<span class="k">let</span> <span class="nv">someMoreInts</span> <span class="o">=</span> <span class="kt">Set</span><span class="p">([</span><span class="mi">3</span><span class="p">,</span> <span class="mi">4</span><span class="p">,</span> <span class="mi">5</span><span class="p">])</span>
<span class="k">let</span> <span class="nv">allTehInts</span> <span class="o">=</span> <span class="n">someInts</span><span class="o">.</span><span class="nf">union</span><span class="p">(</span><span class="n">someMoreInts</span><span class="p">)</span>
</code></pre></div></div>

<p><code class="highlighter-rouge">allTehInts</code> will contain 1, 2, 3, 4 and 5. 3 was in both sets, but sets can only contain unique values, so it doesn’t get included.</p>

<p><em>Which</em> 3 is contained in <code class="highlighter-rouge">allTehInts</code>? The one from <code class="highlighter-rouge">someInts</code>, or the one from <code class="highlighter-rouge">someMoreInts</code>? THE ANSWER WILL SHOCK YOU! Or, confuse you, if you’ve just migrated to Swift 3.</p>

<!--more-->

<p>You may well be saying, “I don’t care which one is included. 3 is 3”, and you’d have a point. But in a recent project I was using sets for a slightly more complex purpose.</p>

<p>To relieve the tedium of mapping JSON to Core Data models, there was code that creates a set of default “attribute mappings”, which assume a 1:1 relationship between the entity attribute name and the field name from JSON. For each entity you can then specify additional mappings for when the names don’t match up or you need to use a value transformer. The final set of mappings that gets used is a union of the default mappings and the specialised mappings.</p>

<p>The equality and hash value of the attribute mapping was based solely on the “remote key path” of the mapping - the name of the field in the JSON response. This makes sense, because you don’t want to map the same remote field to multiple attributes.</p>

<p>To demonstrate the principle without getting sidetracked, here is a simplified example using the reliable old <code class="highlighter-rouge">Person</code> struct:</p>

<div class="language-swift highlighter-rouge"><div class="highlight"><pre class="highlight"><code><span class="kd">struct</span> <span class="kt">Person</span> <span class="p">{</span>
    <span class="k">let</span> <span class="nv">firstName</span><span class="p">:</span> <span class="kt">String</span>
    <span class="k">let</span> <span class="nv">lastName</span><span class="p">:</span> <span class="kt">String</span>
<span class="p">}</span>

<span class="kd">extension</span> <span class="kt">Person</span><span class="p">:</span> <span class="kt">Equatable</span> <span class="p">{}</span>

<span class="kd">func</span> <span class="o">==</span> <span class="p">(</span><span class="nv">lhs</span><span class="p">:</span><span class="kt">Person</span><span class="p">,</span> <span class="nv">rhs</span><span class="p">:</span> <span class="kt">Person</span><span class="p">)</span> <span class="o">-&gt;</span> <span class="kt">Bool</span> <span class="p">{</span>
    <span class="k">return</span> <span class="n">lhs</span><span class="o">.</span><span class="n">firstName</span> <span class="o">==</span> <span class="n">rhs</span><span class="o">.</span><span class="n">firstName</span>
<span class="p">}</span>

<span class="kd">extension</span> <span class="kt">Person</span><span class="p">:</span> <span class="kt">Hashable</span> <span class="p">{</span>
    <span class="k">var</span> <span class="nv">hashValue</span><span class="p">:</span> <span class="kt">Int</span> <span class="p">{</span>
        <span class="k">return</span> <span class="k">self</span><span class="o">.</span><span class="n">firstName</span><span class="o">.</span><span class="n">hashValue</span>
    <span class="p">}</span>
<span class="p">}</span>
</code></pre></div></div>

<p>The <code class="highlighter-rouge">Person</code> has a first and last name, but the uniqueness is measured only on the first name.</p>

<p>Here are three people with unimaginatively similar names:</p>

<div class="language-swift highlighter-rouge"><div class="highlight"><pre class="highlight"><code><span class="k">let</span> <span class="nv">person</span> <span class="o">=</span> <span class="kt">Person</span><span class="p">(</span><span class="nv">firstName</span><span class="p">:</span> <span class="s">"Bob"</span><span class="p">,</span> <span class="nv">lastName</span><span class="p">:</span> <span class="s">"Bobson"</span><span class="p">)</span>
<span class="k">let</span> <span class="nv">person2</span> <span class="o">=</span> <span class="kt">Person</span><span class="p">(</span><span class="nv">firstName</span><span class="p">:</span> <span class="s">"Bob"</span><span class="p">,</span> <span class="nv">lastName</span><span class="p">:</span> <span class="s">"Jobson"</span><span class="p">)</span>
<span class="k">let</span> <span class="nv">person3</span> <span class="o">=</span> <span class="kt">Person</span><span class="p">(</span><span class="nv">firstName</span><span class="p">:</span> <span class="s">"Rob"</span><span class="p">,</span> <span class="nv">lastName</span><span class="p">:</span> <span class="s">"Bobson"</span><span class="p">)</span>
</code></pre></div></div>

<p>Let’s put them into two sets:</p>

<div class="language-swift highlighter-rouge"><div class="highlight"><pre class="highlight"><code><span class="k">let</span> <span class="nv">set1</span> <span class="o">=</span> <span class="kt">Set</span><span class="p">([</span><span class="n">person</span><span class="p">,</span> <span class="n">person3</span><span class="p">])</span>
<span class="k">let</span> <span class="nv">set2</span> <span class="o">=</span> <span class="kt">Set</span><span class="p">([</span><span class="n">person2</span><span class="p">])</span>
</code></pre></div></div>

<p>According to the rules above, <code class="highlighter-rouge">person</code>, Bob Bobson, and <code class="highlighter-rouge">person2</code>, Bob Jobson, are identical - they have the same first name.</p>

<p>Create a single set which is a <code class="highlighter-rouge">union</code> of the two:</p>

<div class="language-swift highlighter-rouge"><div class="highlight"><pre class="highlight"><code><span class="k">let</span> <span class="nv">union</span> <span class="o">=</span> <span class="n">set1</span><span class="o">.</span><span class="nf">union</span><span class="p">(</span><span class="n">set2</span><span class="p">)</span>
</code></pre></div></div>

<p>In Swift 2.2, <code class="highlighter-rouge">person2</code> gets included in <code class="highlighter-rouge">union</code>, and <code class="highlighter-rouge">person</code> is dumped. Reverse the order:</p>

<div class="language-swift highlighter-rouge"><div class="highlight"><pre class="highlight"><code><span class="k">let</span> <span class="nv">union</span> <span class="o">=</span> <span class="n">set2</span><span class="o">.</span><span class="nf">union</span><span class="p">(</span><span class="n">set1</span><span class="p">)</span>
</code></pre></div></div>

<p><code class="highlighter-rouge">person</code> is included in the final set this time. In the project, the final set of mappings was a union of the default and specific mappings, which meant that any specific mappings replaced the defaults.</p>

<p><em>This behaviour is reversed in Swift 3</em>. Members of the <em>first</em> set are kept when performing a union operation. This means that most of the specific mappings are dropped when performing the union, because there is often a default mapping with the same name.</p>

<p>It was a simple fix to reverse the order of the union, and a slightly longer fix to use <code class="highlighter-rouge">update</code> to make the intention of the code completely clear, but it took an awful lot of head-scratching to find out what was happening and why. The Swift 3 documentation is specific about which members will be included in the event of a match, the earlier documentation is not.</p>
]]></content>
  </entry>
  
  <entry>
    <title type="html"><![CDATA[Pentominoes, part seven: Dropping with intent]]></title>
    <link href="http://commandshift.co.uk/blog/2016/07/30/pentominoes-part-seven/"/>
    <updated>2016-07-30T00:00:00+00:00</updated>
    <id>http://commandshift.co.uk/blog/2016/07/30/pentominoes-part-seven</id>
    <content type="html"><![CDATA[<p>I last left the project with the player being able to pick up and drop tiles on the board, but with no implementation of the game logic that I’d spent all that time building up.</p>

<p>In this post I’m going to add the game logic in to the drag and drop action.</p>

<p>My goals are:</p>

<ul>
  <li>To show a highlighted “drop zone” on the board as the player moves a tile around. The drop zone will show them where the tile can be dropped</li>
  <li>To “snap” the tile into the drop zone if the drag is ended while the tile is in a permissible position</li>
  <li>Otherwise, to snap the tile back to its position at the edge of the board</li>
  <li>Sort out the messy pickup of tiles on a busy board</li>
</ul>

<!--more-->

<h2 id="where-am-i">Where am I?</h2>

<p>The tile placing rules work around the <code class="highlighter-rouge">Square</code> in the top left of the tile - that’s the place the <code class="highlighter-rouge">Board</code> uses to assess if a tile can go in a specific location.</p>

<p>I need to do a lot of extra work in the <code class="highlighter-rouge">handlePan(_:)</code> method.</p>

<p>When the <code class="highlighter-rouge">TileView</code> is being dragged around, the origin of the view is going to line up with the origin of the top left square in the tile. This can be converted into the coordinate system of the board like so:</p>

<div class="language-swift highlighter-rouge"><div class="highlight"><pre class="highlight"><code><span class="k">let</span> <span class="nv">locationOnBoard</span> <span class="o">=</span> <span class="n">boardView</span><span class="o">.</span><span class="nf">convertPoint</span><span class="p">(</span><span class="n">activeTile</span><span class="o">.</span><span class="n">bounds</span><span class="o">.</span><span class="n">origin</span><span class="p">,</span> <span class="nv">fromView</span><span class="p">:</span> <span class="n">activeTile</span><span class="p">)</span>
</code></pre></div></div>

<p>The <code class="highlighter-rouge">convertPoint / rect</code> family of functions trip a lot of people up, mostly because you need to remember that a view’s <code class="highlighter-rouge">frame</code> and <code class="highlighter-rouge">center</code> are in the superview’s coordinate system, which then needs to be the <code class="highlighter-rouge">fromView</code> that you use. It’s my <a href="http://stackoverflow.com/questions/8465659/understand-convertrecttoview-convertrectfromview-convertpointtoview-and/8465817#8465817">5th highest voted Stack Overflow answer!</a>. If you use coordinates from the <code class="highlighter-rouge">bounds</code> instead, you can convert from the view itself, so it’s a lot simpler.</p>

<p>In the first attempt at this, I just converted the point to a square on the board, checked that, and let the player drop it if it was OK. However, that didn’t play very well - when placing tiles on an almost-full board, it was much nicer for the game to hunt around for nearby locations that could serve as drop zones, otherwise the player is holding a tile <em>almost</em> over a perfectly good location and it isn’t being highlighted as a drop.</p>

<p>At that point the logic got more complicated than I was happy with inside a gesture handler, so I spun it out into a method on <code class="highlighter-rouge">Board</code>, which is probably where it should have been the whole time.</p>

<p>It ended up looking like this:</p>

<div class="language-swift highlighter-rouge"><div class="highlight"><pre class="highlight"><code><span class="kd">public</span> <span class="kd">func</span> <span class="nf">allowedDropLocation</span><span class="p">(</span><span class="nv">tile</span><span class="p">:</span> <span class="kt">Tile</span><span class="p">,</span> <span class="n">atPoint</span> <span class="nv">point</span><span class="p">:</span> <span class="kt">CGPoint</span><span class="p">,</span> <span class="nv">gridSize</span><span class="p">:</span> <span class="kt">CGFloat</span><span class="p">)</span> <span class="o">-&gt;</span> <span class="kt">Square</span><span class="p">?</span> <span class="p">{</span>
    <span class="k">let</span> <span class="nv">potentialSquare</span> <span class="o">=</span> <span class="nf">squareAtPoint</span><span class="p">(</span><span class="n">point</span><span class="p">,</span> <span class="nv">gridSize</span><span class="p">:</span> <span class="n">gridSize</span><span class="p">)</span>
    <span class="k">var</span> <span class="nv">allowedDropLocation</span><span class="p">:</span> <span class="kt">Square</span><span class="p">?</span>
    <span class="k">if</span> <span class="nf">canPositionTile</span><span class="p">(</span><span class="n">tile</span><span class="p">,</span> <span class="nv">atSquare</span><span class="p">:</span> <span class="n">potentialSquare</span><span class="p">)</span> <span class="p">{</span>
        <span class="n">allowedDropLocation</span> <span class="o">=</span> <span class="n">potentialSquare</span>
    <span class="p">}</span> <span class="k">else</span> <span class="p">{</span>
        <span class="k">var</span> <span class="nv">distanceToDropPoint</span> <span class="o">=</span> <span class="kt">CGFloat</span><span class="o">.</span><span class="n">max</span>
        <span class="k">for</span> <span class="n">square</span> <span class="k">in</span> <span class="nf">squaresSurrounding</span><span class="p">(</span><span class="n">potentialSquare</span><span class="p">)</span> <span class="p">{</span>
            <span class="k">if</span> <span class="nf">canPositionTile</span><span class="p">(</span><span class="n">tile</span><span class="p">,</span> <span class="nv">atSquare</span><span class="p">:</span> <span class="n">square</span><span class="p">)</span> <span class="p">{</span>
                <span class="k">let</span> <span class="nv">origin</span> <span class="o">=</span> <span class="nf">pointAtOriginOfSquare</span><span class="p">(</span><span class="n">square</span><span class="p">,</span> <span class="nv">gridSize</span><span class="p">:</span> <span class="n">gridSize</span><span class="p">)</span>
                <span class="k">let</span> <span class="nv">xDistance</span> <span class="o">=</span> <span class="n">origin</span><span class="o">.</span><span class="n">x</span> <span class="o">-</span> <span class="n">point</span><span class="o">.</span><span class="n">x</span>
                <span class="k">let</span> <span class="nv">yDistance</span> <span class="o">=</span> <span class="n">origin</span><span class="o">.</span><span class="n">y</span> <span class="o">-</span> <span class="n">point</span><span class="o">.</span><span class="n">y</span>
                <span class="c1">// No need to sqrt since we're just comparing</span>
                <span class="k">let</span> <span class="nv">distance</span> <span class="o">=</span> <span class="p">(</span><span class="n">xDistance</span> <span class="o">*</span> <span class="n">xDistance</span><span class="p">)</span> <span class="o">+</span> <span class="p">(</span><span class="n">yDistance</span> <span class="o">*</span> <span class="n">yDistance</span><span class="p">)</span>
                <span class="k">if</span> <span class="n">distance</span> <span class="o">&lt;</span> <span class="n">distanceToDropPoint</span> <span class="p">{</span>
                    <span class="n">distanceToDropPoint</span> <span class="o">=</span> <span class="n">distance</span>
                    <span class="n">allowedDropLocation</span> <span class="o">=</span> <span class="n">square</span>
                <span class="p">}</span>
            <span class="p">}</span>
        <span class="p">}</span>
    <span class="p">}</span>
    <span class="k">return</span> <span class="n">allowedDropLocation</span>
<span class="p">}</span>
</code></pre></div></div>

<p>This did mean I had to <code class="highlighter-rouge">import CoreGraphics</code> into <code class="highlighter-rouge">Board</code>, making my “pure swift” model object not quite so pure, but honestly, who cares? It feels like the right place for this method to go.</p>

<p>In brief, the method finds the square at the correct location, checks if that’s a permissible drop, if not, it gets a 3x3 grid of squares centred on that square and checks each one of those, picking the one whose centre is closest to the tile’s location.</p>

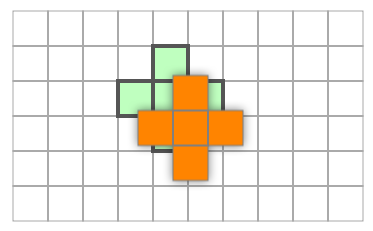
<p>This could possibly do with some tweaking - obviously it favours placing the tile at the “actual” square even when the drop location is really near the edge:</p>

<p><img src="/images/pentominoes/DropLocation.png" alt="tile being dropped near the edge of its drop zone" /></p>

<p>But I think I’ll play a while and see if it’s a problem.</p>

<p><code class="highlighter-rouge">squareAtPoint</code> is a new function on <code class="highlighter-rouge">PlayingGrid</code> that returns a <code class="highlighter-rouge">Square</code> given a particular grid size and point:</p>

<div class="language-swift highlighter-rouge"><div class="highlight"><pre class="highlight"><code><span class="kd">public</span> <span class="kd">func</span> <span class="nf">squareAtPoint</span><span class="p">(</span><span class="nv">point</span><span class="p">:</span> <span class="kt">CGPoint</span><span class="p">,</span> <span class="nv">gridSize</span><span class="p">:</span> <span class="kt">CGFloat</span><span class="p">)</span> <span class="o">-&gt;</span> <span class="kt">Square</span> <span class="p">{</span>
    <span class="k">let</span> <span class="nv">row</span> <span class="o">=</span> <span class="kt">Int</span><span class="p">(</span><span class="nf">floor</span><span class="p">(</span><span class="n">point</span><span class="o">.</span><span class="n">y</span> <span class="o">/</span> <span class="n">gridSize</span><span class="p">))</span>
    <span class="k">let</span> <span class="nv">column</span> <span class="o">=</span> <span class="kt">Int</span><span class="p">(</span><span class="nf">floor</span><span class="p">(</span><span class="n">point</span><span class="o">.</span><span class="n">x</span> <span class="o">/</span> <span class="n">gridSize</span><span class="p">))</span>
    <span class="k">return</span> <span class="kt">Square</span><span class="p">(</span><span class="nv">row</span><span class="p">:</span> <span class="n">row</span><span class="p">,</span> <span class="nv">column</span><span class="p">:</span> <span class="n">column</span><span class="p">)</span>
<span class="p">}</span>
</code></pre></div></div>

<h2 id="showing-the-drop-zone">Showing the drop zone</h2>

<p>The drop zone is going to be the shape of the tile, drawn on the board. I already have a method to get a <code class="highlighter-rouge">CGPath</code> out from a grid, so I add a <code class="highlighter-rouge">CAShapeLayer</code> to <code class="highlighter-rouge">BoardView</code>. Because we’re dealing with locations at the top left of tiles, the <code class="highlighter-rouge">anchorPoint</code> of the layer is set to (0, 0), so that I can set its <code class="highlighter-rouge">position</code> directly corresponding to the square that I’m planning to drop it on. All of this configuration can be done as part of the property declaration, like this:</p>

<div class="language-swift highlighter-rouge"><div class="highlight"><pre class="highlight"><code><span class="kd">private</span> <span class="k">let</span> <span class="nv">highlightLayer</span><span class="p">:</span> <span class="kt">CAShapeLayer</span> <span class="o">=</span> <span class="p">{</span>
    <span class="nv">$0</span><span class="o">.</span><span class="n">anchorPoint</span> <span class="o">=</span> <span class="kt">CGPoint</span><span class="p">(</span><span class="nv">x</span><span class="p">:</span> <span class="mi">0</span><span class="p">,</span> <span class="nv">y</span><span class="p">:</span> <span class="mi">0</span><span class="p">)</span>
    <span class="nv">$0</span><span class="o">.</span><span class="n">fillColor</span> <span class="o">=</span> <span class="kt">UIColor</span><span class="p">(</span><span class="nv">red</span><span class="p">:</span> <span class="mf">0.0</span><span class="p">,</span> <span class="nv">green</span><span class="p">:</span> <span class="mf">1.0</span><span class="p">,</span> <span class="nv">blue</span><span class="p">:</span> <span class="mf">0.0</span><span class="p">,</span> <span class="nv">alpha</span><span class="p">:</span> <span class="mf">0.25</span><span class="p">)</span><span class="o">.</span><span class="kt">CGColor</span>
    <span class="nv">$0</span><span class="o">.</span><span class="n">strokeColor</span> <span class="o">=</span> <span class="kt">UIColor</span><span class="o">.</span><span class="nf">darkGrayColor</span><span class="p">()</span><span class="o">.</span><span class="kt">CGColor</span>
    <span class="nv">$0</span><span class="o">.</span><span class="n">lineWidth</span> <span class="o">=</span> <span class="mf">4.0</span>
    <span class="nv">$0</span><span class="o">.</span><span class="n">hidden</span> <span class="o">=</span> <span class="kc">true</span>
    <span class="k">return</span> <span class="nv">$0</span>
<span class="p">}(</span><span class="kt">CAShapeLayer</span><span class="p">())</span>
</code></pre></div></div>

<p>I’m a fan of this style - it prevents having a lot of setup code in the initializer of the view.</p>

<p>I add a calculated property to <code class="highlighter-rouge">BoardView</code> so the path can be updated:</p>

<div class="language-swift highlighter-rouge"><div class="highlight"><pre class="highlight"><code><span class="k">var</span> <span class="nv">dropPath</span><span class="p">:</span> <span class="kt">CGPath</span><span class="p">?</span> <span class="p">{</span>
    <span class="k">set</span> <span class="p">{</span>
        <span class="k">let</span> <span class="nv">origin</span> <span class="o">=</span> <span class="n">highlightLayer</span><span class="o">.</span><span class="n">position</span>
        <span class="kt">CATransaction</span><span class="o">.</span><span class="nf">begin</span><span class="p">()</span>
        <span class="kt">CATransaction</span><span class="o">.</span><span class="nf">setDisableActions</span><span class="p">(</span><span class="kc">true</span><span class="p">)</span>
        <span class="n">highlightLayer</span><span class="o">.</span><span class="n">path</span> <span class="o">=</span> <span class="n">newValue</span>
        <span class="n">highlightLayer</span><span class="o">.</span><span class="n">position</span> <span class="o">=</span> <span class="n">origin</span>
        <span class="kt">CATransaction</span><span class="o">.</span><span class="nf">commit</span><span class="p">()</span>
    <span class="p">}</span>
    <span class="k">get</span> <span class="p">{</span>
        <span class="k">return</span> <span class="n">highlightLayer</span><span class="o">.</span><span class="n">path</span>
    <span class="p">}</span>
<span class="p">}</span>
</code></pre></div></div>

<p>This is called from the <code class="highlighter-rouge">activeTile</code> <code class="highlighter-rouge">didSet</code> property observer in the view controller:</p>

<div class="language-swift highlighter-rouge"><div class="highlight"><pre class="highlight"><code><span class="n">boardView</span><span class="o">.</span><span class="n">dropPath</span> <span class="o">=</span> <span class="n">activeTile</span><span class="p">?</span><span class="o">.</span><span class="n">tile</span><span class="o">.</span><span class="nf">pathForSquares</span><span class="p">(</span><span class="kc">true</span><span class="p">,</span> <span class="nv">gridSize</span><span class="p">:</span> <span class="n">gridSize</span><span class="p">)</span>
</code></pre></div></div>

<p>In the early draft of this code I had a lot of extra state that I was resetting at different points in the gesture handling, until I realised it made more sense just to tie it to the <code class="highlighter-rouge">activeTile</code> property.</p>

<p>The last part of showing the drop zone is to place the highlight layer in the correct place and make it visible. This method on <code class="highlighter-rouge">BoardView</code> takes care of that:</p>

<div class="language-swift highlighter-rouge"><div class="highlight"><pre class="highlight"><code><span class="kd">func</span> <span class="nf">showDropPathAtOrigin</span><span class="p">(</span><span class="nv">origin</span><span class="p">:</span> <span class="kt">CGPoint</span><span class="p">?)</span> <span class="p">{</span>
    <span class="kt">CATransaction</span><span class="o">.</span><span class="nf">begin</span><span class="p">()</span>
    <span class="kt">CATransaction</span><span class="o">.</span><span class="nf">setDisableActions</span><span class="p">(</span><span class="kc">true</span><span class="p">)</span>
    <span class="k">if</span> <span class="k">let</span> <span class="nv">origin</span> <span class="o">=</span> <span class="n">origin</span> <span class="p">{</span>
        <span class="n">highlightLayer</span><span class="o">.</span><span class="n">position</span> <span class="o">=</span> <span class="n">origin</span>
        <span class="n">highlightLayer</span><span class="o">.</span><span class="n">hidden</span> <span class="o">=</span> <span class="kc">false</span>
    <span class="p">}</span> <span class="k">else</span> <span class="p">{</span>
        <span class="n">highlightLayer</span><span class="o">.</span><span class="n">hidden</span> <span class="o">=</span> <span class="kc">true</span>
    <span class="p">}</span>
    <span class="kt">CATransaction</span><span class="o">.</span><span class="nf">commit</span><span class="p">()</span>
<span class="p">}</span>
</code></pre></div></div>

<p>If no point is passed in, the layer is hidden, otherwise it is moved. Notice that here and in the <code class="highlighter-rouge">dropPath</code> setter, I’m using a <code class="highlighter-rouge">CATransaction</code> to prevent implicit animations happening. Without that code, the path and position changes would be animated, which isn’t the behaviour I’m after.</p>

<p>Back in the gesture handler, I can call the <code class="highlighter-rouge">allowedDropLocation</code> method discussed earlier, find the origin of the square, and use that to position or hide the drop layer:</p>

<div class="language-swift highlighter-rouge"><div class="highlight"><pre class="highlight"><code><span class="k">if</span> <span class="k">let</span> <span class="nv">allowedDropLocation</span> <span class="o">=</span> <span class="n">board</span><span class="o">.</span><span class="nf">allowedDropLocation</span><span class="p">(</span><span class="n">activeTile</span><span class="o">.</span><span class="n">tile</span><span class="p">,</span> <span class="nv">atPoint</span><span class="p">:</span><span class="n">locationOnBoard</span><span class="p">,</span> <span class="nv">gridSize</span><span class="p">:</span> <span class="n">gridSize</span><span class="p">)</span> <span class="p">{</span>
    <span class="k">let</span> <span class="nv">squareOrigin</span> <span class="o">=</span> <span class="n">board</span><span class="o">.</span><span class="nf">pointAtOriginOfSquare</span><span class="p">(</span><span class="n">allowedDropLocation</span><span class="p">,</span> <span class="nv">gridSize</span><span class="p">:</span> <span class="n">gridSize</span><span class="p">)</span>
    <span class="n">boardView</span><span class="o">.</span><span class="nf">showDropPathAtOrigin</span><span class="p">(</span><span class="n">squareOrigin</span><span class="p">)</span>
<span class="p">}</span> <span class="k">else</span> <span class="p">{</span>
    <span class="n">boardView</span><span class="o">.</span><span class="nf">showDropPathAtOrigin</span><span class="p">(</span><span class="kc">nil</span><span class="p">)</span>
<span class="p">}</span>
</code></pre></div></div>

<h2 id="dropping-the-tile">Dropping the tile</h2>

<p>Currently when the player drops a tile, it stays where it is. Now that I know if the tile can fit on the board at its current position, I can take this into account when the gesture ends:</p>

<div class="language-swift highlighter-rouge"><div class="highlight"><pre class="highlight"><code><span class="k">let</span> <span class="nv">locationOnBoard</span> <span class="o">=</span> <span class="n">boardView</span><span class="o">.</span><span class="nf">convertPoint</span><span class="p">(</span><span class="n">activeTile</span><span class="o">.</span><span class="n">bounds</span><span class="o">.</span><span class="n">origin</span><span class="p">,</span> <span class="nv">fromView</span><span class="p">:</span> <span class="n">activeTile</span><span class="p">)</span>
<span class="k">let</span> <span class="nv">allowedDropLocation</span> <span class="o">=</span> <span class="n">board</span><span class="o">.</span><span class="nf">allowedDropLocation</span><span class="p">(</span><span class="n">activeTile</span><span class="o">.</span><span class="n">tile</span><span class="p">,</span> <span class="nv">atPoint</span><span class="p">:</span><span class="n">locationOnBoard</span><span class="p">,</span> <span class="nv">gridSize</span><span class="p">:</span> <span class="n">gridSize</span><span class="p">)</span>

<span class="k">self</span><span class="o">.</span><span class="n">activeTile</span> <span class="o">=</span> <span class="kc">nil</span>

<span class="k">if</span> <span class="k">let</span> <span class="nv">allowedDropLocation</span> <span class="o">=</span> <span class="n">allowedDropLocation</span> <span class="p">{</span>
    <span class="n">board</span><span class="o">.</span><span class="nf">positionTile</span><span class="p">(</span><span class="n">activeTile</span><span class="o">.</span><span class="n">tile</span><span class="p">,</span> <span class="nv">atSquare</span><span class="p">:</span> <span class="n">allowedDropLocation</span><span class="p">)</span>
    <span class="n">boardView</span><span class="o">.</span><span class="nf">addSubviewPreservingLocation</span><span class="p">(</span><span class="n">activeTile</span><span class="p">)</span>
    <span class="kt">UIView</span><span class="o">.</span><span class="nf">animateWithDuration</span><span class="p">(</span><span class="mf">0.1</span><span class="p">)</span> <span class="p">{</span>
        <span class="n">activeTile</span><span class="o">.</span><span class="n">frame</span><span class="o">.</span><span class="n">origin</span> <span class="o">=</span> <span class="k">self</span><span class="o">.</span><span class="n">board</span><span class="o">.</span><span class="nf">pointAtOriginOfSquare</span><span class="p">(</span><span class="n">allowedDropLocation</span><span class="p">,</span> <span class="nv">gridSize</span><span class="p">:</span> <span class="k">self</span><span class="o">.</span><span class="n">gridSize</span><span class="p">)</span>
    <span class="p">}</span>
<span class="p">}</span> <span class="k">else</span> <span class="p">{</span>
    <span class="kt">UIView</span><span class="o">.</span><span class="nf">animateWithDuration</span><span class="p">(</span><span class="mf">0.25</span><span class="p">)</span> <span class="p">{</span>
       <span class="k">self</span><span class="o">.</span><span class="nf">positionTiles</span><span class="p">()</span>
    <span class="p">}</span>
<span class="p">}</span>
</code></pre></div></div>

<p>I repeat the logic for confirming the drop location - this seemed better than having a property for the allowed drop location and having to reset it all the time (which is what I originally had). If there’s a valid location, then the tile is added to the board at the correct position, and the tile view is made a subview of the board. I wrote a utility method to move a view to a new superview, whilst keeping the same location on the screen.</p>

<p>There is then a short animation - either to snap the tile into place on the board, or to return it to “home” around the edge. <code class="highlighter-rouge">positionTiles</code> is the tile placing code that was in <code class="highlighter-rouge">layoutSubviews</code>, which has been moved to its own function.</p>

<p>The <code class="highlighter-rouge">activeTile</code> property is set to nil before this happens, because that is used when the tiles are being positioned.</p>

<h2 id="fixing-tile-pickup">Fixing tile pickup</h2>

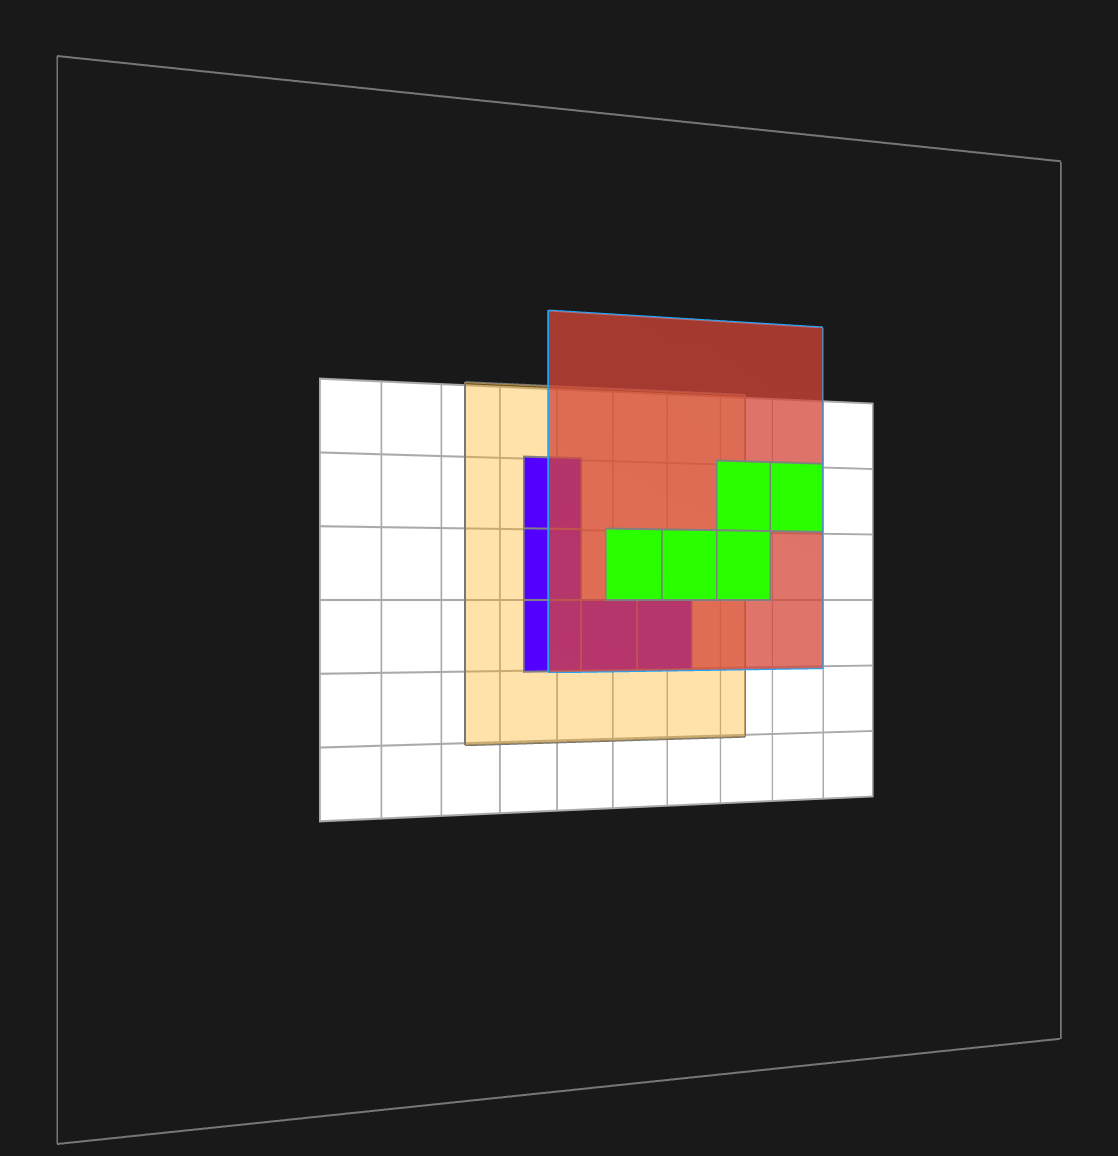
<p>Tile pickup is currently done by hit testing, which means that the order of subviews drives the tile selection. Each tile is a square much larger than the occupied tiles, as you can see in this screenshot from <a href="http://revealapp.com">Reveal</a> (get Reveal, it’s the best):</p>

<p><img src="/images/pentominoes/Overlap.png" alt="tile views overlapping" /></p>

<p>Each tile is a 5x5 grid of squares. As you can see, the V tile (with the orange background) is almost completely covered by the S tile, with the red background. Most attempts to pick up the V will result in the S being picked up instead.</p>

<p>This is only a problem for tiles placed on the board, so I can override <code class="highlighter-rouge">hitTest(_: withEvent:)</code> on <code class="highlighter-rouge">BoardView</code> to fix it. I can get the appropriate square using the same method used when handling the pan gesture, see if there’s a tile at that square, and if so, return the appropriate tile view, otherwise use the super implementation:</p>

<div class="language-swift highlighter-rouge"><div class="highlight"><pre class="highlight"><code><span class="kd">public</span> <span class="k">override</span> <span class="kd">func</span> <span class="nf">hitTest</span><span class="p">(</span><span class="nv">point</span><span class="p">:</span> <span class="kt">CGPoint</span><span class="p">,</span> <span class="n">withEvent</span> <span class="nv">event</span><span class="p">:</span> <span class="kt">UIEvent</span><span class="p">?)</span> <span class="o">-&gt;</span> <span class="kt">UIView</span><span class="p">?</span> <span class="p">{</span>
    
    <span class="k">let</span> <span class="nv">square</span> <span class="o">=</span> <span class="n">board</span><span class="o">.</span><span class="nf">squareAtPoint</span><span class="p">(</span><span class="n">point</span><span class="p">,</span> <span class="nv">gridSize</span><span class="p">:</span> <span class="n">gridSize</span><span class="p">)</span>
    <span class="k">if</span>
        <span class="k">let</span> <span class="nv">tile</span> <span class="o">=</span> <span class="n">board</span><span class="o">.</span><span class="nf">tileAtSquare</span><span class="p">(</span><span class="n">square</span><span class="p">),</span>
        <span class="k">let</span> <span class="nv">tileView</span> <span class="o">=</span> <span class="p">(</span><span class="n">tileViews</span><span class="o">.</span><span class="n">filter</span><span class="p">{</span> <span class="nv">$0</span><span class="o">.</span><span class="n">tile</span><span class="o">.</span><span class="n">shape</span> <span class="o">==</span> <span class="n">tile</span><span class="o">.</span><span class="n">shape</span> <span class="p">})</span><span class="o">.</span><span class="n">first</span> <span class="p">{</span>
        <span class="k">return</span> <span class="n">tileView</span>
    <span class="p">}</span>
    
    <span class="k">return</span> <span class="k">super</span><span class="o">.</span><span class="nf">hitTest</span><span class="p">(</span><span class="n">point</span><span class="p">,</span> <span class="nv">withEvent</span><span class="p">:</span> <span class="n">event</span><span class="p">)</span>
<span class="p">}</span>
</code></pre></div></div>

<p>To get this work I needed a way to check equality on tiles - this meant adding a  property to hold the <code class="highlighter-rouge">Shape</code> that the tile was initialized with.</p>

<p>That’s all for this time - the current state of the code is <a href="https://github.com/jrturton/Pentominoes/commit/44f9e6b55ff3cd4716888c898d7127a448115049">here</a>. The game is now fully working - but it’s not very jazzy. In the next post I’ll be adding some “juice” - little touches to make it more fun.</p>
]]></content>
  </entry>
  
  <entry>
    <title type="html"><![CDATA[Pentominoes, part six: Gestures]]></title>
    <link href="http://commandshift.co.uk/blog/2016/07/12/pentominoes-part-six/"/>
    <updated>2016-07-12T00:00:00+00:00</updated>
    <id>http://commandshift.co.uk/blog/2016/07/12/pentominoes-part-six</id>
    <content type="html"><![CDATA[<p>After some brief experimentation I decided that live views weren’t good enough to use for playing around with an interactive board and gestures. Also, once you get to dealing with gestures and user interaction with something like this, you really need to be working on a device - things that feel fine with a mouse or trackpad and pointer can be no good at all when you’re working on a device.</p>

<p>In this post I’m going to talk about adding gesture recognisers and transferring to a full project.</p>

<!--more-->

<h2 id="the-limits-of-playgrounds">The limits of playgrounds</h2>

<p>This project has come a long way with playgrounds, but there are a few obstacles which make me think it can’t go much further. I made and displayed a view controller within the playground, then decided to change to a full project, because of the following limitations:</p>

<ul>
  <li>Source code can’t be shared between a standard Xcode project and a playground, so you can’t do “live fiddling” in the playground then build the project, incorporating your changes - unless I’ve missed something.</li>
  <li>Live view rendering in playgrounds doesn’t look quite right - it seems to come out slightly blurry.</li>
  <li>The layout life cycle of a view controller’s view in a playground also didn’t seem to come across all that clearly. I found myself adding code to work around the way the playground was working, which seemed a waste of time.</li>
</ul>

<p>I created a new single view Xcode project for the iPad, working in landscape mode only, and moved across the model and view files from the playground.</p>

<p>There’s a single view controller which takes a <code class="highlighter-rouge">board</code> and <code class="highlighter-rouge">tiles</code> property, and has a <code class="highlighter-rouge">boardView</code> and set of <code class="highlighter-rouge">tileViews</code> based off them. At the moment I’m just setting this up in the app delegate as I want to get the game mechanics working before I worry too much about setup and scoring and so on.</p>

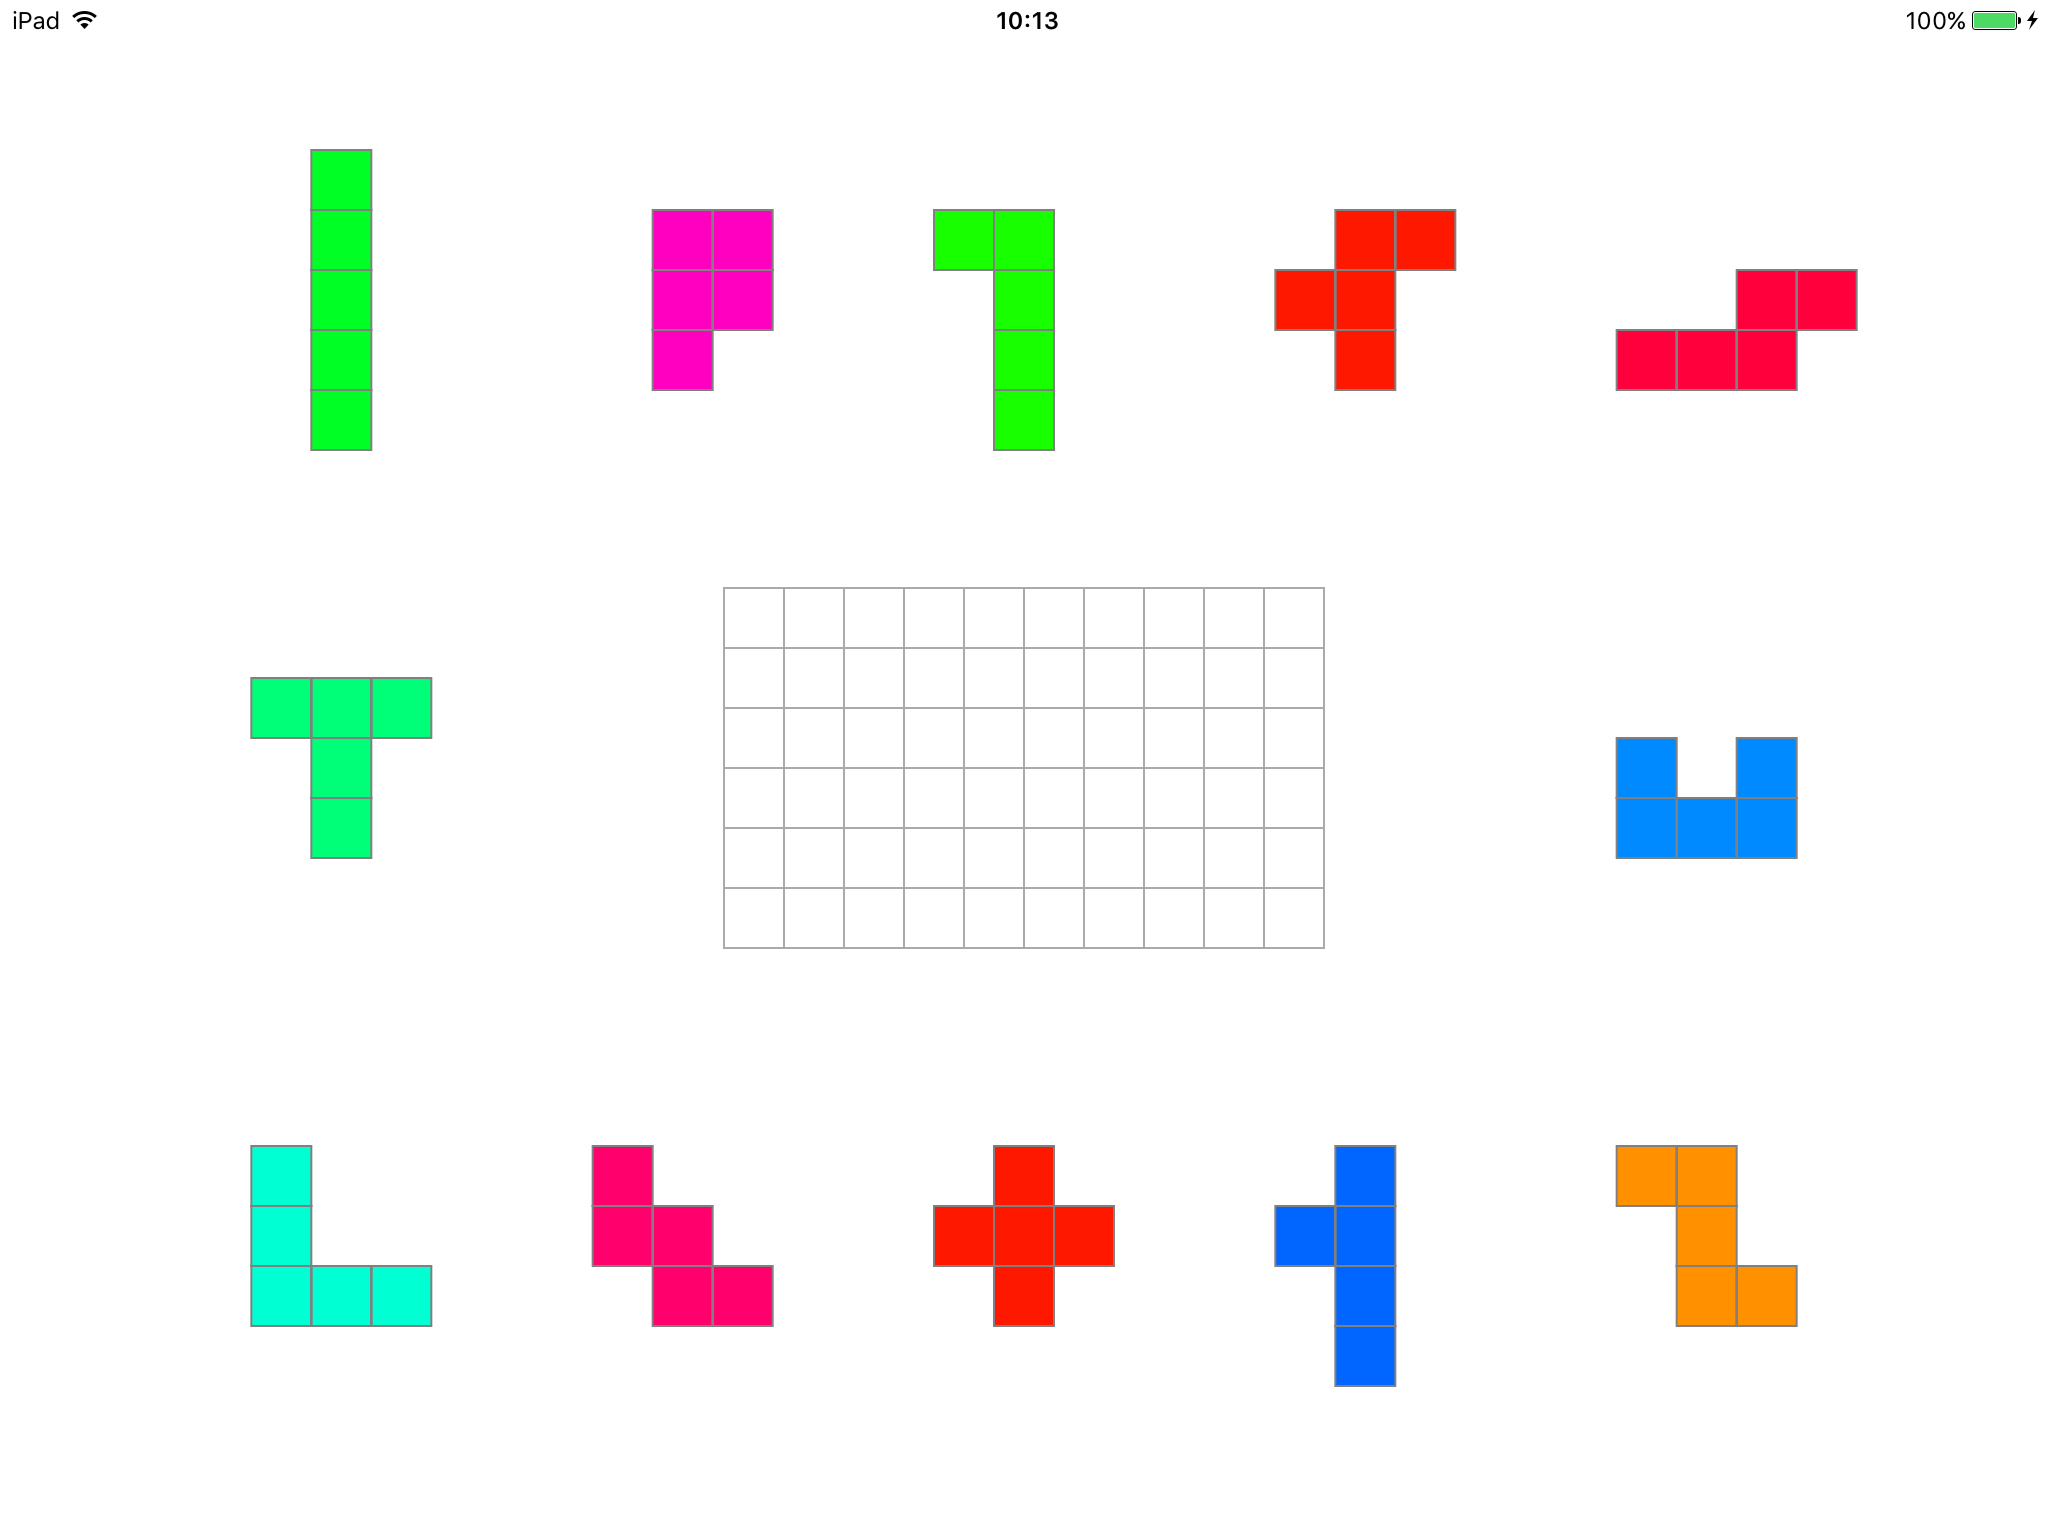
<p>In <code class="highlighter-rouge">viewDidLayoutSubviews()</code> I position the tiles evenly around the board. When you start the game, it looks like this:</p>

<p><img src="/images/pentominoes/Pentominoes_6_gameStart.png" alt="Pentominoes running on iPad" /></p>

<p>The code for that is fairly boring and possibly not what I’m going to end up with when this is all over, so I won’t go into detail on that, you can look in the repo if you’re interested.</p>

<h2 id="gesture-recognisers">Gesture recognisers</h2>

<p>The main interaction the player will have is to drag tiles around the board. You do this with a pan gesture.</p>

<p>The view controller acts as the pan gesture’s delegate. It isn’t allowed to begin unless it begins at the current location of a tile:</p>

<div class="language-swift highlighter-rouge"><div class="highlight"><pre class="highlight"><code><span class="kd">public</span> <span class="kd">func</span> <span class="nf">gestureRecognizerShouldBegin</span><span class="p">(</span><span class="nv">gestureRecognizer</span><span class="p">:</span> <span class="kt">UIGestureRecognizer</span><span class="p">)</span> <span class="o">-&gt;</span> <span class="kt">Bool</span> <span class="p">{</span>
    <span class="k">if</span> <span class="n">gestureRecognizer</span> <span class="o">!=</span> <span class="n">pan</span> <span class="p">{</span>
        <span class="k">return</span> <span class="kc">true</span>
    <span class="p">}</span>
    <span class="k">let</span> <span class="nv">location</span> <span class="o">=</span> <span class="n">gestureRecognizer</span><span class="o">.</span><span class="nf">locationInView</span><span class="p">(</span><span class="n">view</span><span class="p">)</span>
    <span class="k">if</span> <span class="k">let</span> <span class="nv">hitTile</span> <span class="o">=</span> <span class="n">view</span><span class="o">.</span><span class="nf">hitTest</span><span class="p">(</span><span class="n">location</span><span class="p">,</span> <span class="nv">withEvent</span><span class="p">:</span> <span class="kc">nil</span><span class="p">)</span> <span class="k">as?</span> <span class="kt">TileView</span> <span class="p">{</span>
        <span class="n">activeTile</span> <span class="o">=</span> <span class="n">hitTile</span>
        <span class="k">return</span> <span class="kc">true</span>
    <span class="p">}</span>
    <span class="k">return</span> <span class="kc">false</span>
<span class="p">}</span>
</code></pre></div></div>

<p>When this happens it sets the view controller’s <code class="highlighter-rouge">activeTile</code> property, which in turn transitions that tile to the lifted state.</p>

<p>In the handler for the gesture, I move the tile around to follow the movement:</p>

<div class="language-swift highlighter-rouge"><div class="highlight"><pre class="highlight"><code><span class="kd">@IBAction</span> <span class="kd">func</span> <span class="nf">handlePan</span><span class="p">(</span><span class="nv">sender</span><span class="p">:</span> <span class="kt">UIPanGestureRecognizer</span><span class="p">)</span> <span class="p">{</span>
    <span class="k">var</span> <span class="nv">fingerClearedLocation</span> <span class="o">=</span> <span class="n">sender</span><span class="o">.</span><span class="nf">locationInView</span><span class="p">(</span><span class="n">view</span><span class="p">)</span>
    <span class="n">fingerClearedLocation</span><span class="o">.</span><span class="n">y</span> <span class="o">-=</span> <span class="p">(</span><span class="n">activeTile</span><span class="p">?</span><span class="o">.</span><span class="n">bounds</span><span class="o">.</span><span class="n">height</span> <span class="p">??</span> <span class="mf">0.0</span><span class="p">)</span> <span class="o">*</span> <span class="mf">0.5</span>
    <span class="k">switch</span> <span class="n">sender</span><span class="o">.</span><span class="n">state</span> <span class="p">{</span>
    <span class="k">case</span> <span class="o">.</span><span class="kt">Began</span><span class="p">:</span>
        <span class="kt">UIView</span><span class="o">.</span><span class="nf">animateWithDuration</span><span class="p">(</span><span class="mf">0.1</span><span class="p">)</span> <span class="p">{</span> <span class="k">self</span><span class="o">.</span><span class="n">activeTile</span><span class="p">?</span><span class="o">.</span><span class="n">center</span> <span class="o">=</span> <span class="n">fingerClearedLocation</span> <span class="p">}</span>
    <span class="k">case</span> <span class="o">.</span><span class="kt">Changed</span><span class="p">:</span>
        <span class="n">activeTile</span><span class="p">?</span><span class="o">.</span><span class="n">center</span> <span class="o">=</span> <span class="n">fingerClearedLocation</span>
    <span class="k">case</span> <span class="o">.</span><span class="kt">Ended</span><span class="p">,</span> <span class="o">.</span><span class="kt">Cancelled</span><span class="p">:</span>
        <span class="c1">// TODO: put it down in a permissible place</span>
        <span class="n">activeTile</span> <span class="o">=</span> <span class="kc">nil</span>
    <span class="k">default</span><span class="p">:</span>
        <span class="k">break</span>
    <span class="p">}</span>
<span class="p">}</span>
</code></pre></div></div>

<p>Another subtlety that you don’t notice in the simulator - when you’re dragging a tile around, your finger is covering most of the tile. In the code above I’m offsetting the location of the gesture so that you can see the whole tile and, more importantly, where it’s going to go.</p>

<p>With the current code, the tile will go wherever the user lets go - none of the rules I spent so long building are being taken into account yet. However, the game is almost playable right now!</p>

<p>The only missing thing is the ability to rotate. The user is going to do this by tapping the screen while they are moving a tile. The tap gesture is handled like this:</p>

<div class="language-swift highlighter-rouge"><div class="highlight"><pre class="highlight"><code><span class="kd">@IBAction</span> <span class="kd">func</span> <span class="nf">handleTap</span><span class="p">(</span><span class="nv">sender</span><span class="p">:</span> <span class="kt">UITapGestureRecognizer</span><span class="p">)</span> <span class="p">{</span>
    <span class="n">activeTile</span><span class="p">?</span><span class="o">.</span><span class="nf">rotate</span><span class="p">(</span><span class="kc">true</span><span class="p">)</span>
<span class="p">}</span>
</code></pre></div></div>

<p>Nothing happens if there isn’t an active tile.</p>

<p>There are a couple of subtleties to note when using taps together with pans. First, the tap is ignored if a pan is active, unless you implement the following delegate method:</p>

<div class="language-swift highlighter-rouge"><div class="highlight"><pre class="highlight"><code><span class="kd">public</span> <span class="kd">func</span> <span class="nf">gestureRecognizer</span><span class="p">(</span><span class="nv">gestureRecognizer</span><span class="p">:</span> <span class="kt">UIGestureRecognizer</span><span class="p">,</span>
 <span class="n">shouldRecognizeSimultaneouslyWithGestureRecognizer</span> <span class="nv">otherGestureRecognizer</span><span class="p">:</span> <span class="kt">UIGestureRecognizer</span><span class="p">)</span> <span class="o">-&gt;</span> <span class="kt">Bool</span> <span class="p">{</span>
    <span class="k">return</span> <span class="kc">true</span>
<span class="p">}</span>
</code></pre></div></div>

<p>Second, unless you explicitly set a maximum number of touches on the pan (the default is infinity), the tap is also interpreted as being part of the pan. Since the location of a gesture is the average location of all the touches within that gesture, this means that the tile jumps to between your two fingers when you are panning and touching. Setting the maximum touches to 1 stops this.</p>

<p>As it stands now the game is playable, but with a few problems. These will be addressed in upcoming posts:</p>

<ul>
  <li>The rule system needs to be incorporated so that the tiles can only be placed on the board where they are allowed to go.</li>
  <li>Picking up tiles that are close to each other seems a little unpredictable, because the entire tile area rather than the populated area is used for touches.</li>
  <li>It might be worth looking at a long press gesture to pick up tiles in this situation, so the user can tell which tile they are going to move when dealing with tiles on the board.</li>
</ul>

<p>The repo as at the end of this post is at <a href="https://github.com/jrturton/Pentominoes/commit/72b24c33a1824b6de23bf5bbee9e73d321a721d4">this commit</a>.</p>
]]></content>
  </entry>
  
  <entry>
    <title type="html"><![CDATA[Pentominoes, part five: Some drawing]]></title>
    <link href="http://commandshift.co.uk/blog/2016/06/19/pentominoes-part-five/"/>
    <updated>2016-06-19T00:00:00+00:00</updated>
    <id>http://commandshift.co.uk/blog/2016/06/19/pentominoes-part-five</id>
    <content type="html"><![CDATA[<p>It’s time to move on from the character-based visualisations of the board and the tiles, and create some views.</p>

<p>Each tile will be represented with a view, and the board will be a view. Placed tiles will be added as subviews of the board, which will simplify the drawing and positioning logic.</p>

<!--more-->

<h2 id="tiles">Tiles</h2>

<p>A <code class="highlighter-rouge">TileView</code> is initialised with a <code class="highlighter-rouge">Tile</code> model, a grid size (the edge of one of the squares that make up the view) and a colour. I originally had a method in here to create a path from the occupied squares, but moved this out to the <code class="highlighter-rouge">PlayingGrid</code> protocol since it ended up also applying to the board.</p>

<p>The tile view has a shape layer derived from this path, and an optional drop shadow (to be shown when the player has “picked up” the tile. It looks like this:</p>

<p><img src="/images/pentominoes/Tile.png" alt="Lifted single tile" /></p>

<p>The tile view has a <code class="highlighter-rouge">rotate</code> method which will animate a rotation, then update the tile model and redraw after it is done. This keeps the model and view in sync without being too complicated, and it means I don’t have to keep track of the rotated state of any views or the model. It’s possible that won’t work well with the UI (I might want to allow two or three rotations to be performed at once) but it will do for now. I’d rather get something working than overcomplicate before I’m actually at a specific stage in the project. The rotation method currently looks like this:</p>

<div class="language-swift highlighter-rouge"><div class="highlight"><pre class="highlight"><code><span class="kd">func</span> <span class="nf">rotate</span><span class="p">(</span><span class="nv">clockwise</span><span class="p">:</span> <span class="kt">Bool</span><span class="p">)</span> <span class="p">{</span>
    <span class="kt">UIView</span><span class="o">.</span><span class="nf">animateWithDuration</span><span class="p">(</span><span class="mf">0.1</span><span class="p">,</span> <span class="nv">animations</span><span class="p">:</span> <span class="p">{</span>
        <span class="k">self</span><span class="o">.</span><span class="n">transform</span> <span class="o">=</span> <span class="kt">CGAffineTransformMakeRotation</span><span class="p">(</span><span class="n">clockwise</span> <span class="p">?</span> <span class="kt">CGFloat</span><span class="p">(</span><span class="kt">M_PI_2</span><span class="p">)</span> <span class="p">:</span> <span class="kt">CGFloat</span><span class="p">(</span><span class="o">-</span><span class="kt">M_PI_2</span><span class="p">))</span>
        <span class="p">},</span> <span class="nv">completion</span><span class="p">:</span> <span class="p">{</span> <span class="n">_</span> <span class="k">in</span>
            <span class="k">self</span><span class="o">.</span><span class="n">transform</span> <span class="o">=</span> <span class="kt">CGAffineTransformIdentity</span>
            <span class="k">self</span><span class="o">.</span><span class="n">tile</span><span class="o">.</span><span class="nf">rotate</span><span class="p">(</span><span class="n">clockwise</span><span class="p">)</span>
            <span class="k">self</span><span class="o">.</span><span class="n">shapeLayer</span><span class="o">.</span><span class="n">path</span> <span class="o">=</span> <span class="k">self</span><span class="o">.</span><span class="nf">tilePath</span><span class="p">()</span>
    <span class="p">})</span>
<span class="p">}</span>
</code></pre></div></div>

<p>The <code class="highlighter-rouge">lifted</code> property will be toggled when the user picks up or places a tile. It affects the shadow of the shape layer in a property observer:</p>

<div class="language-swift highlighter-rouge"><div class="highlight"><pre class="highlight"><code><span class="kd">public</span> <span class="k">var</span> <span class="nv">lifted</span><span class="p">:</span> <span class="kt">Bool</span> <span class="o">=</span> <span class="kc">false</span> <span class="p">{</span>
    <span class="k">didSet</span> <span class="p">{</span>
        <span class="n">layer</span><span class="o">.</span><span class="n">shadowRadius</span> <span class="o">=</span> <span class="mf">5.0</span>
        <span class="n">layer</span><span class="o">.</span><span class="n">shadowOffset</span> <span class="o">=</span> <span class="o">.</span><span class="n">zero</span>
        <span class="n">layer</span><span class="o">.</span><span class="n">shadowColor</span> <span class="o">=</span> <span class="kt">UIColor</span><span class="o">.</span><span class="nf">blackColor</span><span class="p">()</span><span class="o">.</span><span class="kt">CGColor</span>
        <span class="n">layer</span><span class="o">.</span><span class="n">shadowOpacity</span> <span class="o">=</span> <span class="n">lifted</span> <span class="p">?</span> <span class="mf">0.5</span> <span class="p">:</span> <span class="mf">0.0</span>
    <span class="p">}</span>
<span class="p">}</span>
</code></pre></div></div>

<h2 id="the-board">The Board</h2>

<p>A <code class="highlighter-rouge">BoardView</code> is initialised with a <code class="highlighter-rouge">Board</code> model and a grid size. It contains a shape layer which draws the empty board. This is the same path algorithm that I use for the tile, except the board draws empty squares, and the tile draws occupied squares. At the moment, it doesn’t do anything else.</p>

<h2 id="making-the-paths">Making the paths</h2>

<p>This is one of those functions that probably be collapsed into a single-liner in Swift, but that’s usually not a path I like to go down. It makes things unreadable and the intermediate steps are invisible as far as debugging is concerned. Who benefits from making code as short as possible?</p>

<p>I went with this in the end. It makes each stage of the process pretty clear. It could perhaps be replaced entirely with a single for..in loop or <code class="highlighter-rouge">reduce</code>, but I like the fact that this structure shows several distinct steps. This means that if I decided to do additional things during the building of this path, or if I required just the <code class="highlighter-rouge">[CGRect]</code> output, it would be simple to split things out into separate functions.</p>

<p>This is an extension of <code class="highlighter-rouge">PlayingGrid</code>:</p>

<div class="language-swift highlighter-rouge"><div class="highlight"><pre class="highlight"><code><span class="kd">public</span> <span class="kd">func</span> <span class="nf">pathForSquares</span><span class="p">(</span><span class="nv">occupied</span><span class="p">:</span> <span class="kt">Bool</span><span class="p">,</span> <span class="nv">gridSize</span><span class="p">:</span> <span class="kt">CGFloat</span><span class="p">)</span> <span class="o">-&gt;</span> <span class="kt">CGPath</span> <span class="p">{</span>
    
    <span class="k">let</span> <span class="nv">squaresForPath</span> <span class="o">=</span> <span class="nf">squares</span><span class="p">()</span><span class="o">.</span><span class="n">filter</span> <span class="p">{</span> <span class="nv">$0</span><span class="o">.</span><span class="n">occupied</span> <span class="o">==</span> <span class="n">occupied</span> <span class="p">}</span>
    
    <span class="k">let</span> <span class="nv">rects</span> <span class="p">:</span> <span class="p">[</span><span class="kt">CGRect</span><span class="p">]</span> <span class="o">=</span> <span class="n">squaresForPath</span><span class="o">.</span><span class="n">map</span> <span class="p">{</span> <span class="n">square</span> <span class="k">in</span>
        <span class="k">let</span> <span class="nv">originX</span> <span class="o">=</span> <span class="kt">CGFloat</span><span class="p">(</span><span class="n">square</span><span class="o">.</span><span class="n">column</span><span class="p">)</span> <span class="o">*</span> <span class="n">gridSize</span>
        <span class="k">let</span> <span class="nv">originY</span> <span class="o">=</span> <span class="kt">CGFloat</span><span class="p">(</span><span class="n">square</span><span class="o">.</span><span class="n">row</span><span class="p">)</span> <span class="o">*</span> <span class="n">gridSize</span>
        <span class="k">return</span> <span class="kt">CGRect</span><span class="p">(</span><span class="nv">x</span><span class="p">:</span> <span class="n">originX</span><span class="p">,</span> <span class="nv">y</span><span class="p">:</span> <span class="n">originY</span><span class="p">,</span> <span class="nv">width</span><span class="p">:</span> <span class="n">gridSize</span><span class="p">,</span> <span class="nv">height</span><span class="p">:</span> <span class="n">gridSize</span><span class="p">)</span>
    <span class="p">}</span>
    
    <span class="k">let</span> <span class="nv">path</span> <span class="p">:</span> <span class="kt">UIBezierPath</span> <span class="o">=</span> <span class="n">rects</span><span class="o">.</span><span class="nf">reduce</span><span class="p">(</span><span class="kt">UIBezierPath</span><span class="p">())</span> <span class="p">{</span> <span class="n">path</span><span class="p">,</span> <span class="n">rect</span> <span class="k">in</span>
        <span class="n">path</span><span class="o">.</span><span class="nf">appendPath</span><span class="p">(</span><span class="kt">UIBezierPath</span><span class="p">(</span><span class="nv">rect</span><span class="p">:</span> <span class="n">rect</span><span class="p">))</span>
        <span class="k">return</span> <span class="n">path</span>
    <span class="p">}</span>
    
    <span class="k">return</span> <span class="n">path</span><span class="o">.</span><span class="kt">CGPath</span>
<span class="p">}</span>
</code></pre></div></div>

<h2 id="a-fast-visualisation">A fast visualisation</h2>

<p>I wanted to do a quick check that my board view and tile views were playing nicely with the logic I’d built in the earlier sections. This was a few lines of code to achieve in a playground:</p>

<div class="language-swift highlighter-rouge"><div class="highlight"><pre class="highlight"><code><span class="k">let</span> <span class="nv">board</span> <span class="o">=</span> <span class="kt">Board</span><span class="p">(</span><span class="nv">size</span><span class="p">:</span> <span class="o">.</span><span class="kt">SixByTen</span><span class="p">)</span>
<span class="k">let</span> <span class="nv">boardView</span> <span class="o">=</span> <span class="kt">BoardView</span><span class="p">(</span><span class="nv">board</span><span class="p">:</span> <span class="n">board</span><span class="p">,</span> <span class="nv">gridSize</span><span class="p">:</span> <span class="mi">30</span><span class="p">)</span>
<span class="k">let</span> <span class="nv">shapes</span> <span class="o">=</span> <span class="p">(</span><span class="mi">0</span><span class="o">..&lt;</span><span class="mi">11</span><span class="p">)</span><span class="o">.</span><span class="n">map</span> <span class="p">{</span> <span class="kt">Shape</span><span class="p">(</span><span class="nv">rawValue</span><span class="p">:</span><span class="nv">$0</span><span class="p">)</span><span class="o">!</span> <span class="p">}</span>
<span class="k">let</span> <span class="nv">tiles</span> <span class="o">=</span> <span class="n">shapes</span><span class="o">.</span><span class="n">map</span> <span class="p">{</span> <span class="kt">Tile</span><span class="p">(</span><span class="nv">shape</span><span class="p">:</span> <span class="nv">$0</span><span class="p">)</span> <span class="p">}</span>
<span class="k">for</span> <span class="n">tile</span> <span class="k">in</span> <span class="n">tiles</span> <span class="p">{</span>
    <span class="k">for</span> <span class="n">square</span> <span class="k">in</span> <span class="n">board</span><span class="o">.</span><span class="nf">squares</span><span class="p">()</span> <span class="p">{</span>
        <span class="k">if</span> <span class="n">board</span><span class="o">.</span><span class="nf">canPositionTile</span><span class="p">(</span><span class="n">tile</span><span class="p">,</span> <span class="nv">atSquare</span><span class="p">:</span> <span class="n">square</span><span class="p">)</span> <span class="p">{</span>
            <span class="n">board</span><span class="o">.</span><span class="nf">positionTile</span><span class="p">(</span><span class="n">tile</span><span class="p">,</span> <span class="nv">atSquare</span><span class="p">:</span> <span class="n">square</span><span class="p">)</span>
            <span class="k">let</span> <span class="nv">tileView</span> <span class="o">=</span> <span class="kt">TileView</span><span class="p">(</span><span class="nv">tile</span><span class="p">:</span> <span class="n">tile</span><span class="p">,</span><span class="nv">color</span><span class="p">:</span> <span class="nf">randomColor</span><span class="p">(),</span> <span class="nv">gridSize</span><span class="p">:</span> <span class="n">boardView</span><span class="o">.</span><span class="n">gridSize</span><span class="p">)</span>
            <span class="n">boardView</span><span class="o">.</span><span class="nf">addSubview</span><span class="p">(</span><span class="n">tileView</span><span class="p">)</span>
            <span class="n">tileView</span><span class="o">.</span><span class="n">frame</span><span class="o">.</span><span class="n">origin</span> <span class="o">=</span> <span class="n">board</span><span class="o">.</span><span class="nf">pointAtOriginOfSquare</span><span class="p">(</span><span class="n">square</span><span class="p">,</span> <span class="nv">gridSize</span><span class="p">:</span> <span class="n">boardView</span><span class="o">.</span><span class="n">gridSize</span><span class="p">)</span>
            <span class="k">break</span>
        <span class="p">}</span>
    <span class="p">}</span>
<span class="p">}</span>
</code></pre></div></div>

<p>Here I am just going through each possible tile and placing it in the first possible square on the board.</p>

<p>Adding the <code class="highlighter-rouge">boardView</code> inline shows this:</p>

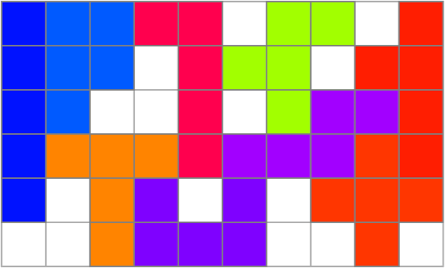
<p><img src="/images/pentominoes/BoardWithTiles.png" alt="Board with tiles" /></p>

<p>It’s starting to look real!</p>

<p>The code at the end of this post is at <a href="https://github.com/jrturton/Pentominoes/commit/8864d0464d301ad98830634f9480c21b8bbabde7">this commit</a>.</p>
]]></content>
  </entry>
  
  <entry>
    <title type="html"><![CDATA[Pentominoes, part four: Updating the board]]></title>
    <link href="http://commandshift.co.uk/blog/2016/06/12/pentominoes-part-four/"/>
    <updated>2016-06-12T00:00:00+00:00</updated>
    <id>http://commandshift.co.uk/blog/2016/06/12/pentominoes-part-four</id>
    <content type="html"><![CDATA[<p>So far my <code class="highlighter-rouge">Board</code> model is smart enough to tell if a <code class="highlighter-rouge">Tile</code> can be placed in a specific location. Now I need to think about what happens when the player actually places the tile. How does the board update its model? What needs to happen here?</p>

<!--more-->

<p>The <code class="highlighter-rouge">rows</code> property of the board needs to change so that the squares now occupied by the tile are marked as such. Simply updating the relevant positions in the array isn’t going to be good enough, though. The user may pick up a tile again - how will I know which tile it was, and which squares to mark as unoccupied again?</p>

<p>There are many possible solutions to this problem. I decided to do it like this:</p>

<ul>
  <li>Store the <code class="highlighter-rouge">rows</code> configuration of an empty board when the board is initialised</li>
  <li>Create a new struct which holds a tile and its location on the board</li>
  <li>Have a private array of these structs to record placed tiles</li>
  <li>Have a property observer on this array which updates <code class="highlighter-rouge">rows</code> by adding all placed tiles onto the empty board.</li>
</ul>

<p>I toyed with the idea of making <code class="highlighter-rouge">rows</code> a calculated variable but that seemed like it would add a lot of processing overhead (the <code class="highlighter-rouge">rows</code> property is going to be accessed quite often) without making things much simpler. The only concern with the current model is that if a placed tile is rotated, this will not be reflected in the board’s model. However, a user will not be able to rotate a placed tile - they will have to remove it from the board to do that.</p>

<p>The empty board is just a constant <code class="highlighter-rouge">[[Bool]]</code> which is assigned during init. Here is the struct and property:</p>

<div class="language-swift highlighter-rouge"><div class="highlight"><pre class="highlight"><code><span class="kd">private</span> <span class="kd">struct</span> <span class="kt">PlacedTile</span> <span class="p">{</span>
    <span class="k">let</span> <span class="nv">square</span><span class="p">:</span> <span class="kt">Square</span>
    <span class="k">let</span> <span class="nv">tile</span><span class="p">:</span> <span class="kt">Tile</span>
<span class="p">}</span>

<span class="kd">private</span> <span class="k">var</span> <span class="nv">placedTiles</span> <span class="o">=</span> <span class="p">[</span><span class="kt">PlacedTile</span><span class="p">]()</span> <span class="p">{</span>
    <span class="k">didSet</span> <span class="p">{</span>
        <span class="nf">updateRows</span><span class="p">()</span>
    <span class="p">}</span>
<span class="p">}</span>
</code></pre></div></div>

<p>A property observer on an array is fired whenever an object is added or removed. This is the function that updates the board:</p>

<div class="language-swift highlighter-rouge"><div class="highlight"><pre class="highlight"><code><span class="kd">private</span> <span class="kd">func</span> <span class="nf">updateRows</span><span class="p">()</span> <span class="p">{</span>
    <span class="n">rows</span> <span class="o">=</span> <span class="n">emptyBoard</span>
    <span class="k">for</span> <span class="n">placedTile</span> <span class="k">in</span> <span class="n">placedTiles</span> <span class="p">{</span>
        <span class="k">let</span> <span class="nv">occupiedSquares</span> <span class="o">=</span> <span class="n">placedTile</span><span class="o">.</span><span class="n">tile</span><span class="o">.</span><span class="nf">squares</span><span class="p">()</span><span class="o">.</span><span class="n">filter</span> <span class="p">{</span> <span class="nv">$0</span><span class="o">.</span><span class="n">occupied</span> <span class="o">==</span> <span class="kc">true</span> <span class="p">}</span>
        <span class="k">for</span> <span class="n">tileSquare</span> <span class="k">in</span> <span class="n">occupiedSquares</span> <span class="p">{</span>
            <span class="k">let</span> <span class="nv">boardLocation</span> <span class="o">=</span> <span class="n">tileSquare</span><span class="o">.</span><span class="nf">offsetBy</span><span class="p">(</span><span class="n">placedTile</span><span class="o">.</span><span class="n">square</span><span class="p">)</span>
            <span class="n">rows</span><span class="p">[</span><span class="n">boardLocation</span><span class="o">.</span><span class="n">row</span><span class="p">][</span><span class="n">boardLocation</span><span class="o">.</span><span class="n">column</span><span class="p">]</span> <span class="o">=</span> <span class="kc">true</span>
        <span class="p">}</span>
    <span class="p">}</span>
<span class="p">}</span>
</code></pre></div></div>

<p>Pretty simple - for each occupied square in a placed tile, mark the relevant board square as occupied.</p>

<p>Now to place or remove a tile:</p>

<div class="language-swift highlighter-rouge"><div class="highlight"><pre class="highlight"><code><span class="kd">public</span> <span class="kd">func</span> <span class="nf">positionTile</span><span class="p">(</span><span class="nv">tile</span><span class="p">:</span> <span class="kt">Tile</span><span class="p">,</span> <span class="n">atSquare</span> <span class="nv">square</span><span class="p">:</span> <span class="kt">Square</span><span class="p">)</span> <span class="o">-&gt;</span> <span class="kt">Bool</span> <span class="p">{</span>
    <span class="k">if</span> <span class="o">!</span><span class="nf">canPositionTile</span><span class="p">(</span><span class="n">tile</span><span class="p">,</span> <span class="nv">atSquare</span><span class="p">:</span> <span class="n">square</span><span class="p">)</span> <span class="p">{</span>
        <span class="k">return</span> <span class="kc">false</span>
    <span class="p">}</span>
    <span class="n">placedTiles</span><span class="o">.</span><span class="nf">append</span><span class="p">(</span><span class="kt">PlacedTile</span><span class="p">(</span><span class="nv">square</span><span class="p">:</span> <span class="n">square</span><span class="p">,</span> <span class="nv">tile</span><span class="p">:</span> <span class="n">tile</span><span class="p">))</span>
    <span class="k">return</span> <span class="kc">true</span>
<span class="p">}</span>

<span class="kd">public</span> <span class="kd">func</span> <span class="nf">removeTile</span><span class="p">(</span><span class="nv">tile</span><span class="p">:</span> <span class="kt">Tile</span><span class="p">)</span> <span class="o">-&gt;</span> <span class="kt">Tile</span><span class="p">?</span> <span class="p">{</span>
	<span class="k">if</span> <span class="k">let</span> <span class="nv">index</span> <span class="o">=</span> <span class="n">placedTiles</span><span class="o">.</span><span class="nf">indexOf</span><span class="p">(</span> <span class="p">{</span> <span class="nv">$0</span><span class="o">.</span><span class="n">tile</span> <span class="o">===</span> <span class="n">tile</span> <span class="p">}</span> <span class="p">){</span>
        <span class="n">placedTiles</span><span class="o">.</span><span class="nf">removeAtIndex</span><span class="p">(</span><span class="n">index</span><span class="p">)</span>
        <span class="k">return</span> <span class="n">tile</span>
    <span class="p">}</span>
    <span class="k">return</span> <span class="kc">nil</span>
<span class="p">}</span>
</code></pre></div></div>

<p>I’m planning to use these return values to inform the UI once I get to that stage.</p>

<p>While thinking about the updated board model and user interaction, it seemed that I was going to need a method to find the tile at a given board square. This will be used when processing touches on the board, and managed to give me some Bonus Swift Features™ to cram into this article after all. I was wondering if I’d get any.</p>

<p>Here’s the method I wrote:</p>

<div class="language-swift highlighter-rouge"><div class="highlight"><pre class="highlight"><code><span class="kd">public</span> <span class="kd">func</span> <span class="nf">tileAtSquare</span><span class="p">(</span><span class="nv">square</span><span class="p">:</span> <span class="kt">Square</span><span class="p">)</span> <span class="o">-&gt;</span> <span class="kt">Tile</span><span class="p">?</span> <span class="p">{</span>
	<span class="k">for</span> <span class="n">placedTile</span> <span class="k">in</span> <span class="n">placedTiles</span> <span class="p">{</span>
		<span class="k">let</span> <span class="nv">locationInTile</span> <span class="o">=</span> <span class="n">square</span><span class="o">.</span><span class="nf">offsetBy</span><span class="p">(</span><span class="o">-</span><span class="n">placedTile</span><span class="o">.</span><span class="n">square</span><span class="p">)</span>
		<span class="k">if</span> <span class="n">placedTile</span><span class="o">.</span><span class="n">tile</span><span class="o">.</span><span class="nf">squareWithinGrid</span><span class="p">(</span><span class="n">locationInTile</span><span class="p">)</span> <span class="p">{</span>
			<span class="k">let</span> <span class="nv">occupiedSquares</span> <span class="o">=</span> <span class="n">placedTile</span><span class="o">.</span><span class="n">tile</span><span class="o">.</span><span class="nf">squares</span><span class="p">()</span><span class="o">.</span><span class="n">filter</span> <span class="p">{</span> <span class="nv">$0</span><span class="o">.</span><span class="n">occupied</span> <span class="o">==</span> <span class="kc">true</span> <span class="p">}</span>
			<span class="k">for</span> <span class="n">tileSquare</span> <span class="k">in</span> <span class="n">occupiedSquares</span> <span class="p">{</span>
				<span class="k">if</span> <span class="n">tileSquare</span> <span class="o">==</span> <span class="n">locationInTile</span> <span class="p">{</span>
					<span class="k">return</span> <span class="n">placedTile</span><span class="o">.</span><span class="n">tile</span>
				<span class="p">}</span>
			<span class="p">}</span>
		<span class="p">}</span>
	<span class="p">}</span>
	<span class="k">return</span> <span class="kc">nil</span>
<span class="p">}</span>
</code></pre></div></div>

<p>This translates the board location to a tile location, checks that is anywhere within the tile, then checks if an occupied square in the tile matches up.</p>

<p>The first bonus Swift feature is here: <code class="highlighter-rouge">square.offsetBy(-placedTile.square)</code>. To translate from a board location to a tile location, I need to do the reverse of the offset function. Rather than define a new function, since I could not think of a non-confusing pair of names for them, I instead defined the unary minus operator to work for a <code class="highlighter-rouge">Square</code>:</p>

<div class="language-swift highlighter-rouge"><div class="highlight"><pre class="highlight"><code><span class="kd">public</span> <span class="k">prefix</span> <span class="kd">func</span> <span class="o">-</span><span class="p">(</span><span class="nv">square</span><span class="p">:</span> <span class="kt">Square</span><span class="p">)</span> <span class="o">-&gt;</span> <span class="kt">Square</span> <span class="p">{</span>
    <span class="k">return</span> <span class="kt">Square</span><span class="p">(</span><span class="nv">row</span><span class="p">:</span> <span class="o">-</span><span class="n">square</span><span class="o">.</span><span class="n">row</span><span class="p">,</span> <span class="nv">column</span><span class="p">:</span> <span class="o">-</span><span class="n">square</span><span class="o">.</span><span class="n">column</span><span class="p">)</span>
<span class="p">}</span>
</code></pre></div></div>

<p>I deliberately do not return a <code class="highlighter-rouge">Square</code> with an occupied property - anything returned here is for location calculations only, and not part of the board model.</p>

<p>In a similar vein, for the second bonus Swift feature I defined <code class="highlighter-rouge">==</code> for <code class="highlighter-rouge">Square</code> to ignore the occupied property:</p>

<div class="language-swift highlighter-rouge"><div class="highlight"><pre class="highlight"><code><span class="kd">public</span> <span class="kd">func</span> <span class="o">==</span><span class="p">(</span><span class="nv">left</span><span class="p">:</span> <span class="kt">Square</span><span class="p">,</span> <span class="nv">right</span><span class="p">:</span> <span class="kt">Square</span><span class="p">)</span> <span class="o">-&gt;</span> <span class="kt">Bool</span> <span class="p">{</span>
    <span class="k">return</span> <span class="n">left</span><span class="o">.</span><span class="n">row</span> <span class="o">==</span> <span class="n">right</span><span class="o">.</span><span class="n">row</span> <span class="o">&amp;&amp;</span> <span class="n">left</span><span class="o">.</span><span class="n">column</span> <span class="o">==</span> <span class="n">right</span><span class="o">.</span><span class="n">column</span>
<span class="p">}</span>
</code></pre></div></div>

<p>At the end of this stage of the project I have these feelings:</p>

<ul>
  <li>The model and logic is pretty close to done</li>
  <li>I’m starting to feel itchy about the lack of unit tests. Playgrounds were good for quick visualisations and checks, but I can see some opportunities to refactor and I don’t want to do that without the backup of tests.</li>
  <li>I’m starting to think about the views that are going to be involved - I would like to continue in playgrounds to use Live Views for those quick visualisation wins again.</li>
</ul>

<p>The next post will either be me migrating into an Xcode project and adding some tests, or creating some views in the playground, or a bit of both. It’d be nice to get a project going but it’s also really good to be looking at things in a live view as you are writing code, and it would be interesting to see how far I can take that.</p>

<p><a href="https://github.com/jrturton/Pentominoes/commit/fb3c3630019118bed6dae73f83815d71eb38839e">Here’s the link</a> to the code as of the end of this post.</p>
]]></content>
  </entry>
  
  <entry>
    <title type="html"><![CDATA[Pentominoes, part three: Placing the first tile]]></title>
    <link href="http://commandshift.co.uk/blog/2016/06/09/pentominoes-part-three/"/>
    <updated>2016-06-09T00:00:00+00:00</updated>
    <id>http://commandshift.co.uk/blog/2016/06/09/pentominoes-part-three</id>
    <content type="html"><![CDATA[<p>It’s time to think about some game logic. The first thing a player will do is try to place a <code class="highlighter-rouge">Tile</code> on the <code class="highlighter-rouge">Board</code>. How can I tell if the move should be allowed?</p>

<p>To solve this problem I ended up creating a <code class="highlighter-rouge">SequenceType</code> and <code class="highlighter-rouge">GeneratorType</code>, which is the main focus of this part.</p>

<!--more-->

<p>To see if a tile can go in a certain position on a board, I need to check each occupied square of the tile’s grid, and each square that matches on the board’s grid, and see if the spaces are all free.</p>

<h2 id="making-a-forin-loop">Making a for…in loop</h2>

<p>I <em>could</em> (and, indeed, did) do this by having an outer loop of rows and an inner loop of columns, but it felt a bit messy, and part of the point of this project is to look at some of the interesting things Swift permits you to do. A nicer way to work would be to be able to go something like:</p>

<div class="language-swift highlighter-rouge"><div class="highlight"><pre class="highlight"><code><span class="k">for</span> <span class="n">square</span> <span class="k">in</span> <span class="n">tile</span><span class="o">.</span><span class="n">squares</span> <span class="p">{</span>
	<span class="k">if</span> <span class="n">square</span><span class="o">.</span><span class="n">occupied</span> <span class="p">{</span>
		<span class="o">...</span> <span class="n">check</span> <span class="n">the</span> <span class="n">board</span> <span class="n">at</span> <span class="n">the</span> <span class="n">relevant</span> <span class="n">square</span>
	<span class="p">}</span>
<span class="p">}</span>
</code></pre></div></div>

<p>The first step is to make a <code class="highlighter-rouge">struct</code> which can represent a square on a <code class="highlighter-rouge">PlayingGrid</code>:</p>

<div class="language-swift highlighter-rouge"><div class="highlight"><pre class="highlight"><code><span class="kd">public</span> <span class="kd">struct</span> <span class="kt">Square</span> <span class="p">{</span>
    <span class="k">let</span> <span class="nv">row</span><span class="p">:</span> <span class="kt">Int</span>
    <span class="k">let</span> <span class="nv">column</span><span class="p">:</span> <span class="kt">Int</span>
    <span class="k">let</span> <span class="nv">occupied</span><span class="p">:</span> <span class="kt">Bool</span><span class="p">?</span>
<span class="p">}</span>
</code></pre></div></div>

<p><code class="highlighter-rouge">occupied</code> is an optional because sometimes I will want to create a Square and use it to query a <code class="highlighter-rouge">PlayingGrid</code>.</p>

<p>To allow a for…in loop to work, you need two things: a <code class="highlighter-rouge">SequenceType</code>, and a <code class="highlighter-rouge">GeneratorType</code>.</p>

<p>The sequence is the thing that is returned from, for example, <code class="highlighter-rouge">tile.squares</code> in the code above. Things like arrays also conform to <code class="highlighter-rouge">SequenceType</code>, which is how you can do for…in loops on them.</p>

<p><code class="highlighter-rouge">SequenceType</code> has a single function you have to implement. Once you have that function, you can <code class="highlighter-rouge">map</code>, <code class="highlighter-rouge">reduce</code>, <code class="highlighter-rouge">forEach</code> and many others. The function is <code class="highlighter-rouge">generate()</code>, and that has to return a <code class="highlighter-rouge">GeneratorType</code>.</p>

<h2 id="generatortype">GeneratorType</h2>

<p><code class="highlighter-rouge">GeneratorType</code> is a simple protocol. It has one function to implement, <code class="highlighter-rouge">next()</code>, which returns whatever type your sequence is going to be made of. Swift can infer that from the way you declare the function.</p>

<p>In this case the generator is going to be a class, as it will need to hold some mutable state to track the last element that was generated. Here’s the setup:</p>

<div class="language-swift highlighter-rouge"><div class="highlight"><pre class="highlight"><code><span class="kd">public</span> <span class="kd">class</span> <span class="kt">GridSquareGenerator</span><span class="p">:</span> <span class="kt">GeneratorType</span> <span class="p">{</span>
    <span class="k">var</span> <span class="nv">currentRow</span><span class="p">:</span> <span class="kt">Int</span> <span class="o">=</span> <span class="mi">0</span>
    <span class="k">var</span> <span class="nv">currentColumn</span><span class="p">:</span> <span class="kt">Int</span> <span class="o">=</span> <span class="o">-</span><span class="mi">1</span>
    
    <span class="k">let</span> <span class="nv">grid</span><span class="p">:</span> <span class="kt">PlayingGrid</span>
    
    <span class="kd">public</span> <span class="nf">init</span><span class="p">(</span><span class="nv">grid</span><span class="p">:</span> <span class="kt">PlayingGrid</span><span class="p">)</span> <span class="p">{</span>
        <span class="k">self</span><span class="o">.</span><span class="n">grid</span> <span class="o">=</span> <span class="n">grid</span>
    <span class="p">}</span>
<span class="p">}</span>
</code></pre></div></div>

<p>And here is the all-important <code class="highlighter-rouge">next()</code> method:</p>

<div class="language-swift highlighter-rouge"><div class="highlight"><pre class="highlight"><code><span class="kd">public</span> <span class="kd">func</span> <span class="nf">next</span><span class="p">()</span> <span class="o">-&gt;</span> <span class="kt">Square</span><span class="p">?</span> <span class="p">{</span>
    <span class="k">guard</span> <span class="n">currentRow</span> <span class="o">&lt;</span> <span class="n">grid</span><span class="o">.</span><span class="n">rows</span><span class="o">.</span><span class="n">count</span> <span class="k">else</span> <span class="p">{</span> <span class="k">return</span> <span class="kc">nil</span> <span class="p">}</span>
    
    <span class="n">currentColumn</span> <span class="o">+=</span> <span class="mi">1</span>
    
    <span class="k">if</span> <span class="n">currentColumn</span> <span class="o">==</span> <span class="n">grid</span><span class="p">[</span><span class="n">currentRow</span><span class="p">]</span><span class="o">.</span><span class="n">count</span> <span class="p">{</span>
        <span class="n">currentColumn</span> <span class="o">=</span> <span class="mi">0</span>
        <span class="n">currentRow</span> <span class="o">+=</span> <span class="mi">1</span>
    <span class="p">}</span>
    <span class="k">if</span> <span class="n">currentRow</span> <span class="o">&lt;</span> <span class="n">grid</span><span class="o">.</span><span class="n">rows</span><span class="o">.</span><span class="n">count</span> <span class="p">{</span>
        <span class="k">return</span> <span class="kt">Square</span><span class="p">(</span><span class="nv">row</span><span class="p">:</span> <span class="n">currentRow</span><span class="p">,</span> <span class="nv">column</span><span class="p">:</span> <span class="n">currentColumn</span><span class="p">,</span> <span class="nv">occupied</span><span class="p">:</span> <span class="n">grid</span><span class="p">[</span><span class="n">currentRow</span><span class="p">][</span><span class="n">currentColumn</span><span class="p">])</span>
    <span class="p">}</span> <span class="k">else</span> <span class="p">{</span>
        <span class="k">return</span> <span class="kc">nil</span>
    <span class="p">}</span>
<span class="p">}</span>
</code></pre></div></div>

<p>This moves along the columns and down the rows, creating and returning the squares. Generators can take many forms, you can even have ones that are theoretically infinite (for example, ones that generate mathematical series). It all depends on the state you track and the implementation of <code class="highlighter-rouge">next()</code>.</p>

<h2 id="sequencetype">SequenceType</h2>

<p>Creating the sequence is simple:</p>

<div class="language-swift highlighter-rouge"><div class="highlight"><pre class="highlight"><code><span class="kd">public</span> <span class="kd">class</span> <span class="kt">GridSquareSequence</span><span class="p">:</span> <span class="kt">SequenceType</span> <span class="p">{</span>
    <span class="k">let</span> <span class="nv">grid</span><span class="p">:</span> <span class="kt">PlayingGrid</span>
    
    <span class="kd">public</span> <span class="nf">init</span><span class="p">(</span><span class="nv">grid</span><span class="p">:</span> <span class="kt">PlayingGrid</span><span class="p">)</span> <span class="p">{</span>
        <span class="k">self</span><span class="o">.</span><span class="n">grid</span> <span class="o">=</span> <span class="n">grid</span>
    <span class="p">}</span>
    
    <span class="kd">public</span> <span class="kd">func</span> <span class="nf">generate</span><span class="p">()</span> <span class="o">-&gt;</span> <span class="kt">GridSquareGenerator</span> <span class="p">{</span>
        <span class="k">return</span> <span class="kt">GridSquareGenerator</span><span class="p">(</span><span class="nv">grid</span><span class="p">:</span> <span class="n">grid</span><span class="p">)</span>
    <span class="p">}</span>
<span class="p">}</span>
</code></pre></div></div>

<p>To make the sequence of squares of a <code class="highlighter-rouge">PlayingGrid</code> accessible, declare it like so:</p>

<div class="language-swift highlighter-rouge"><div class="highlight"><pre class="highlight"><code><span class="kd">extension</span> <span class="kt">PlayingGrid</span> <span class="p">{</span>
    <span class="kd">public</span> <span class="kd">func</span> <span class="nf">squares</span><span class="p">()</span> <span class="o">-&gt;</span> <span class="kt">GridSquareSequence</span> <span class="p">{</span>
        <span class="k">return</span> <span class="kt">GridSquareSequence</span><span class="p">(</span><span class="nv">grid</span><span class="p">:</span> <span class="k">self</span><span class="p">)</span>
    <span class="p">}</span>
<span class="p">}</span>
</code></pre></div></div>

<h2 id="placing-a-tile">Placing a tile</h2>

<p>With all that mess hidden away inside the <code class="highlighter-rouge">PlayingGrid</code> protocol, it is now quite nice to add placement checking logic to the board:</p>

<div class="language-swift highlighter-rouge"><div class="highlight"><pre class="highlight"><code><span class="kd">extension</span> <span class="kt">Board</span> <span class="p">{</span>
    <span class="kd">public</span> <span class="kd">func</span> <span class="nf">canPositionTile</span><span class="p">(</span><span class="nv">tile</span><span class="p">:</span> <span class="kt">Tile</span><span class="p">,</span> <span class="nv">atSquare</span><span class="p">:</span> <span class="kt">Square</span><span class="p">)</span> <span class="o">-&gt;</span> <span class="kt">Bool</span> <span class="p">{</span>
        
        <span class="k">for</span> <span class="n">tileSquare</span> <span class="k">in</span> <span class="n">tile</span><span class="o">.</span><span class="nf">squares</span><span class="p">()</span> <span class="p">{</span>
            <span class="k">let</span> <span class="nv">boardSquare</span> <span class="o">=</span> <span class="n">tileSquare</span><span class="o">.</span><span class="nf">offsetBy</span><span class="p">(</span><span class="n">atSquare</span><span class="p">)</span>
            <span class="k">if</span> <span class="o">!</span><span class="nf">squareWithinBoard</span><span class="p">(</span><span class="n">boardSquare</span><span class="p">)</span> <span class="p">{</span>
                <span class="k">return</span> <span class="kc">false</span>
            <span class="p">}</span>
            <span class="k">if</span> <span class="n">tileSquare</span><span class="o">.</span><span class="n">occupied</span> <span class="o">==</span> <span class="kc">true</span> <span class="o">&amp;&amp;</span> <span class="nf">squareOccupied</span><span class="p">(</span><span class="n">boardSquare</span><span class="p">)</span> <span class="p">{</span>
                <span class="k">return</span> <span class="kc">false</span>
            <span class="p">}</span>
        <span class="p">}</span>
        <span class="k">return</span> <span class="kc">true</span>
    <span class="p">}</span>
<span class="p">}</span>
</code></pre></div></div>

<p>I added a couple of utility functions to make this more readable, not shown here.</p>

<p>At this point, the blog posts have caught up to where I am in development. So from now on I’ll be giving commit links to the repo for the state at the end of each post. Here’s the <a href="https://github.com/jrturton/Pentominoes/commit/b95d9b64753550e9e165abb8e987bc6c3dd1d991">first</a>.</p>

<p>In the <a href="http://commandshift.co.uk/blog/2016/06/12/pentominoes-part-four/">next post</a> I talk about updating the board’s model when tiles are placed and removed.</p>
]]></content>
  </entry>
  
  <entry>
    <title type="html"><![CDATA[Pentominoes, part two: Board]]></title>
    <link href="http://commandshift.co.uk/blog/2016/06/08/pentominoes-part-two/"/>
    <updated>2016-06-08T00:00:00+00:00</updated>
    <id>http://commandshift.co.uk/blog/2016/06/08/pentominoes-part-two</id>
    <content type="html"><![CDATA[<p>In <a href="http://commandshift.co.uk/blog/2016/06/06/pentominoes_part_one/">part one</a> I went through the process of building the Tile model objects for my Pentominoes puzzle app. In this part I will talk about making the Board, and what I learned about protocols and default implementations in the process.</p>

<!--more-->

<p>The board, like the tiles, can be represented with a two-dimensional array of <code class="highlighter-rouge">Bool</code>s. Also, like the tiles, it’s going to be nice to be able to view the board as a string and access locations in there via subscripting. Hmmm.</p>

<p>At this point I had three choices.</p>

<p>I could reimplement the same logic in the <code class="highlighter-rouge">Board</code> and <code class="highlighter-rouge">Tile</code> classes, which is silly. I could make both classes inherit from a superclass, but that didn’t feel right. Instead I decided to create a protocol.</p>

<h2 id="protocols-and-default-implementations">Protocols and default implementations</h2>

<div class="language-swift highlighter-rouge"><div class="highlight"><pre class="highlight"><code><span class="kd">public</span> <span class="kd">protocol</span> <span class="kt">PlayingGrid</span> <span class="p">{</span>
    <span class="k">var</span> <span class="nv">rows</span><span class="p">:</span> <span class="p">[[</span><span class="kt">Bool</span><span class="p">]]</span> <span class="p">{</span> <span class="k">get</span> <span class="p">}</span>
    <span class="nf">subscript</span><span class="p">(</span><span class="nv">row</span><span class="p">:</span> <span class="kt">Int</span><span class="p">)</span> <span class="o">-&gt;</span> <span class="p">[</span><span class="kt">Bool</span><span class="p">]</span> <span class="p">{</span> <span class="k">get</span> <span class="p">}</span>
<span class="p">}</span>
</code></pre></div></div>

<p>The subscript implementation can be done in an extension:</p>

<div class="language-swift highlighter-rouge"><div class="highlight"><pre class="highlight"><code><span class="kd">extension</span> <span class="kt">PlayingGrid</span> <span class="p">{</span>
    <span class="kd">public</span> <span class="nf">subscript</span><span class="p">(</span><span class="nv">row</span><span class="p">:</span> <span class="kt">Int</span><span class="p">)</span> <span class="o">-&gt;</span> <span class="p">[</span><span class="kt">Bool</span><span class="p">]</span> <span class="p">{</span>
        <span class="k">get</span> <span class="p">{</span>
            <span class="k">return</span> <span class="n">rows</span><span class="p">[</span><span class="n">row</span><span class="p">]</span>
        <span class="p">}</span>
    <span class="p">}</span>
<span class="p">}</span>
</code></pre></div></div>

<p>The corresponding code can be removed from the <code class="highlighter-rouge">Tile</code> class, which is now declared like so:</p>

<div class="language-swift highlighter-rouge"><div class="highlight"><pre class="highlight"><code><span class="kd">public</span> <span class="kd">class</span> <span class="kt">Tile</span><span class="p">:</span> <span class="kt">PlayingGrid</span> <span class="p">{</span>
</code></pre></div></div>

<p>I then tried to make a default implementation of the <code class="highlighter-rouge">CustomStringConvertible</code> protocol method in an extension:</p>

<div class="language-swift highlighter-rouge"><div class="highlight"><pre class="highlight"><code><span class="kd">extension</span> <span class="kt">PlayingGrid</span><span class="p">:</span> <span class="kt">CustomStringConvertible</span> <span class="p">{</span>
</code></pre></div></div>

<p>This gives the error “Extension of protocol cannot have an inheritance clause”. It turns out you can’t do it like this. However, what I wanted is still possible. I had to define the inheritance in the main declaration:</p>

<div class="language-swift highlighter-rouge"><div class="highlight"><pre class="highlight"><code><span class="kd">public</span> <span class="kd">protocol</span> <span class="kt">PlayingGrid</span><span class="p">:</span> <span class="kt">CustomStringConvertible</span> <span class="p">{</span>
</code></pre></div></div>

<p>Then in the extension, it can be implemented. I rewrote the implementation so it didn’t look so much like robot vomit:</p>

<div class="language-swift highlighter-rouge"><div class="highlight"><pre class="highlight"><code><span class="kd">extension</span> <span class="kt">Bool</span> <span class="p">{</span>
    <span class="k">var</span> <span class="nv">gridCharacter</span><span class="p">:</span> <span class="kt">String</span> <span class="p">{</span>
        <span class="k">return</span> <span class="k">self</span> <span class="p">?</span> <span class="s">"#"</span> <span class="p">:</span> <span class="s">"_"</span>
    <span class="p">}</span>
<span class="p">}</span>

<span class="kd">extension</span> <span class="kt">PlayingGrid</span> <span class="k">where</span> <span class="k">Self</span><span class="p">:</span> <span class="kt">CustomStringConvertible</span> <span class="p">{</span>
    <span class="kd">public</span> <span class="k">var</span> <span class="nv">description</span><span class="p">:</span> <span class="kt">String</span> <span class="p">{</span>
        <span class="k">let</span> <span class="nv">descriptions</span> <span class="p">:</span> <span class="p">[</span><span class="kt">String</span><span class="p">]</span> <span class="o">=</span> <span class="n">rows</span><span class="o">.</span><span class="n">map</span> <span class="p">{</span> <span class="n">row</span> <span class="k">in</span>
            <span class="n">row</span><span class="o">.</span><span class="nf">reduce</span><span class="p">(</span><span class="s">""</span><span class="p">)</span> <span class="p">{</span> <span class="n">string</span><span class="p">,</span> <span class="n">gridValue</span> <span class="k">in</span>
                <span class="n">string</span> <span class="o">+</span> <span class="n">gridValue</span><span class="o">.</span><span class="n">gridCharacter</span> 
            <span class="p">}</span>
        <span class="p">}</span>
        <span class="k">return</span> <span class="n">descriptions</span><span class="o">.</span><span class="nf">joinWithSeparator</span><span class="p">(</span><span class="s">"</span><span class="se">\n</span><span class="s">"</span><span class="p">)</span>
    <span class="p">}</span>
<span class="p">}</span>
</code></pre></div></div>

<p>I then had to add similar code to make <code class="highlighter-rouge">PlayingGrid</code> <code class="highlighter-rouge">CustomPlaygroundQuickLookable</code> as well. First, amend the protocol declaration:</p>

<div class="language-swift highlighter-rouge"><div class="highlight"><pre class="highlight"><code><span class="kd">public</span> <span class="kd">protocol</span> <span class="kt">PlayingGrid</span><span class="p">:</span> <span class="kt">CustomStringConvertible</span><span class="p">,</span> <span class="kt">CustomPlaygroundQuickLookable</span> <span class="p">{</span>
</code></pre></div></div>

<p>Then, amend the constraints on the extension (they need to be in the same extension, because the quick look depends on the description):</p>

<div class="language-swift highlighter-rouge"><div class="highlight"><pre class="highlight"><code><span class="kd">extension</span> <span class="kt">PlayingGrid</span> <span class="k">where</span> <span class="k">Self</span><span class="p">:</span> <span class="kd">protocol</span><span class="o">&lt;</span><span class="kt">CustomStringConvertible</span><span class="p">,</span> <span class="kt">CustomPlaygroundQuickLookable</span><span class="o">&gt;</span> <span class="p">{</span>
</code></pre></div></div>

<p>(the <code class="highlighter-rouge">protocol&lt; &gt;</code> syntax was pointed out to me by the wonderful <a href="https://twitter.com/jessyMeow">@jessyMeow</a>)</p>

<p>Within the extension, I used the same implementation of <code class="highlighter-rouge">customPlaygroundQuickLook()</code> from <code class="highlighter-rouge">Tile</code>, removing the code from that class.</p>

<p>Having done all that to split the shared functionality out from <code class="highlighter-rouge">Tile</code>, it was time to create <code class="highlighter-rouge">Board</code>.</p>

<h2 id="making-the-board">Making the Board</h2>

<p>According to the <a href="https://en.wikipedia.org/wiki/Pentomino">Wikipedia entry</a> there are four different board sizes which can take all of the tiles with no gaps. It’s not possible to represent this nicely in an enum, because the raw value of an enum can’t be a tuple. Instead, a struct with static values works:</p>

<div class="language-swift highlighter-rouge"><div class="highlight"><pre class="highlight"><code><span class="kd">public</span> <span class="kd">struct</span> <span class="kt">Size</span> <span class="p">{</span>
    <span class="k">let</span> <span class="nv">height</span><span class="p">:</span> <span class="kt">Int</span>
    <span class="k">let</span> <span class="nv">width</span><span class="p">:</span> <span class="kt">Int</span>
    
    <span class="kd">public</span> <span class="kd">static</span> <span class="k">let</span> <span class="nv">SixByTen</span> <span class="o">=</span> <span class="kt">Size</span><span class="p">(</span><span class="nv">height</span><span class="p">:</span> <span class="mi">6</span><span class="p">,</span> <span class="nv">width</span><span class="p">:</span> <span class="mi">10</span><span class="p">)</span>
    <span class="kd">public</span> <span class="kd">static</span> <span class="k">let</span> <span class="nv">FiveByTwelve</span> <span class="o">=</span> <span class="kt">Size</span><span class="p">(</span><span class="nv">height</span><span class="p">:</span> <span class="mi">5</span><span class="p">,</span> <span class="nv">width</span><span class="p">:</span> <span class="mi">12</span><span class="p">)</span>
    <span class="kd">public</span> <span class="kd">static</span> <span class="k">let</span> <span class="nv">FourByFifteen</span> <span class="o">=</span> <span class="kt">Size</span><span class="p">(</span><span class="nv">height</span><span class="p">:</span> <span class="mi">4</span><span class="p">,</span> <span class="nv">width</span><span class="p">:</span> <span class="mi">15</span><span class="p">)</span>
    <span class="kd">public</span> <span class="kd">static</span> <span class="k">let</span> <span class="nv">ThreeByTwenty</span> <span class="o">=</span> <span class="kt">Size</span><span class="p">(</span><span class="nv">height</span><span class="p">:</span> <span class="mi">3</span><span class="p">,</span> <span class="nv">width</span><span class="p">:</span> <span class="mi">20</span><span class="p">)</span>
<span class="p">}</span>
</code></pre></div></div>

<p>I use the height dimension first simply because that’s how it is shown in the Wikipedia page and I wanted to use common nomenclature.</p>

<p>The board’s initializer needs to take a <code class="highlighter-rouge">Size</code>, now we’ve defined it. To allow for positioning of any type or rotation of tile anywhere in the board, I will add four blocks of padding in each direction around the empty board. That way a tile can be placed anywhere on the “board” with a minimum of one of its squares actually on the playing surface.</p>

<p>This is probably the sort of code that could be written as an unreadable one-liner in Swift, but that’s not how I roll.</p>

<div class="language-swift highlighter-rouge"><div class="highlight"><pre class="highlight"><code><span class="kd">public</span> <span class="nf">init</span><span class="p">(</span><span class="nv">size</span><span class="p">:</span> <span class="kt">Size</span><span class="p">)</span> <span class="p">{</span>
    <span class="c1">// Extend by four "occupied" positions in every direction</span>
    <span class="k">let</span> <span class="nv">paddingHorizontal</span> <span class="o">=</span> <span class="p">[</span><span class="kt">Bool</span><span class="p">]</span><span class="o">.</span><span class="nf">init</span><span class="p">(</span><span class="nv">count</span><span class="p">:</span> <span class="mi">4</span><span class="p">,</span> <span class="nv">repeatedValue</span><span class="p">:</span> <span class="kc">true</span><span class="p">)</span>
    <span class="k">let</span> <span class="nv">paddingVertical</span> <span class="o">=</span> <span class="p">[</span><span class="kt">Bool</span><span class="p">]</span><span class="o">.</span><span class="nf">init</span><span class="p">(</span><span class="nv">count</span><span class="p">:</span> <span class="mi">8</span> <span class="o">+</span> <span class="n">size</span><span class="o">.</span><span class="n">width</span><span class="p">,</span> <span class="nv">repeatedValue</span><span class="p">:</span> <span class="kc">true</span><span class="p">)</span>
    <span class="k">let</span> <span class="nv">fullPaddingVertical</span> <span class="o">=</span> <span class="p">[[</span><span class="kt">Bool</span><span class="p">]]</span><span class="o">.</span><span class="nf">init</span><span class="p">(</span><span class="nv">count</span><span class="p">:</span> <span class="mi">4</span><span class="p">,</span> <span class="nv">repeatedValue</span><span class="p">:</span> <span class="n">paddingVertical</span><span class="p">)</span>
    <span class="k">let</span> <span class="nv">emptyRow</span> <span class="o">=</span> <span class="p">[</span><span class="kt">Bool</span><span class="p">]</span><span class="o">.</span><span class="nf">init</span><span class="p">(</span><span class="nv">count</span><span class="p">:</span> <span class="n">size</span><span class="o">.</span><span class="n">width</span><span class="p">,</span> <span class="nv">repeatedValue</span><span class="p">:</span> <span class="kc">false</span><span class="p">)</span>
    <span class="n">rows</span> <span class="o">=</span> <span class="n">fullPaddingVertical</span>
    <span class="k">for</span> <span class="n">_</span> <span class="k">in</span> <span class="mi">0</span><span class="o">..&lt;</span><span class="n">size</span><span class="o">.</span><span class="n">height</span> <span class="p">{</span>
        <span class="n">rows</span> <span class="o">+=</span> <span class="p">[</span><span class="n">paddingHorizontal</span> <span class="o">+</span> <span class="n">emptyRow</span> <span class="o">+</span> <span class="n">paddingHorizontal</span><span class="p">]</span>
    <span class="p">}</span>
    <span class="n">rows</span> <span class="o">+=</span> <span class="n">fullPaddingVertical</span>
<span class="p">}</span>
</code></pre></div></div>

<p>I feel better about the code after these changes. I think its a sensible use of a protocol, I learned lots of things about default implementations and protocol constraints, and the actual <code class="highlighter-rouge">Board</code> and <code class="highlighter-rouge">Tile</code> implementations are currently very light. In the <a href="http://commandshift.co.uk/blog/2016/06/09/pentominoes-part-three/">next part</a> I will start to work on some game logic - placing tiles on the board.</p>

]]></content>
  </entry>
  
  <entry>
    <title type="html"><![CDATA[Pentominoes, part one: Tiles]]></title>
    <link href="http://commandshift.co.uk/blog/2016/06/06/pentominoes_part_one/"/>
    <updated>2016-06-06T00:00:00+00:00</updated>
    <id>http://commandshift.co.uk/blog/2016/06/06/pentominoes_part_one</id>
    <content type="html"><![CDATA[<p>My daughter and I are members of <a href="https://www.at-bristol.org.uk">At-Bristol</a>, a most excellent interactive science centre in Bristol. On a recent visit she was captivated by a “Pentominoes” puzzle. Pentominoes are the twelve possible tile shapes you can make using five squares, joined at their edges. They are a little like tetris shapes, but with five squares instead of four.</p>

<!--more-->

<p>Here are the possible tile shapes and the two common notations for them:</p>

<p><a href="https://commons.wikimedia.org/wiki/File:Pentomino_Naming_Conventions.svg#/media/File:Pentomino_Naming_Conventions.svg"><img src="https://upload.wikimedia.org/wikipedia/commons/thumb/6/69/Pentomino_Naming_Conventions.svg/1200px-Pentomino_Naming_Conventions.svg.png" alt="Pentomino Naming Conventions.svg" /></a><br />By <a href="//commons.wikimedia.org/wiki/User:Nonenmac" title="User:Nonenmac">R. A. Nonenmacher</a> - <span class="int-own-work" lang="en">Own work</span>, <a href="http://www.gnu.org/copyleft/fdl.html" title="GNU Free Documentation License">GFDL</a>, https://commons.wikimedia.org/w/index.php?curid=4412149</p>

<hr />

<p>The puzzle consisted of wooden versions of the possible shapes and a six-by-ten frame to fit them in. Although my daughter didn’t manage to solve the puzzle, she displayed extraordinary tenacity and technique, and I’m sure she would have got there given time.</p>

<p>I promised to make her a version of the puzzle to play on her iPad instead. I’ve done a few little projects like this for her (hopefully one day, <em>with</em> her) and thought this one might make an interesting “development diary” type of post. I’ve no doubt made some decisions you disagree with. I’ve no doubt made some decisions <em>I</em> will disagree with, as I move through the project, but that’s the point of this series - code doesn’t spring perfectly formed onto the screen. It’s written, examined, tested and re-written until it’s good enough. I hope to document that process.</p>

<p>Note that I said “good enough”, not “perfect”. You have to ship. I’m also hoping that the double commitments of writing about the process and the fact I promised her will help to drive this project along.</p>

<h2 id="first-thing-the-tiles">First thing: The tiles</h2>

<p>I always like to get the data model and “business rules” defined at the start of a project. UI comes at the end for me, since it is so often driven by data. The first part to tackle was the tiles.</p>

<p>Here are the rules about tiles:</p>

<ul>
  <li>The tiles can rotate on the z-axis in 90 degree increments.</li>
  <li>The tile has a specific pattern of squares that cannot change, except via rotation</li>
  <li>There are 12 possible tile patterns, only one of each is permitted in the game</li>
</ul>

<p>Which lead me to these code considerations:</p>

<p>Each <code class="highlighter-rouge">Tile</code> in the model represents a <em>real, physical</em> object in the game, and we have the ability to change the internal state of the tile by rotating it. Therefore <code class="highlighter-rouge">Tile</code> should be a <code class="highlighter-rouge">class</code>, not a <code class="highlighter-rouge">struct</code>:</p>

<div class="language-swift highlighter-rouge"><div class="highlight"><pre class="highlight"><code><span class="kd">public</span> <span class="kd">class</span> <span class="kt">Tile</span> <span class="p">{</span>
<span class="p">}</span>
</code></pre></div></div>

<p>Any possible rotation of the tile can fit into a five-by-five grid, so the tile will contain a two-dimensional matrix of <code class="highlighter-rouge">Bool</code> to represent the grid, where <code class="highlighter-rouge">true</code> represents the presence of a part of the tile, and <code class="highlighter-rouge">false</code> represents the absence:</p>

<div class="language-swift highlighter-rouge"><div class="highlight"><pre class="highlight"><code><span class="kd">private</span> <span class="p">(</span><span class="k">set</span><span class="p">)</span> <span class="kd">public</span> <span class="k">var</span> <span class="nv">rows</span><span class="p">:</span> <span class="p">[[</span><span class="kt">Bool</span><span class="p">]]</span>
</code></pre></div></div>

<p>It’s going to be handy to be able to access a particular location using a nice subscript notation, such as <code class="highlighter-rouge">tile[1][1]</code>:</p>

<div class="language-swift highlighter-rouge"><div class="highlight"><pre class="highlight"><code><span class="kd">public</span> <span class="nf">subscript</span><span class="p">(</span><span class="nv">row</span><span class="p">:</span> <span class="kt">Int</span><span class="p">)</span> <span class="o">-&gt;</span> <span class="p">[</span><span class="kt">Bool</span><span class="p">]</span> <span class="p">{</span>
	<span class="k">get</span> <span class="p">{</span>
		<span class="k">return</span> <span class="n">rows</span><span class="p">[</span><span class="n">row</span><span class="p">]</span>
	<span class="p">}</span>
<span class="p">}</span>
</code></pre></div></div>

<p><code class="highlighter-rouge">true</code> and <code class="highlighter-rouge">false</code> don’t look very good when you’re trying to debug or examine your work, so <code class="highlighter-rouge">Tile</code> should be <code class="highlighter-rouge">CustomStringConvertible</code> so that it can be <code class="highlighter-rouge">print</code>ed usefully in a playground. Here <code class="highlighter-rouge">#</code> will represent a filled space and <code class="highlighter-rouge">_</code> an empty one:</p>

<div class="language-swift highlighter-rouge"><div class="highlight"><pre class="highlight"><code><span class="kd">extension</span> <span class="kt">Tile</span><span class="p">:</span> <span class="kt">CustomStringConvertible</span> <span class="p">{</span>
    <span class="kd">public</span> <span class="k">var</span> <span class="nv">description</span><span class="p">:</span> <span class="kt">String</span> <span class="p">{</span>
        <span class="k">let</span> <span class="nv">descriptions</span><span class="p">:</span> <span class="p">[</span><span class="kt">String</span><span class="p">]</span> <span class="o">=</span> <span class="n">rows</span><span class="o">.</span><span class="n">map</span> <span class="p">{</span> <span class="nv">$0</span><span class="o">.</span><span class="nf">reduce</span><span class="p">(</span><span class="s">""</span><span class="p">)</span> <span class="p">{</span> <span class="nv">$0</span> <span class="o">+</span> <span class="p">(</span><span class="nv">$1</span> <span class="p">?</span> <span class="s">"#"</span> <span class="p">:</span> <span class="s">"_"</span><span class="p">)</span> <span class="p">}</span> <span class="p">}</span>
        <span class="k">return</span> <span class="n">descriptions</span><span class="o">.</span><span class="nf">joinWithSeparator</span><span class="p">(</span><span class="s">"</span><span class="se">\n</span><span class="s">"</span><span class="p">)</span>
    <span class="p">}</span>
<span class="p">}</span>
</code></pre></div></div>

<p>The 12 possible tile patterns should be represented by an <code class="highlighter-rouge">enum</code>. Tiles should be created with <code class="highlighter-rouge">init(shape: O)</code>. I want to be able to create these in a loop, so I’m using an integer raw value:</p>

<div class="language-swift highlighter-rouge"><div class="highlight"><pre class="highlight"><code><span class="kd">public</span> <span class="kd">enum</span> <span class="kt">Shapes</span><span class="p">:</span> <span class="kt">Int</span> <span class="p">{</span>
    <span class="k">case</span> <span class="kt">O</span> <span class="o">=</span> <span class="mi">0</span>
    <span class="k">case</span> <span class="kt">P</span> <span class="o">=</span> <span class="mi">1</span>
    <span class="k">case</span> <span class="kt">Q</span> <span class="o">=</span> <span class="mi">2</span>
    <span class="k">case</span> <span class="kt">R</span> <span class="o">=</span> <span class="mi">3</span>
    <span class="k">case</span> <span class="kt">S</span> <span class="o">=</span> <span class="mi">4</span>
    <span class="k">case</span> <span class="kt">T</span> <span class="o">=</span> <span class="mi">5</span>
    <span class="k">case</span> <span class="kt">U</span> <span class="o">=</span> <span class="mi">6</span>
    <span class="k">case</span> <span class="kt">V</span> <span class="o">=</span> <span class="mi">7</span>
    <span class="k">case</span> <span class="kt">W</span> <span class="o">=</span> <span class="mi">8</span>
    <span class="k">case</span> <span class="kt">X</span> <span class="o">=</span> <span class="mi">9</span>
    <span class="k">case</span> <span class="kt">Y</span> <span class="o">=</span> <span class="mi">10</span>
    <span class="k">case</span> <span class="kt">Z</span> <span class="o">=</span> <span class="mi">11</span>
<span class="p">}</span>
</code></pre></div></div>

<p>To create the two-dimensional array to represent the tiles but also to make the code nice and readable, I decided to do a reversal of the <code class="highlighter-rouge">description</code> method and have a <code class="highlighter-rouge">[String]</code> calculated variable which could be used to create the tiles:</p>

<div class="language-swift highlighter-rouge"><div class="highlight"><pre class="highlight"><code><span class="k">var</span> <span class="nv">stringMap</span><span class="p">:</span> <span class="p">[</span><span class="kt">String</span><span class="p">]</span> <span class="p">{</span>
        <span class="k">switch</span> <span class="k">self</span> <span class="p">{</span>
        <span class="k">case</span> <span class="kt">O</span><span class="p">:</span>
            <span class="k">return</span> <span class="p">[</span>
                <span class="s">"__#__"</span><span class="p">,</span>
                <span class="s">"__#__"</span><span class="p">,</span>
                <span class="s">"__#__"</span><span class="p">,</span>
                <span class="s">"__#__"</span><span class="p">,</span>
                <span class="s">"__#__"</span>
            <span class="p">]</span>
       <span class="o">...</span>
</code></pre></div></div>

<p>The initialiser then looks like this:</p>

<div class="language-swift highlighter-rouge"><div class="highlight"><pre class="highlight"><code><span class="kd">public</span> <span class="nf">init</span><span class="p">(</span><span class="nv">shape</span><span class="p">:</span> <span class="kt">Shapes</span><span class="p">)</span> <span class="p">{</span>
    <span class="n">rows</span> <span class="o">=</span> <span class="n">shape</span><span class="o">.</span><span class="n">stringMap</span><span class="o">.</span><span class="n">map</span> <span class="p">{</span>
        <span class="k">return</span> <span class="nv">$0</span><span class="o">.</span><span class="n">characters</span><span class="o">.</span><span class="n">map</span> <span class="p">{</span> <span class="nv">$0</span> <span class="o">==</span> <span class="s">"#"</span> <span class="p">}</span>
    <span class="p">}</span>
<span class="p">}</span>
</code></pre></div></div>

<p>And of course, I was going to get this up and running in a playground first. Why on earth not? This meant I could instantly see if I’d screwed anything up:</p>

<div class="language-swift highlighter-rouge"><div class="highlight"><pre class="highlight"><code><span class="k">let</span> <span class="nv">tile</span> <span class="o">=</span> <span class="kt">Tile</span><span class="p">(</span><span class="nv">shape</span><span class="p">:</span> <span class="o">.</span><span class="kt">O</span><span class="p">)</span>
<span class="nf">print</span><span class="p">(</span><span class="n">tile</span><span class="p">)</span>
</code></pre></div></div>

<p>Printing is a bit tedious, though, and when I add the <code class="highlighter-rouge">Tile</code> inline in the playground I get a fairly useless view with an outline list of unlabelled variables. That can be solved by making it <code class="highlighter-rouge">CustomPlaygroundQuickLookable</code>:</p>

<div class="language-swift highlighter-rouge"><div class="highlight"><pre class="highlight"><code><span class="kd">extension</span> <span class="kt">Tile</span><span class="p">:</span> <span class="kt">CustomPlaygroundQuickLookable</span> <span class="p">{</span>
    <span class="kd">public</span> <span class="kd">func</span> <span class="nf">customPlaygroundQuickLook</span><span class="p">()</span> <span class="o">-&gt;</span> <span class="kt">PlaygroundQuickLook</span> <span class="p">{</span>
        <span class="k">return</span> <span class="kt">PlaygroundQuickLook</span><span class="p">(</span><span class="nv">reflecting</span><span class="p">:</span> <span class="n">description</span><span class="p">)</span>
    <span class="p">}</span>
<span class="p">}</span>
</code></pre></div></div>

<p>Now the tile shows up clearly inline in the playground!</p>

<p>The final part to address about tiles was the rotation action. I set about solving this complex problem the way all programmers do - I searched for “Rotate 2D array” on Stack Overflow, which led me <a href="http://stackoverflow.com/a/8664879/852828">here</a>, and then <a href="http://stackoverflow.com/a/32922962/852828">here</a>. Putting this information together gave me a rotation method (<code class="highlighter-rouge">transpose</code> was copied wholesale from Abizer’s answer, so not reproduced here):</p>

<div class="language-swift highlighter-rouge"><div class="highlight"><pre class="highlight"><code><span class="kd">public</span> <span class="kd">func</span> <span class="nf">rotate</span><span class="p">(</span><span class="nv">clockwise</span><span class="p">:</span> <span class="kt">Bool</span><span class="p">)</span> <span class="p">{</span>  
    <span class="k">if</span> <span class="o">!</span><span class="n">clockwise</span> <span class="p">{</span>
        <span class="nf">reverseRows</span><span class="p">()</span>
    <span class="p">}</span>
    <span class="n">rows</span> <span class="o">=</span> <span class="nf">transpose</span><span class="p">(</span><span class="n">rows</span><span class="p">)</span>
    <span class="k">if</span> <span class="n">clockwise</span> <span class="p">{</span>
        <span class="nf">reverseRows</span><span class="p">()</span>
    <span class="p">}</span>
<span class="p">}</span>
<span class="kd">private</span> <span class="kd">func</span> <span class="nf">reverseRows</span><span class="p">()</span> <span class="p">{</span>
    <span class="n">rows</span> <span class="o">=</span> <span class="n">rows</span><span class="o">.</span><span class="n">map</span> <span class="p">{</span> <span class="nv">$0</span><span class="o">.</span><span class="nf">reverse</span><span class="p">()</span> <span class="p">}</span>
<span class="p">}</span>
</code></pre></div></div>

<p>Thanks to the quick looking in the playground it was easy to check that this was working as intended. That was tiles all done. The <a href="http://commandshift.co.uk/blog/2016/06/08/pentominoes-part-two/">next part of the series</a> will talk about the board.</p>
]]></content>
  </entry>
  
  <entry>
    <title type="html"><![CDATA[What is the Apple Watch good for?]]></title>
    <link href="http://commandshift.co.uk/blog/2016/04/17/what-is-the-apple-watch-good-for/"/>
    <updated>2016-04-17T00:00:00+00:00</updated>
    <id>http://commandshift.co.uk/blog/2016/04/17/what-is-the-apple-watch-good-for</id>
    <content type="html"><![CDATA[<p>I wrote <a href="http://martiancraft.com/blog/2016/04/apple-watch-good/">an article</a> for the MartianCraft blog about the Apple Watch, and what makes a good or bad watch experience.</p>
]]></content>
  </entry>
  
  <entry>
    <title type="html"><![CDATA[Understanding UISplitViewController]]></title>
    <link href="http://commandshift.co.uk/blog/2016/04/11/understanding-split-view-controller/"/>
    <updated>2016-04-11T00:00:00+00:00</updated>
    <id>http://commandshift.co.uk/blog/2016/04/11/understanding-split-view-controller</id>
    <content type="html"><![CDATA[<p>Over the last few releases of iOS, things got complicated. First, we were able to share storyboards between iPad and iPhone projects, thanks to autolayout and size classes. Next, it turned out that iPad apps could be shrunken down to iPhone size, stretched out and shrunk back again during multitasking. Apps had to adapt themselves to different sizes at runtime, making sure that they displayed relevant content, appropriate to the current size.</p>

<p>Apple’s solution to this is <code class="highlighter-rouge">UISplitViewController</code>. On the iPad, this maintains a two-column interface, with a smaller “primary” or “master” view controller on the leading side, and a larger “secondary” or “detail” view controller on the trailing side. On the iPhone, only one view controller is visible. Before multitasking, developers could get away with copy-pasting a delegate method from the template code, maybe checking <code class="highlighter-rouge">UIUserInterfaceIdiom</code> in a few places, and the split view would work nicely on both devices without anyone having to think too much. Since multitasking, more thinking is required.</p>

<!--more-->

<h2 id="collapse-into-now">Collapse into now</h2>

<p>The split view controller has a Boolean property, <code class="highlighter-rouge">collapsed</code>, which indicates which state it is in. The <code class="highlighter-rouge">collapsed</code> state is determined from the horizontal size class currently being used:</p>

<table>
  <thead>
    <tr>
      <th style="text-align: center">Device</th>
      <th style="text-align: center">Orientation</th>
      <th style="text-align: center">Multitasking state</th>
      <th style="text-align: center">Horizontal Size Class</th>
      <th style="text-align: center">Collapsed</th>
    </tr>
  </thead>
  <tbody>
    <tr>
      <td style="text-align: center">iPad</td>
      <td style="text-align: center">All</td>
      <td style="text-align: center">Full Screen</td>
      <td style="text-align: center"><code class="highlighter-rouge">.Regular</code></td>
      <td style="text-align: center"><code class="highlighter-rouge">false</code></td>
    </tr>
    <tr>
      <td style="text-align: center">iPad</td>
      <td style="text-align: center">Landscape</td>
      <td style="text-align: center">2/3</td>
      <td style="text-align: center"><code class="highlighter-rouge">.Regular</code></td>
      <td style="text-align: center"><code class="highlighter-rouge">false</code></td>
    </tr>
    <tr>
      <td style="text-align: center">iPad</td>
      <td style="text-align: center">Landscape</td>
      <td style="text-align: center">1/2</td>
      <td style="text-align: center"><code class="highlighter-rouge">.Compact</code></td>
      <td style="text-align: center"><code class="highlighter-rouge">true</code></td>
    </tr>
    <tr>
      <td style="text-align: center">iPad Pro</td>
      <td style="text-align: center">Landscape</td>
      <td style="text-align: center">1/2</td>
      <td style="text-align: center"><code class="highlighter-rouge">.Regular</code></td>
      <td style="text-align: center"><code class="highlighter-rouge">false</code> (acts like portrait orientation)</td>
    </tr>
    <tr>
      <td style="text-align: center">iPad</td>
      <td style="text-align: center">Landscape</td>
      <td style="text-align: center">1/3</td>
      <td style="text-align: center"><code class="highlighter-rouge">.Compact</code></td>
      <td style="text-align: center"><code class="highlighter-rouge">true</code></td>
    </tr>
    <tr>
      <td style="text-align: center">iPad</td>
      <td style="text-align: center">Portrait</td>
      <td style="text-align: center">Split</td>
      <td style="text-align: center"><code class="highlighter-rouge">.Compact</code></td>
      <td style="text-align: center"><code class="highlighter-rouge">true</code></td>
    </tr>
    <tr>
      <td style="text-align: center">iPhone 6 Plus</td>
      <td style="text-align: center">Landscape</td>
      <td style="text-align: center">-</td>
      <td style="text-align: center"><code class="highlighter-rouge">.Regular</code></td>
      <td style="text-align: center"><code class="highlighter-rouge">false</code></td>
    </tr>
    <tr>
      <td style="text-align: center">iPhone 6 Plus</td>
      <td style="text-align: center">Portrait</td>
      <td style="text-align: center">-</td>
      <td style="text-align: center"><code class="highlighter-rouge">.Compact</code></td>
      <td style="text-align: center"><code class="highlighter-rouge">true</code></td>
    </tr>
    <tr>
      <td style="text-align: center">Other iPhones</td>
      <td style="text-align: center">Any</td>
      <td style="text-align: center">-</td>
      <td style="text-align: center"><code class="highlighter-rouge">.Compact</code></td>
      <td style="text-align: center"><code class="highlighter-rouge">true</code></td>
    </tr>
  </tbody>
</table>

<p></p>
<p>When a split view controller is born, it assumes it is in a non-collapsed state. When it is added to the window, if running in a <code class="highlighter-rouge">.Compact</code> horizontal size class, it collapses. If the user rotates their iPhone 6 Plus or changes multitasking mode in their iPad (or rotates their iPad whilst multitasking, the list of testing scenarios goes on and on…) it can transition between the expanded and collapsed states.</p>

<p>The transition between collapsed and expanded states involves several actors, and requires quite a lot of spelunking through the documentation to understand, so I’ve done that for you. Let’s start with collapsing.</p>

<h2 id="till-i-collapse">‘Till I Collapse</h2>

<p>First, the split view talks to its delegate. It calls <code class="highlighter-rouge">primaryViewControllerForCollapsingSplitViewController(_:)</code>, which may return a view controller. You would implement this if a completely new view controller was more appropriate to use than the exisiting primary view controller.</p>

<p>After that, the split view controller calls <code class="highlighter-rouge">splitViewController(_:collapseSecondaryViewController: ontoPrimaryViewController:)</code> on its delegate. This is the method that’s included in the master-detail sample project. It returns a <code class="highlighter-rouge">Boolean</code>.</p>

<p>The split view controller is asking the delegate to do the collapsing for it, and the return value indicates if the delegate has handled the collapse or not. With that in mind, the answer returned means the following:</p>

<ul>
  <li><code class="highlighter-rouge">true</code>: this tells the split view controller not to do anything with the secondary view controller, because the delegate has handled it. In the template project, it’s “handled” by doing nothing, so the secondary controller is discarded. If you have additional requirements you would use this opportunity to configure the primary controller based on the contents of the secondary controller, perhaps to show an expanded table row for the content that was previously displayed in the secondary controller.</li>
  <li><code class="highlighter-rouge">false</code>: this tells the split view controller that the delegate has <em>not</em> handled the collapse, and the split view controller itself needs to do some work.</li>
</ul>

<p>Whatever you return from this method, the secondary view controller is going away very soon.</p>

<p>If the method above returns <code class="highlighter-rouge">false</code> or is not implemented, then that means the split view controller will attempt to perform the collapse itself.</p>

<p>It does this by calling <code class="highlighter-rouge">collapseSecondaryViewController(_:forSplitViewController:)</code> on the primary view controller. This method is implemented by <code class="highlighter-rouge">UIViewController</code> but nothing is really done there. <code class="highlighter-rouge">UINavigationController</code> overrides this method and will take the secondary view controller and add it to the top of the navigation stack.</p>

<p>Here’s a diagram showing the flow of operations when collapsing:</p>

<p class="center-image"><img src="/images/split/collapsing.png" alt="Flow chart of collapsing process" /></p>

<p>This can be where things get strange. In the template project, the primary and secondary view controllers are both navigation controllers. After collapse, if you investigate the view controller stack, it looks like this:</p>

<ul>
  <li>Split View Controller (root)
    <ul>
      <li>Navigation Controller (primary)
        <ul>
          <li>Primary Content view controller</li>
          <li>Navigation Controller (secondary)
            <ul>
              <li>Secondary Content view controller</li>
            </ul>
          </li>
        </ul>
      </li>
    </ul>
  </li>
</ul>

<p>This doesn’t seem right to me. If you try to push a navigation controller onto a navigation stack, you get an exception. Why is it allowed in this case? If you ask the secondary content view controller for its navigation controller, you get the secondary one, likewise for the navigation bar, which isn’t even on the screen. Any queries about the navigation stack may reveal unexpected answers. <em>Most</em> things seem to work OK, there must be some private UIKit message passing going on in the background, but if you’re experiencing problems with your adaptive app, the wonky navigation stack is worth looking at.</p>

<p>You can straighten things out, either in the split view delegate:</p>

<div class="language-swift highlighter-rouge"><div class="highlight"><pre class="highlight"><code><span class="k">if</span> <span class="k">let</span> 
  <span class="nv">primaryNav</span> <span class="o">=</span> <span class="n">primaryViewController</span> <span class="k">as?</span> <span class="kt">UINavigationController</span><span class="p">,</span>
  <span class="n">secondaryNav</span> <span class="o">=</span> <span class="n">secondaryViewController</span> <span class="k">as?</span> <span class="kt">UINavigationController</span> <span class="p">{</span>
    <span class="n">primaryNav</span><span class="o">.</span><span class="n">viewControllers</span> <span class="o">=</span> <span class="n">primaryNav</span><span class="o">.</span><span class="n">viewControllers</span> <span class="o">+</span> <span class="n">secondaryNav</span><span class="o">.</span><span class="n">viewControllers</span>
    <span class="k">return</span> <span class="kc">true</span>
<span class="p">}</span>
</code></pre></div></div>
<p>Or in a navigation controller subclass:</p>

<div class="language-swift highlighter-rouge"><div class="highlight"><pre class="highlight"><code><span class="k">override</span> <span class="kd">func</span> <span class="nf">collapseSecondaryViewController</span><span class="p">(</span><span class="nv">secondaryViewController</span><span class="p">:</span> <span class="kt">UIViewController</span><span class="p">,</span> <span class="n">forSplitViewController</span> <span class="nv">splitViewController</span><span class="p">:</span> <span class="kt">UISplitViewController</span><span class="p">)</span> <span class="p">{</span>
  <span class="k">if</span> <span class="k">let</span> <span class="nv">secondaryAsNav</span> <span class="o">=</span> <span class="n">secondaryViewController</span> <span class="k">as?</span> <span class="kt">UINavigationController</span> <span class="p">{</span>
    <span class="n">viewControllers</span> <span class="o">=</span> <span class="n">viewControllers</span> <span class="o">+</span> <span class="n">secondaryAsNav</span><span class="o">.</span><span class="n">viewControllers</span>
  <span class="p">}</span> <span class="k">else</span> <span class="p">{</span>
    <span class="k">super</span><span class="o">.</span><span class="nf">collapseSecondaryViewController</span><span class="p">(</span><span class="n">secondaryViewController</span><span class="p">,</span> <span class="nv">forSplitViewController</span><span class="p">:</span> <span class="n">splitViewController</span><span class="p">)</span>
  <span class="p">}</span>
<span class="p">}</span>
</code></pre></div></div>

<p>All you’re doing here is taking the view controller stack from the secondary navigation controller, and adding it in to the stack of the primary controller. Note that if you do this, <strong>you’re also responsible for splitting the stack on expand, and wrapping the secondary stack in a new navigation controller</strong>.</p>

<p>Here’s a representation of what each version looks like:</p>

<p class="center-image"><img src="/images/split/hierarchy.png" alt="Diagram showing different ways of collapsing navigation stacks" /></p>

<p>That’s enough collapsing. Time to look at expanding.</p>

<h2 id="expand-your-mind">Expand your mind</h2>

<p>As with collapsing, first the split view controller talks to its delegate, calling <code class="highlighter-rouge">primaryViewControllerForExpandingSplitViewController(_:)</code>. This is your opportunity to provide an entirely new view controller to be on the primary side. If this is not implemented or you return <code class="highlighter-rouge">nil</code>, the existing primary view controller will be used. If you implemented the corresponding method called during collapse, you probably want to reverse whatever you did there.</p>

<p>To tease apart the primary and secondary view controllers, the <code class="highlighter-rouge">splitViewController(_:separateSecondaryViewControllerFromPrimaryViewController:)</code> delegate method is then called. This method returns a <code class="highlighter-rouge">UIViewController?</code>; if you return something, it will be the new secondary controller. If you don’t, the split view controller will try to handle the separation itself. If you manually combined navigation stacks in the delegate method when collapsing, you will need to separate them yourself at this point, and create a new navigation controller for the secondary view controller.</p>

<p>If you return <code class="highlighter-rouge">nil</code> from this method or do not implement it, the split view controller tries to handle the separation itself by calling <code class="highlighter-rouge">separateSecondaryViewControllerForSplitViewController(_:)</code> on the primary view controller. Like the corresponding collapse method, this is implemented as (presumably) a stub on <code class="highlighter-rouge">UIViewController</code>. <code class="highlighter-rouge">UINavigationController</code> overrides this method and will return the top view controller from its navigation stack. If you recall the discussion in the collapse section, this will be itself a navigation controller, if you’re using the unmodified template code.</p>

<p>Here’s a diagram showing the flow of operations when expanding:</p>

<p class="center-image"><img src="/images/split/expanding.png" alt="Flow chart of collapsing process" /></p>

<h2 id="the-size-class-of-a-cow">The size (class) of a cow</h2>

<p>In normal use the split view controller will pass its own horizontal size class to the secondary view controller, and a horizontal size class of <code class="highlighter-rouge">.Compact</code> to the primary view controller.</p>

<p>This means that <code class="highlighter-rouge">traitCollectionDidChange</code> will <em>not</em> indicate a change in horizontal size class on the primary view controller when the iPhone 6 Plus is rotated, nor will you be able to use the horizontal size class of the primary view controller to implement platform-specific behaviour.</p>

<p>If you want the primary view controller to hold the same horizontal size class as the split view controller itself for whatever reason, you can implement <code class="highlighter-rouge">overrideTraitCollectionForChildViewController(_:)</code> in a split view controller subclass:</p>

<div class="language-swift highlighter-rouge"><div class="highlight"><pre class="highlight"><code><span class="k">override</span> <span class="kd">func</span> <span class="nf">overrideTraitCollectionForChildViewController</span><span class="p">(</span><span class="nv">childViewController</span><span class="p">:</span> <span class="kt">UIViewController</span><span class="p">)</span> <span class="o">-&gt;</span> <span class="kt">UITraitCollection</span><span class="p">?</span> <span class="p">{</span>
    <span class="k">guard</span> <span class="k">let</span> <span class="nv">collection</span> <span class="o">=</span> <span class="k">super</span><span class="o">.</span><span class="nf">overrideTraitCollectionForChildViewController</span><span class="p">(</span><span class="n">childViewController</span><span class="p">)</span> <span class="k">else</span> <span class="p">{</span> <span class="k">return</span> <span class="kc">nil</span> <span class="p">}</span>
    <span class="k">let</span> <span class="nv">overrideCollection</span> <span class="o">=</span> <span class="kt">UITraitCollection</span><span class="p">(</span><span class="nv">horizontalSizeClass</span><span class="p">:</span> <span class="k">self</span><span class="o">.</span><span class="n">traitCollection</span><span class="o">.</span><span class="n">horizontalSizeClass</span><span class="p">)</span>
    <span class="k">return</span> <span class="kt">UITraitCollection</span><span class="p">(</span><span class="nv">traitsFromCollections</span><span class="p">:</span> <span class="p">[</span><span class="n">collection</span><span class="p">,</span> <span class="n">overrideCollection</span><span class="p">])</span>
<span class="p">}</span>
</code></pre></div></div>

<h2 id="split-personality">Split personality</h2>

<p>This post should have clarified your understanding of the expanding and collapsing process that occurs with a split view controller, its delegate and its primary view controller. You should have additional insight into things that might be giving you problems, and some useful leads on how to fix those problems.</p>

]]></content>
  </entry>
  
  <entry>
    <title type="html"><![CDATA[Notes on WatchKit]]></title>
    <link href="http://commandshift.co.uk/blog/2016/03/24/notes-on-watchkit/"/>
    <updated>2016-03-24T00:00:00+00:00</updated>
    <id>http://commandshift.co.uk/blog/2016/03/24/notes-on-watchkit</id>
    <content type="html"><![CDATA[<p>I recently completed a project involving a WatchKit app. It was not a pleasant experience, so here’s a screed of vague complaints with some half-baked possible solutions, and a possible ray of sunshine at the end.</p>

<!--more-->

<h2 id="tools-and-hardware">Tools and hardware</h2>

<p>The simulator seems unreliable at connecting to the phone simulator and the debugger. In this respect it is an accurate simulator.</p>

<p>Installing and debugging on the watch is a painful experience. Communication is over Bluetooth, via a connected phone. Swift watch apps have a minimum footprint of around 7MB due to inclusion of the standard libraries, so installation takes a while, if it works at all. If you’re not interested in debugging, it’s often more reliable to build and install the phone app, then use the Watch app to install the watch app, which is not an easy sentence to read.</p>

<p>You can’t wait for the app to launch, like you can with phones, so debugging the arrival of notifications or startup issues is not possible. That’s a shame, because the arrival of notifications and app startup is a fraught and bug-prone process.</p>

<p>Very often the debugger will fail to attach to the process or claim it has finished running the app. The usual dance of restarts seems to fix this, but the key to success seems to be that you need the “Trust this computer?” dialogue to show up <em>on the watch</em>. After that, you’re usually ok.</p>

<p>Because of the slow communication round trip, breakpoints and debugger commands can take some time to execute. The watch also has chronic logorrhoea, if you look at the devices tab in Xcode, which can make tracking issues by console logging (because you can’t wait for the app to launch…) something of a filtering exercise.</p>

<p>All of this is very hard work on the watch, which is a tiny device not designed for long periods of heavy Bluetooth and screen use. This means the battery will die rather quickly. You could put it on the charger, but then you have to enter the PIN every time to unlock the device. You could remove the PIN, but then goodbye Apple Pay. You could buy a development watch, but there’s no economic incentive to develop a watch app since they come “free” with your iOS app.</p>

<p>Solution? Some sort of developer dock which charges <em>and</em> keeps the device unlocked? Bonus points if it enables direct communication as well.</p>

<h2 id="sdk">SDK</h2>

<p>WatchKit seems very stuck with the limitations from watchOS 1 - write-only access to most UI elements being the most glaring one. That didn’t seem to present too much of an issue. The following things did trip me up; they’re mentioned in the documentation but perhaps not in big enough writing:</p>

<ul>
  <li><code class="highlighter-rouge">WCSession</code> messages are <em>always</em> handled on a background thread. If you’re making UI changes in response to them, you have to dispatch to the main thread.</li>
  <li>UI updates are ignored if the interface controller is not active. If you are updating UI in response to messages or network calls or something else you don’t control the timing of, you may need to maintain some separate state and update your UI when that changes, and again when the interface controller activates.</li>
  <li>For navigation-based interfaces there is no non-animated update to the navigation stack, which can make some UI updates jarring.</li>
  <li>Shared user defaults and core data storage disappeared with watchOS 2. You are responsible for shuttling data back and forth using <code class="highlighter-rouge">WCSession</code>, which can be quite tiresome.</li>
</ul>

<p>None of the above are impossible to surmount, except the non-animated navigation stack. Overall the SDK reflects well the limitations of the device, from a capability and UX perspective. I expect improvements for watchOS 3, and will be interested to see what the next generation of devices are like.</p>

<h2 id="bugs">Bugs</h2>

<p><a href="http://openradar.me/25214443">The major bug encountered</a> was due to app startup in response to a notification being tapped. A lot of time was burnt on this, because the watch app does some interesting things on startup which we assumed were being done wrong, until we realised it was a simple matter of tapping the notification too quickly.</p>

<p>Even if that bug didn’t exist, app launching is painfully slow, and must be the major factor preventing the use of third party apps.</p>

<h2 id="good-things">Good things</h2>

<p>The best things, by a country mile, are the dynamic notifications. This allows you to build a custom UI to display in response to a notification. Since notifications are undoubtedly the watch’s “killer app”, this had to be good, and it is. The following things would be even nicer:</p>

<ul>
  <li>Dynamic notifications without the requirement for an actual watch app. 100% of the time I just read a notification and either dismiss it or hit one of the actions (usually to delete an email or like a tweet). I don’t need to open an app on the watch, with all the waiting and the limited UI, and developers of apps that have interesting notifications but no need for a watch app should be able to take advantage.</li>
  <li>Dynamic notifications on iOS. Having seen what’s possible on the watch, showing a bit of text and some buttons seems terribly limited now.</li>
</ul>

<h2 id="lessons">Lessons</h2>

<p>Apple say that you should expect interactions with watch apps to be measured in seconds. Assuming they’re not counting the seconds spent waiting for the app to start, this is true. Nobody wants to spend time prodding at a tiny screen whilst holding their arm up awkwardly.</p>

<p>The third party apps I use on the watch are:</p>

<ul>
  <li>Runkeeper</li>
  <li>Omnifocus (rarely)</li>
</ul>

<p>I have several more installed, but day-to-day I simply don’t use them. I use <em>lots</em> of notification actions, though.</p>

<p>Your watch app should deliver the absolute minimum useful level of functionality (or, it should not exist - that is a valid choice and correct in most cases!). Think very carefully before adding navigation stacks, master-detail interfaces and the like. They’re not nice to write, and not nice to use.</p>

<p>Start with a single screen. And in most cases, stop right there.</p>
]]></content>
  </entry>
  
  <entry>
    <title type="html"><![CDATA[Better snapshots]]></title>
    <link href="http://commandshift.co.uk/blog/2016/03/13/better-snapshots/"/>
    <updated>2016-03-13T20:00:03+00:00</updated>
    <id>http://commandshift.co.uk/blog/2016/03/13/better-snapshots</id>
    <content type="html"><![CDATA[<p>In my talk at <a href="http://rwdevcon.com">RWDevCon 2016</a> I described a way to handle custom view controller transitions in a way that didn’t lead to messing up your view controllers and leaving yourself with a lot of horrible cleanup code.</p>

<p>The secret to painless custom transitions is to do a lot of snapshots. In the talk I mentioned some utility methods for making snapshots, but there wasn’t time in the session to cover the details. Instead, I’ve written about them here.</p>

<!--more-->

<p>A sensible view controller transition doesn’t move, fade or otherwise manipulate any of the view controller’s views. That way lies madness. The correct way to handle them is:</p>

<ul>
  <li>Create a canvas view, which fills the container view of the transition context</li>
  <li>Snapshot everything you’re interested in moving</li>
  <li>Move the snapshots around, then animate them to their final positions</li>
  <li>Remove the canvas when you’re done</li>
</ul>

<p>This has numerous advantages:</p>

<ul>
  <li>No cleanup code or resetting of view properties</li>
  <li>You can take advantage of autolayout in your view controllers, but move the snapshots around by animating the <code class="highlighter-rouge">center</code> property, which makes much more sense when doing transitions and means you don’t need outlets to all your constraints</li>
  <li>Keeps the view controller very loosely coupled to the transition</li>
</ul>

<p>Making a snapshot from a UIView is simple and fast:</p>

<div class="language-swift highlighter-rouge"><div class="highlight"><pre class="highlight"><code><span class="k">let</span> <span class="nv">snapshot</span> <span class="o">=</span> <span class="n">view</span><span class="o">.</span><span class="nf">snapshotViewAfterScreenUpdates</span><span class="p">(</span><span class="kc">false</span><span class="p">)</span>
</code></pre></div></div>

<p>The resulting view has the same <code class="highlighter-rouge">bounds</code> as the original, but has a frame origin at zero, which is usually useless.</p>

<p>For transitions, what is usually required is for the snapshot to be added to the canvas view, at the same position on the screen. This is done with an extension on <code class="highlighter-rouge">UIView</code>:</p>

<div class="language-swift highlighter-rouge"><div class="highlight"><pre class="highlight"><code><span class="kd">func</span> <span class="nf">snapshotView</span><span class="p">(</span><span class="nv">view</span><span class="p">:</span> <span class="kt">UIView</span><span class="p">,</span> <span class="nv">afterUpdates</span><span class="p">:</span> <span class="kt">Bool</span><span class="p">)</span> <span class="o">-&gt;</span> <span class="kt">UIView</span> <span class="p">{</span>
    <span class="k">let</span> <span class="nv">snapshot</span> <span class="o">=</span> <span class="n">view</span><span class="o">.</span><span class="nf">snapshotViewAfterScreenUpdates</span><span class="p">(</span><span class="n">afterUpdates</span><span class="p">)</span>
    <span class="k">self</span><span class="o">.</span><span class="nf">addSubview</span><span class="p">(</span><span class="n">snapshot</span><span class="p">)</span>
    <span class="n">snapshot</span><span class="o">.</span><span class="n">frame</span> <span class="o">=</span> <span class="nf">convertRect</span><span class="p">(</span><span class="n">view</span><span class="o">.</span><span class="n">bounds</span><span class="p">,</span> <span class="nv">fromView</span><span class="p">:</span> <span class="n">view</span><span class="p">)</span>
    <span class="k">return</span> <span class="n">snapshot</span>
<span class="p">}</span>
</code></pre></div></div>

<p>You call the function like this:</p>

<div class="language-swift highlighter-rouge"><div class="highlight"><pre class="highlight"><code><span class="k">let</span> <span class="nv">snapshot</span> <span class="o">=</span> <span class="n">canvas</span><span class="o">.</span><span class="nf">snapshotView</span><span class="p">(</span><span class="n">view</span><span class="p">,</span> <span class="nv">afterUpdates</span><span class="p">:</span> <span class="kc">false</span><span class="p">)</span>
</code></pre></div></div>

<p>For an array of views, another method in the extension:</p>

<div class="language-swift highlighter-rouge"><div class="highlight"><pre class="highlight"><code><span class="kd">func</span> <span class="nf">snapshotViews</span><span class="p">(</span><span class="nv">views</span><span class="p">:</span> <span class="p">[</span><span class="kt">UIView</span><span class="p">],</span> <span class="nv">afterUpdates</span><span class="p">:</span> <span class="kt">Bool</span><span class="p">)</span> <span class="o">-&gt;</span> <span class="p">[</span><span class="kt">UIView</span><span class="p">]</span> <span class="p">{</span>
    <span class="k">return</span> <span class="n">views</span><span class="o">.</span><span class="n">map</span> <span class="p">{</span> <span class="nf">snapshotView</span><span class="p">(</span><span class="nv">$0</span><span class="p">,</span> <span class="nv">afterUpdates</span><span class="p">:</span> <span class="n">afterUpdates</span><span class="p">)</span> <span class="p">}</span>
<span class="p">}</span>
</code></pre></div></div>

<p>Snapshotting is so common and so useful when doing transitions, and these extension methods make your transition code much more readable and obvious.</p>

<p>The full source is here:</p>

<script src="https://gist.github.com/jrturton/76d71410d6dc7a643def.js"></script>

]]></content>
  </entry>
  
  <entry>
    <title type="html"><![CDATA[Dealing with web services]]></title>
    <link href="http://commandshift.co.uk/blog/2015/09/23/dealing-with-web-services/"/>
    <updated>2015-09-23T00:00:00+00:00</updated>
    <id>http://commandshift.co.uk/blog/2015/09/23/dealing-with-web-services</id>
    <content type="html"><![CDATA[<p>A major difference between making your own apps and making apps for others as a contractor or “professional” developer (a common step as people move from hobbyist or indie developers to perhaps more lucrative work) will be the web services you’re asked to interact with.</p>

<p>Nobody’s going to pay you to make a Flickr or Twitter client, which is inconvenient because that’s what most of the online examples seem to use. If you’ve never written code that interacts with a web API before, it’s hard to approach these things with confidence, especially if you’re expected to talk to the developers of that API to work out any issues, and if those APIs are being written and rewritten in parallel with the development of the app.</p>

<p>In this article I’m going to go over the basics of your networking code. I’m going to assume you’re working with an API from this century so we’re talking about JSON and REST<sup id="fnref:rest"><a href="#fn:rest" class="footnote">1</a></sup>. If you’re hearing terms like SOAP from your web people then <em>run away</em>.</p>

<!--more-->

<h2 id="structure">Structure</h2>

<p>You interact with a web API the same way you interact with the web when browsing: via a URL. Here’s one:</p>

<p>https://api.staging.example.com/widgets/details?id=123456</p>

<p>And here’s a breakdown of what each part means, and is called:</p>

<ul>
  <li><strong>https://</strong> - this is the <strong>scheme</strong>. For most services this will be <code class="highlighter-rouge">https</code>, but sometimes the staging server will run <code class="highlighter-rouge">http</code>. This makes it easier to debug and cheaper to run (since you don’t need a certificate and the traffic is unencrypted). The production server should really be running https. As of iOS9, any requests to <code class="highlighter-rouge">http</code> endpoints will fail unless you whitelist them as App Transport Security exceptions.</li>
  <li><strong>api.staging.example.com</strong> - this is the <strong>domain</strong>. You’d expect different values here to point to different servers (live, testing etc). When coupled with the scheme it is referred to as the <strong>base URL</strong>. Usually  this value is switched out depending on your build settings, so you can make builds targeting different servers without having to change your code.</li>
  <li><strong>/widgets/</strong> - this is the <strong>path</strong>. It should be a sensible, human-readable string or strings, separated by <code class="highlighter-rouge">/</code> characters, giving you some idea of the part of the API you’re talking to.</li>
  <li><strong>details</strong> - this is the <strong>endpoint</strong>. This describes exactly what you’re asking (or telling) the API - it’s like the method name.</li>
  <li><strong>?id=123456</strong> - this is the <strong>query string</strong>. It’s like the parameters of the method that you’re calling.</li>
</ul>

<p>So the URL above is asking, <strong>securely</strong>, for the <strong>details</strong> of the <strong>widget</strong> with <strong>id 123456</strong> from the <strong>staging</strong> server at <strong>example.com</strong>. There’s a lot of information in that URL!</p>

<h2 id="get-and-post">GET and POST</h2>

<p>You’ll use these two types of requests. Which one is at the discretion of the people writing the web services, but as a general rule, it’s usually GET unless you’re uploading some data, like an image file. It’s possible (though not recommended) for a GET request to be used to update the server, so the distinction isn’t black and white.</p>

<h2 id="building-a-url">Building a URL</h2>

<p>You’ve seen all the components of a typical web service URL. How do you go about building them in code? If you’re thinking “<em>stick a bunch of strings together and create an <code class="highlighter-rouge">NSURL</code></em>” then this is exactly the article for you.</p>

<p>Using strings is a bad idea. If you have a format string like <code class="highlighter-rouge">?this=%@&amp;that=%@</code>followed by a comma-delimited list of string variables, that is unreadable, unmaintainable code. Not only that, if your user has entered some of that data you’re going to <em>break the internet</em><sup id="fnref:break"><a href="#fn:break" class="footnote">2</a></sup> if they’ve entered an ampersand or an equals or one of the several other characters that URLs use for structure rather than content.</p>

<p>There is a <em>nice</em> way to build up a URL. It’s called <code class="highlighter-rouge">NSURLComponents</code>. This class breaks down all the various parts of a URL into properties, allowing you to read or assign them one by one. You can get the full URL out at any point:</p>

<div class="language-swift highlighter-rouge"><div class="highlight"><pre class="highlight"><code><span class="c1">// Create from base URL</span>
<span class="k">let</span> <span class="nv">components</span> <span class="o">=</span> <span class="kt">NSURLComponents</span><span class="p">(</span><span class="nv">string</span><span class="p">:</span> <span class="s">"http://api.example.com"</span><span class="p">)</span><span class="o">!</span>
<span class="c1">// components.URL is http://api.example.com</span>

<span class="c1">//  Add path</span>
<span class="n">components</span><span class="o">.</span><span class="n">path</span> <span class="o">=</span> <span class="s">"/widgets/details"</span>
<span class="c1">// components.URL is http://api.example.com/widgets/details</span>

<span class="c1">// Create query items</span>
<span class="k">let</span> <span class="nv">queryItem</span> <span class="o">=</span> <span class="kt">NSURLQueryItem</span><span class="p">(</span><span class="nv">name</span><span class="p">:</span> <span class="s">"id"</span><span class="p">,</span> <span class="nv">value</span><span class="p">:</span> <span class="s">"123456"</span><span class="p">)</span>
<span class="n">components</span><span class="o">.</span><span class="n">queryItems</span> <span class="o">=</span> <span class="p">[</span><span class="n">queryItem</span><span class="p">]</span>
<span class="c1">// components.URL is http://api.example.com/widgets/details?id=123456</span>

<span class="k">let</span> <span class="nv">sillyItem</span> <span class="o">=</span> <span class="kt">NSURLQueryItem</span><span class="p">(</span><span class="nv">name</span><span class="p">:</span> <span class="s">"escape"</span><span class="p">,</span> <span class="nv">value</span><span class="p">:</span> <span class="s">"?&amp;-="</span><span class="p">)</span>
<span class="n">components</span><span class="o">.</span><span class="n">queryItems</span> <span class="o">=</span> <span class="p">[</span><span class="n">queryItem</span><span class="p">,</span> <span class="n">sillyItem</span><span class="p">]</span>
<span class="c1">//components.URL is http://api.example.com/widgets/details?id=123456&amp;escape=?%26-%3D</span>
</code></pre></div></div>

<h2 id="making-a-request">Making a request</h2>

<p>I’m going to be bold here and say that you don’t need to use a third party networking component. The Foundation networking classes are good enough for most purposes since the change to <code class="highlighter-rouge">NSURLSession</code>. Any wrappers around this do little more than obscure your knowledge of how those classes are doing their jobs.</p>

<p>I’m not going to go into the full details of how to use <code class="highlighter-rouge">NSURLSession</code> here, but this playground code should give you some idea of how simple it is:</p>

<div class="language-swift highlighter-rouge"><div class="highlight"><pre class="highlight"><code><span class="kd">import</span> <span class="kt">Foundation</span>
<span class="kd">import</span> <span class="kt">XCPlayground</span>

<span class="kt">XCPSetExecutionShouldContinueIndefinitely</span><span class="p">(</span><span class="kc">true</span><span class="p">)</span>

<span class="k">let</span> <span class="nv">letters</span> <span class="o">=</span> <span class="kt">NSURL</span><span class="p">(</span><span class="nv">string</span><span class="p">:</span> <span class="s">"http://private-8f863-commandshift.apiary-mock.com/letters"</span><span class="p">)</span><span class="o">!</span>

<span class="k">let</span> <span class="nv">request</span> <span class="o">=</span> <span class="kt">NSMutableURLRequest</span><span class="p">(</span><span class="kt">URL</span><span class="p">:</span> <span class="n">letters</span><span class="p">)</span>
<span class="k">let</span> <span class="nv">session</span> <span class="o">=</span> <span class="kt">NSURLSession</span><span class="o">.</span><span class="nf">sharedSession</span><span class="p">()</span>
<span class="k">let</span> <span class="nv">task</span> <span class="o">=</span> <span class="n">session</span><span class="o">.</span><span class="nf">dataTaskWithRequest</span><span class="p">(</span><span class="n">request</span><span class="p">)</span> <span class="p">{</span>
    <span class="p">(</span><span class="n">data</span><span class="p">,</span> <span class="n">response</span><span class="p">,</span> <span class="n">error</span><span class="p">)</span> <span class="k">in</span>
    
    <span class="k">if</span> <span class="k">let</span> <span class="nv">error</span> <span class="o">=</span> <span class="n">error</span> <span class="p">{</span>
        <span class="n">error</span>
        <span class="k">return</span>
    <span class="p">}</span>
    
    <span class="k">guard</span> <span class="k">let</span> <span class="nv">response</span> <span class="o">=</span> <span class="n">response</span> <span class="k">as?</span> <span class="kt">NSHTTPURLResponse</span>  <span class="k">else</span> <span class="p">{</span> <span class="k">return</span> <span class="p">}</span>
    <span class="k">guard</span> <span class="n">response</span><span class="o">.</span><span class="n">statusCode</span> <span class="o">==</span> <span class="mi">200</span> <span class="k">else</span> <span class="p">{</span>
        <span class="nf">print</span><span class="p">(</span><span class="s">"Status </span><span class="se">\(</span><span class="n">response</span><span class="o">.</span><span class="n">statusCode</span><span class="se">)</span><span class="s"> returned"</span><span class="p">)</span>
        <span class="k">return</span>
    <span class="p">}</span>

    <span class="k">guard</span> <span class="k">let</span> <span class="nv">data</span> <span class="o">=</span> <span class="n">data</span> <span class="k">else</span> <span class="p">{</span> <span class="k">return</span> <span class="p">}</span>
    <span class="k">do</span> <span class="p">{</span>
        <span class="k">let</span> <span class="nv">json</span> <span class="o">=</span> <span class="k">try</span> <span class="kt">NSJSONSerialization</span><span class="o">.</span><span class="kt">JSONObjectWithData</span><span class="p">(</span><span class="n">data</span><span class="p">,</span> <span class="nv">options</span><span class="p">:</span> <span class="p">[])</span>
        <span class="n">json</span>
    <span class="p">}</span> <span class="k">catch</span> <span class="n">_</span> <span class="p">{</span>
        <span class="nf">print</span><span class="p">(</span><span class="s">"Oops"</span><span class="p">)</span>
    <span class="p">}</span>
    <span class="kt">XCPSetExecutionShouldContinueIndefinitely</span><span class="p">(</span><span class="kc">false</span><span class="p">)</span>
<span class="p">}</span>

<span class="n">task</span><span class="o">.</span><span class="nf">resume</span><span class="p">()</span>
</code></pre></div></div>

<p>You can substitute any URL (or build one with components) and immediately see the responses you get. I like to follow a four-stage process in these completion handlers:</p>

<ol>
  <li><strong>Handle the <code class="highlighter-rouge">error</code> parameter</strong>: This is returned when something went wrong meaning the connection attempt could not even be made.</li>
  <li><strong>Handle the response code</strong>: <a href="https://en.wikipedia.org/wiki/List_of_HTTP_status_codes">Non-20x responses</a> can mean a variety of problems, and how you deal with them depends very much on the needs of your app.</li>
  <li><strong>Handle server-level errors</strong>: Often a completely valid JSON response will contain an error flag or error dictionary. You’ll usually want to build your own error object out of this.</li>
  <li><strong>Handle the valid JSON</strong>: This is the “happy path”. Here you’ll be parsing out model objects and updating your app.</li>
</ol>

<p><a href="http://www.cimgf.com/2015/09/21/massive-view-controllers/">None of this code should be in a view controller</a>, by the way! Your view controllers should, at most, be asking some other object to go fetch stuff, and passing in a completion block with a single error and a single data parameter to be executed when done. But that’s a whole other post.</p>

<h2 id="tools">Tools</h2>

<p>The playground code above is a great way to explore a new API - you can quickly change the URL and see results instantly. But it’s a bit of a mess, and you’re changing the same thing over and over again rather than building up a good idea of the responses and calls you are working with. Enter <a href="https://luckymarmot.com/paw">Paw</a>, an indispensable and very nicely done app (no affiliation, I am a happily paying customer) which allows you to build up a set of API calls and tweak them with variables, environments, and view the responses. It will even, with plugins, generate the Objective-C or Swift code just like that shown above.</p>

<p>Maybe your API hasn’t been written yet. You could mess about with locally stored JSON files and proxies and so forth to make up for that, or you could use a service like <a href="https://apiary.io/">Apiary</a> which allows you to stand up quick responses to calls - all you have to do when you’re done is switch out the domain. I’m using Apiary for the example above.</p>

<p>The next important thing about writing your networking code is to use unit tests. Having to run through your UI tapping buttons and so on to see if you’ve done your networking right is silly, and you need to stop it. Asynchronous unit tests are a doddle now that <code class="highlighter-rouge">XCTestExpectation</code> exists, and since you’re not putting your network code is in a view controller it’s all much more testable.</p>

<p>Once your code is up and running you may have further problems. Maybe the API isn’t ready, or you want to get a specific response, or you just want to see the exact responses coming back at a specific time for a specific request, or you want to see what happens if you get a 404 or an error or a timeout. It’s time for <a href="http://www.charlesproxy.com">Charles</a> which, a bit like AppCode, is so useful and powerful you can overlook how hideous it looks. (Again, no affiliation, happily paying customer!) Charles can do all of these things and more, by acting as a proxy and showing you all the traffic passing between the iOS simulator, or your device, and the internet (unless that traffic is correctly using certificate pinning and is secure!). You can replace calls with local text files, breakpoint on requests or responses and edit the contents, rewrite data according to your own rules. I probably know how to use about 10% of its power and I’m getting my money’s worth. You know those ridiculous high scores on Game Center? Pretty sure that’s Charles. Not me though, I’m all natural.</p>
<div class="footnotes">
  <ol>
    <li id="fn:rest">
      <p>I’m not going to define REST  to mean anything other than “things are at a URL”, have that argument somewhere else <a href="#fnref:rest" class="reversefootnote">&#8617;</a></p>
    </li>
    <li id="fn:break">
      <p>Well, your request won’t work, anyway, but you can’t be too careful. <a href="#fnref:break" class="reversefootnote">&#8617;</a></p>
    </li>
  </ol>
</div>
]]></content>
  </entry>
  
  <entry>
    <title type="html"><![CDATA[What happens when I touch this?]]></title>
    <link href="http://commandshift.co.uk/blog/2015/09/10/what-happens-when-i-touch-this/"/>
    <updated>2015-09-10T17:29:46+00:00</updated>
    <id>http://commandshift.co.uk/blog/2015/09/10/what-happens-when-i-touch-this</id>
    <content type="html"><![CDATA[<p>You’re a great developer. Look at the quality blogs you read. If you’re starting a project today you’ll be using storyboards, organising your code in groups, everything will be well commented and it’ll be obvious in three years time what’s going on.</p>

<p>Meanwhile, back in reality, you’re working on an app that was first written for iOS4 and each of the dozen developers who’ve had a month to implement or fix things since then have gone in, done their stuff and moved on.  Things get complicated. If you’re asked to work on an app, either to bolt more stuff onto it or (hooray!) to do some cleanup, then the very first thing you need to do is work out where you are and what’s going on.</p>

<p>I gave a lightning talk at iOSDevUK this year. I had five minutes to talk, so thought I’d cover the relatively simple(!) topic of how to navigate a massive, new codebase when you’re dropped in as a new developer and asked to fix problems or implement new features, <em>right now</em>. Here are the points I was trying to get across.</p>

<!--more-->

<h2 id="whats-on-the-screen">What’s on the screen?</h2>

<p>It’s fairly simple to see which <em>views</em> are on the screen, thanks to the view debugger in Xcode (when it works) or tools like Reveal.</p>

<p>However, when you’re trying to work out where in the app you need to make changes, what’s often more useful is knowing which view <em>controllers</em> are currently in play. Most of the action in most iOS apps happens, or at least is kicked off, from code that lives in a view controller.</p>

<p>To find out what you’re looking at, you can pause the app in the debugger and type this:</p>

<div class="language-objc highlighter-rouge"><div class="highlight"><pre class="highlight"><code><span class="n">po</span> <span class="p">[[[</span><span class="n">UIWindow</span> <span class="nf">keyWindow</span><span class="p">]</span>  <span class="nf">rootViewController</span><span class="p">]</span>  <span class="nf">_printHierarchy</span><span class="p">]</span>
</code></pre></div></div>

<p>This gives you a hierarchical list of the view controllers that are currently on screen, from the bottom up. A navigation controller will have the current stack displayed and any presented or child controllers will be included. If your app is showing child controllers without adding them to the hierarchy, you have another problem to solve.</p>

<p>The above command is quite long so at this point I’d recommend looking at <a href="https://www.github.com/facebook/chisel">Chisel</a>, a collection of LLDB commands maintained by Facebook. Once you’ve installed Chisel you can type <code class="highlighter-rouge">pvc</code> instead, which is much easier.</p>

<h2 id="what-happens-when-i-touch-this">What happens when I touch this?</h2>

<p>The previous developer (don’t we all love to hate the previous developer, even if it was us) may have been “clever” in their use of code. Sometimes it’s not clear at all what happens when a button is tapped. To find out literally <em>everything</em> that ever happens in the app you’re working on, pause in the debugger and type this:</p>

<div class="language-objc highlighter-rouge"><div class="highlight"><pre class="highlight"><code><span class="n">rb</span> <span class="p">.</span> <span class="o">-</span><span class="n">s</span> <span class="n">MyApp</span>
</code></pre></div></div>

<p>Replacing <code class="highlighter-rouge">MyApp</code> with the name of the current target. This magic incantation creates a <strong>regular expression breakpoint</strong>, using the rather unspecific regular expression of <code class="highlighter-rouge">.</code>, in the shared library known as <code class="highlighter-rouge">MyApp</code>. This creates a breakpoint on <em>every method of your app</em>. Every. Method. Of. Your. App. If you have timers or regular network hits, you may not get much use out of this, but otherwise it can really speed up your code navigation.</p>

<p>LLDB will create all of those breakpoints under a single umbrella breakpoint. This may take a while. You’ll want to turn them off again pretty sharpish since it makes actually working in the app quite painful. To do that, type this:</p>

<div class="language-objc highlighter-rouge"><div class="highlight"><pre class="highlight"><code><span class="n">br</span> <span class="n">li</span> <span class="o">-</span><span class="n">b</span>
</code></pre></div></div>

<p>This gives you a list of all the current breakpoints. Your regex one will be obvious, and it will have a number. To get rid of it, type this:</p>

<div class="language-objc highlighter-rouge"><div class="highlight"><pre class="highlight"><code><span class="n">br</span> <span class="n">delete</span> <span class="n">X</span>
</code></pre></div></div>

<p>Where X is the number.</p>

<h2 id="logjams">Logjams</h2>

<p>That idiot previous developer put hundreds of log statements in the app. Maybe they were a little bit helpful and made them <code class="highlighter-rouge">DLog</code> statements so they didn’t log plaintext passwords out to a customer’s device. However you still can’t use logging to find out when things happen (<code class="highlighter-rouge">NSLog(@"IN VIEW DID APPEAR!!");</code>) because there’s so much noise in there.</p>

<p>Good.</p>

<p>You shouldn’t be adding log statements for navigation anyway, and neither should that previous developer. You’re creating code changes, which you’ll need to roll back whenever you finally work out what the problem is.</p>

<p>To hide all that noise from the debugger console, look at the bottom of the window. There’s a popup there that says “All Output”. Click that and change it to “Debugger Output”. Now the only things you’ll see in the console are messages from the debugger.</p>

<p>Add a breakpoint in the method you’re interested in. Edit the breakpoint (right-click and choose <strong>Edit Breakpoint…</strong>). Choose <strong>Log Message</strong> as the action, and type your navigational info in there. Check <strong>Automatically continue…</strong>:</p>

<p><img src="/images/loggingbreakpoint.png" alt="Editing a breakpoint" /></p>

<p>Now when you hit that breakpoint, it puts your message out into the clean, uncluttered debug console.</p>

<h2 id="app-mapping">App mapping</h2>

<p>You can combine two of the previous tips with a third and you have an instant method of mapping out screen changes in your app.</p>

<p>Create a symbolic breakpoint on <code class="highlighter-rouge">-[UIViewController viewDidAppear:]</code>. Add <code class="highlighter-rouge">pvc</code> as the debugger action and choose to automatically continue. Now exercise your app - as you move around and show screens, you’ll be shown a continuously up-to-date list of all the view controllers being put on the screen at the same time.</p>

<p>These few simple tips have really helped me when I’ve been dropped in an enemy codebase with no map. I hope they help you too.</p>
]]></content>
  </entry>
  
  <entry>
    <title type="html"><![CDATA[Things I learnt about the Photos framework]]></title>
    <link href="http://commandshift.co.uk/blog/2015/07/14/things-i-learnt-about-the-photos-framework/"/>
    <updated>2015-07-14T00:00:00+00:00</updated>
    <id>http://commandshift.co.uk/blog/2015/07/14/things-i-learnt-about-the-photos-framework</id>
    <content type="html"><![CDATA[<p>I recently worked on an app featuring a photo browser. The work involved updating the code (previously using Assets Library) to use the Photos framework.</p>

<p>I found out a few things that don’t seem to be represented very well in the documentation or the examples floating round online, so here they are.</p>

<!--more-->

<h2 id="image-request-completion-blocks">Image request completion blocks</h2>

<p>For <code class="highlighter-rouge">.Opportunistic</code> delivery mode requests, which is the option you want when scrolling through an album, the completion block may be fired multiple (usually two) times - the image manager will get a fast, low-quality version, call the completion block, then call it again when it gets a higher quality version.</p>

<p>What’s important to note is that the first completion block can be executed <em>before the request function has returned</em>. This has a few implications.</p>

<p>Async processes kicked off during cell configuration typically run like this:</p>

<ol>
  <li>Kick off the request</li>
  <li>In the completion block, get the cell of interest, and set the relevant property</li>
</ol>

<p>This setup means that if the async process takes some time to return, and the cell has been reused, the data isn’t assigned to the wrong cell. You normally don’t just capture the cell inside the completion block, then configure it, you’d normally capture the index path, then use that to get the appropriate cell from the table or collection view. If that returns nil, your cell is offscreen.</p>

<p>However, for a completion block that can be executed immediately <em>or</em> after some time, that pattern can’t apply. You need to assign some identifier to the cell before you request the image, then check that identifier is the same when the completion block runs.</p>

<p><a href="https://developer.apple.com/library/ios/samplecode/UsingPhotosFramework/Listings/SamplePhotosApp_AAPLAssetGridViewController_m.html">Apple’s sample code</a> uses an incrementing integer value which is assigned to the tag of the cell. Normally I wouldn’t touch the <code class="highlighter-rouge">.tag</code> property with a bargepole but this use almost makes sense. You could also use a property to hold the index path. You <em>can’t</em> use the request identifier, since the block can be executed before the request identifier has even been returned.</p>

<p>The completion block is also called if the request is cancelled, so if you’re canceling requests while scrolling (which is a good idea), you need to bear that in mind. You can see if the completion block is called for a cancelled request by checking in the <code class="highlighter-rouge">info</code> dictionary.</p>

<p>Finally, for reasons unknown, sometimes image requests would simply never return a full sized image. The completion block would be called, there would be nothing amiss in the <code class="highlighter-rouge">info</code> dictionary, but the <code class="highlighter-rouge">result</code> comes back as nil. I had a single image where this would happen all the time.</p>

<h2 id="resizing-mode">Resizing mode</h2>

<p>For scrolling through a large library, always use the <code class="highlighter-rouge">.Fast</code> resizing mode. You’d think that <code class="highlighter-rouge">.Exact</code> combined with opportunistic delivery would be optimal, but I found it made a huge performance difference, for no discernible quality difference, to stick with <code class="highlighter-rouge">.Fast</code>.</p>

<h2 id="caching">Caching</h2>

<p><code class="highlighter-rouge">PFCachingImageManager</code> is well worth using. For a huge library, you can’t cache everything, and if the user is scrolling super fast then caching doesn’t seem to offer much advantage. It does work very well for caching a few screens-worth of images either side of the current scroll position - with this in place  you get high-quality thumbnails very quickly when scrolling to the next page of images.</p>

<p>Ignore caching when scrolling, but update the caches when scrolling stops, was the combination I settled on in the end.</p>

<p>It’s very tempting to optimise for the “scroll like a madman through the entire library” use case, it’s very satisfying seeing those 60fps numbers and thinking of all the super-fast work that’s happening, but it’s only developers and QA engineers that do that in real life!</p>

<h2 id="change-notifications">Change notifications</h2>

<p>If you register for library change notifications, be very careful about how you handle them. It appeared to me that change notifications would come through very frequently when using an album built from a fetch request (which was every album in the project). The <code class="highlighter-rouge">PHFetchResultChangeDetails</code> object would contain incremental changes, which lead you to believe that there’s only a few updates to deal with, but then I’d see <em>hundreds</em> of indexes in the <code class="highlighter-rouge">changedIndexes</code>. Telling the collection view to reload all those cells, as suggested in the documentation, was a performance killer.</p>

<p>I believe that these notifications are sent out when the framework is updating its “optimised storage” of the library, replacing its local caches with larger or smaller versions of the images. If you’re showing an album view with identically sized thumbnail cells then you can safely ignore changes if they apply to cells outside the visible area.</p>

<p>Moves, insertions and deletions seemed more reasonable and handling them as described in the documentation was fine.</p>

<h2 id="hardware-environment">Hardware environment</h2>

<p>When you’re testing, the phone and the environment make a huge difference. Network access speed and  device free space all affect performance. I had the same 10,000-image photo library take between 1.5GB and 5GB, depending on the available space on the device. This means your library is going to be faster on the device with more space, since it doesn’t have to fetch from iCloud as often.</p>

<h2 id="closing-thoughts">Closing thoughts</h2>

<p>The Photos framework is a big improvement over the Assets Library, and it does a great job of dealing with network requests, image resizing and caching for you. It would be amazing if it could also be used to deliver images from partner services like Facebook - there is already OS-level integration with some services, and extending it to Photos would make my job a lot easier!</p>
]]></content>
  </entry>
  
  <entry>
    <title type="html"><![CDATA[It's time to ditch your Autolayout helper]]></title>
    <link href="http://commandshift.co.uk/blog/2015/07/06/its-time-to-ditch-your-autolayout-helper/"/>
    <updated>2015-07-06T00:00:00+00:00</updated>
    <id>http://commandshift.co.uk/blog/2015/07/06/its-time-to-ditch-your-autolayout-helper</id>
    <content type="html"><![CDATA[<p>When iOS 6 came out, we were in the early stages of planning for a major project. We managed to convince the client that the new app should be iOS 6 only, and decided to go all-in on the new features.</p>

<p>The two biggest new features, which we used almost everywhere in <a href="https://itunes.apple.com/gb/app/hl-live-for-ipad/id762449126?mt=8">the app</a>, were collection views and autolayout.</p>

<p>The app was built almost entirely in code, meaning a lot of constraint creation. My <a href="https://github.com/jrturton/UIView-Autolayout">autolayout helper category</a> was written to help build it.</p>

<p>Now it’s time for that category, and all the others (and there are <em><a href="https://cocoapods.org/">loads</a></em>), to be deprecated.</p>

<!--more-->

<p>Any “helper” category or wrapper introduces the following costs versus using the native API:</p>

<ul>
  <li>Installing and maintaining a dependency</li>
  <li>Learning an additional API or DSL</li>
  <li>Masking the native functionality and therefore obscuring some understanding of how things actually work</li>
  <li>An extra possible source of bugs when things aren’t working</li>
  <li>Vulnerability to changes made by the OS vendor or library maintainer that break your work</li>
</ul>

<p>If the helper category’s benefits offset these costs, then fine, go ahead. But if they don’t, you should not be using it.</p>

<p>As an example, my category uses left/right instead of leading/trailing. It wasn’t an issue for me (and I had no idea of the significance when I was writing it) since the app wasn’t due to be localised. If your app will be localised for RTL languages, you shouldn’t be using my category.</p>

<p>It’s also now recommended to create constraints first and activate them in a set. My code doesn’t do that. My code doesn’t take layout margins into account either. Do any of the others? I don’t know, and I don’t care, because they are all redundant.</p>

<h2 id="why-did-we-need-layout-helpers">Why did we need layout helpers?</h2>
<ul>
  <li>Interface builder was awful for creating constraints, therefore it was easier in code</li>
  <li>The constraint API was verbose and common tasks took too much boilerplate.</li>
</ul>

<h2 id="why-dont-we-need-them-any-more">Why don’t we need them any more?</h2>
<ul>
  <li>Interface builder should now be your default option for creating your UI. Seriously. It’s really good now, and I can’t imagine making an adaptive interface using size classes in code.</li>
  <li>Stack views should be your default option for layout anyway.</li>
</ul>

<p>With these changes alone, you’d be making constraints in code so rarely that the benefits of adding a layout helper aren’t worth it. I haven’t used my own category in the last couple of projects I’ve worked on.</p>

<p>But  there’s more. <a href="https://developer.apple.com/library/prerelease/ios/documentation/AppKit/Reference/NSLayoutAnchor_ClassReference/">Layout Anchors</a> make many common constraint creation tasks much easier as well.</p>

<h2 id="what-now">What now?</h2>

<p>Helper categories and wrappers have their place. But don’t use them mindlessly. Learn enough about what they are helping you with to know if you need them, and re-assess at new version releases if they are still relevant and if they are being updated to reflect the state of the art.</p>

<p>Using and understanding the first-party API should always be your preferred option.</p>

<p>Now, excuse me while I go and write a helper library for the new Contacts API.</p>
]]></content>
  </entry>
  
  <entry>
    <title type="html"><![CDATA[Swift Generics]]></title>
    <link href="http://commandshift.co.uk/blog/2015/05/11/swift-generics/"/>
    <updated>2015-05-11T13:29:46+00:00</updated>
    <id>http://commandshift.co.uk/blog/2015/05/11/swift-generics</id>
    <content type="html"><![CDATA[<p>“Don’t Repeat Yourself” is a solid bit of programming wisdom. It’s so common it has been made into an acronym, DRY, which means that people get to make “jokes” about DRYing out their codebase.</p>

<p>If you write a bit of code that does something, and elsewhere in your program you need to do the same or a very similar thing, don’t copy and paste the bit of code. Make it accessible from both places, and make the minimum set of changes needed to make it reusable.</p>

<p><a href="http://en.wikipedia.org/wiki/Boilerplate_code">“Boilerplate” code</a> refers to code that has to be included regularly and without much alteration to achieve basic functionality. There are plenty of frequent, common operations that require a lot of boilerplate code. The boilerplate code obscures what you actually want to do and makes the program harder to read. A good example is inserting managed objects into a context. For each type of managed object, the code looks almost exactly the same, but different types are involved.</p>

<p>I’m going to discuss some of the boilerplate code encountered in Core Data, and how you can use Swift generics to DRY out some of these operations. First, a few words about generics.</p>

<!--more-->

<h2 id="generics-in-functions">Generics in functions</h2>

<p>Generics in functions allow code to be flexible about types at writing time, but strict at compile time. They work by having  type tokens for each non-specified type involved in the function. The type tokens can be completely generic, or have protocol restrictions on them. For example, for kicking off a <a href="http://commandshift.co.uk/blog/2014/12/28/nice-web-services-swift-edition/">nice web service request</a>, I have this function:</p>

<div class="language-swift highlighter-rouge"><div class="highlight"><pre class="highlight"><code><span class="kd">func</span> <span class="n">startRequest</span><span class="o">&lt;</span><span class="kt">C</span> <span class="p">:</span> <span class="kt">WebServiceConfiguration</span><span class="p">,</span> <span class="kt">R</span> <span class="p">:</span> <span class="kt">WebServiceResponse</span><span class="o">&gt;</span><span class="p">(</span><span class="nv">configuration</span><span class="p">:</span> <span class="kt">C</span><span class="p">,</span> <span class="nv">completion</span><span class="p">:(</span><span class="nv">response</span><span class="p">:</span><span class="kt">R</span><span class="p">?,</span> <span class="nv">error</span><span class="p">:</span><span class="kt">NSError</span><span class="p">?)</span><span class="o">-&gt;</span><span class="kt">Void</span><span class="p">)</span>
</code></pre></div></div>

<p>Don’t panic! Here’s a breakdown:</p>

<ul>
  <li><code class="highlighter-rouge">startRequest</code> - this is the name of the function</li>
  <li><code class="highlighter-rouge">&lt;C : WebServiceConfiguration, R: WebServiceResponse&gt;</code> - these are the <em>type tokens</em>. Here we have two generic types, C and R. C has to conform to the <code class="highlighter-rouge">WebServiceConfiguration</code> protocol, and R has to conform to the <code class="highlighter-rouge">WebServiceResponse</code> protocol.</li>
  <li><code class="highlighter-rouge">configuration: C</code> - the first parameter is of type C, which as we’ve noted above must conform to the <code class="highlighter-rouge">WebServiceConfiguration</code> protocol.</li>
  <li><code class="highlighter-rouge">completion:(response:R?, error:NSError?)-&gt;Void</code> - the second paramater is a closure, which takes an optional R (conforming to <code class="highlighter-rouge">WebServiceResponse</code> and an optional error.</li>
</ul>

<p>The type tokens don’t have to be single letters, though they are in nearly every example I’ve seen. You can use longer terms, but then the whole function definition can get quite long.</p>

<p>You call the function like so:</p>

<div class="language-swift highlighter-rouge"><div class="highlight"><pre class="highlight"><code><span class="k">let</span> <span class="nv">loginConfiguration</span> <span class="o">=</span> <span class="kt">LoginConfiguration</span><span class="p">(</span><span class="nv">username</span><span class="p">:</span> <span class="n">username</span><span class="p">,</span> <span class="nv">password</span><span class="p">:</span><span class="n">password</span><span class="p">)</span>
<span class="nf">startRequest</span><span class="p">(</span><span class="n">loginConfiguration</span><span class="p">)</span> <span class="p">{</span>
  <span class="p">(</span><span class="nv">response</span> <span class="p">:</span> <span class="kt">LoginResponse</span><span class="p">?,</span> <span class="n">error</span><span class="p">)</span> <span class="k">in</span>
  <span class="c1">// Do stuff...</span>
<span class="p">}</span>
</code></pre></div></div>

<p>The compiler can tell from this code that we’re calling <code class="highlighter-rouge">startRequest</code> using a <code class="highlighter-rouge">LoginConfiguration</code> for the C type token, and a <code class="highlighter-rouge">LoginResponse</code> for the R type token. Clever stuff!</p>

<p><code class="highlighter-rouge">startRequest</code> is the <em>only</em> function you ever call when kicking off a web request. There’s no need for a separate function for each API endpoint!</p>

<h2 id="generics-in-container-types">Generics in container types</h2>

<p>As well as function arguments, generics are also used for container types - the most common example being the Optional enum, but also Swift’s typed arrays and dictionaries. Those aren’t as interesting for this discussion, though.</p>

<h2 id="core-data---inserting-objects">Core Data - inserting objects</h2>

<p>To insert a new entity in your context, the following code is required:</p>

<div class="language-swift highlighter-rouge"><div class="highlight"><pre class="highlight"><code><span class="k">let</span> <span class="nv">person</span> <span class="o">=</span> <span class="kt">NSEntityDescription</span><span class="o">.</span><span class="nf">insertNewObjectForEntityForName</span><span class="p">(</span><span class="s">"Person"</span><span class="p">,</span> <span class="nv">inManagedObjectContext</span><span class="p">:</span> <span class="n">context</span><span class="p">)</span> <span class="k">as!</span> <span class="kt">Person</span>
<span class="n">person</span><span class="o">.</span><span class="n">name</span> <span class="o">=</span> <span class="s">"Bob"</span>
<span class="o">...</span>
</code></pre></div></div>

<p>Yes, it’s only one line, but it’s quite a long one, there’s a constant string in there, and you need to force cast to a Person because <code class="highlighter-rouge">insertNewObject...</code> returns <code class="highlighter-rouge">AnyObject</code>.</p>

<p>I find it’s useful to think of how a function might look before I get around to implementing it. For inserting an object, I have the following requirements:</p>

<ul>
  <li>We need a managed object context</li>
  <li>I don’t want to have to write the class of the inserted object more than once</li>
  <li>It must be obvious what is happening</li>
  <li>No type casting required.</li>
</ul>

<p>I’d like to do this:</p>

<div class="language-swift highlighter-rouge"><div class="highlight"><pre class="highlight"><code><span class="k">let</span> <span class="nv">person</span> <span class="o">=</span> <span class="n">context</span><span class="o">.</span><span class="nf">insert</span><span class="p">(</span><span class="kt">Person</span><span class="p">)</span>
</code></pre></div></div>

<p>First, get rid of the constant string with an extension on <code class="highlighter-rouge">NSManagedObject</code>:</p>

<div class="language-swift highlighter-rouge"><div class="highlight"><pre class="highlight"><code><span class="kd">extension</span> <span class="kt">NSManagedObject</span> <span class="p">{</span>    
  <span class="kd">class</span> <span class="k">var</span> <span class="nv">entityName</span> <span class="p">:</span> <span class="kt">String</span> <span class="p">{</span>
    <span class="k">let</span> <span class="nv">components</span> <span class="o">=</span> <span class="kt">NSStringFromClass</span><span class="p">(</span><span class="k">self</span><span class="p">)</span><span class="o">.</span><span class="nf">componentsSeparatedByString</span><span class="p">(</span><span class="s">"."</span><span class="p">)</span>
    <span class="k">return</span> <span class="n">components</span><span class="p">[</span><span class="mi">1</span><span class="p">]</span>
  <span class="p">}</span>
<span class="p">}</span>
</code></pre></div></div>

<p>This assumes your entity names always match your class names. The processing is to remove the module name from the start. If you have any entities that don’t follow this rule, you’d have to override this method in the appropriate <code class="highlighter-rouge">NSManagedObject</code> subclass.</p>

<p>Now, you can write the following extension for <code class="highlighter-rouge">NSManagedObjectContext</code>:</p>

<div class="language-swift highlighter-rouge"><div class="highlight"><pre class="highlight"><code><span class="kd">extension</span> <span class="kt">NSManagedObjectContext</span> <span class="p">{</span>
    
    <span class="kd">func</span> <span class="n">insert</span><span class="o">&lt;</span><span class="kt">T</span> <span class="p">:</span> <span class="kt">NSManagedObject</span><span class="o">&gt;</span><span class="p">(</span><span class="nv">entity</span><span class="p">:</span> <span class="kt">T</span><span class="o">.</span><span class="k">Type</span><span class="p">)</span> <span class="o">-&gt;</span> <span class="kt">T</span> <span class="p">{</span>
        <span class="k">let</span> <span class="nv">entityName</span> <span class="o">=</span> <span class="n">entity</span><span class="o">.</span><span class="n">entityName</span>
        <span class="k">return</span> <span class="kt">NSEntityDescription</span><span class="o">.</span><span class="nf">insertNewObjectForEntityForName</span><span class="p">(</span><span class="n">entityName</span><span class="p">,</span> <span class="nv">inManagedObjectContext</span><span class="p">:</span><span class="k">self</span><span class="p">)</span> <span class="k">as!</span> <span class="kt">T</span>
    <span class="p">}</span>
    
<span class="p">}</span>
</code></pre></div></div>

<p>There’s a small amount of magic happening here. The type token, T, has a specifier saying that the type used must be a subclass of <code class="highlighter-rouge">NSManagedObject</code>. The last line of the function is pretty much the same as the original insert code used above, using the forced cast. But in the function definition, I’m using <code class="highlighter-rouge">T.Type</code>, not <code class="highlighter-rouge">T</code>. This means the function is expecting the <code class="highlighter-rouge">entity</code> parameter to be a <em>type</em>, rather than an instance of an entity.</p>

<p>Generics have allowed me to write a function where I pass in a class, which is guaranteed to return an instance of that class.</p>

<p>As desired, this can be called like this:</p>

<div class="language-swift highlighter-rouge"><div class="highlight"><pre class="highlight"><code><span class="k">let</span> <span class="nv">person</span> <span class="o">=</span> <span class="n">context</span><span class="o">.</span><span class="nf">insert</span><span class="p">(</span><span class="kt">Person</span><span class="p">)</span>
</code></pre></div></div>

<p>But there’s more. To support unit testing or development of an app, it is extremely useful to be able to quickly produce a set of sample data. For example, I’d like to create 10 <code class="highlighter-rouge">Person</code> objects like this:</p>

<div class="language-swift highlighter-rouge"><div class="highlight"><pre class="highlight"><code><span class="n">context</span><span class="o">.</span><span class="nf">createTestObjects</span><span class="p">(</span><span class="mi">10</span><span class="p">)</span> <span class="p">{</span>
  <span class="p">(</span><span class="nv">person</span><span class="p">:</span> <span class="kt">Person</span><span class="p">,</span> <span class="n">index</span><span class="p">)</span> <span class="k">in</span>
  <span class="n">person</span><span class="o">.</span><span class="n">name</span> <span class="o">=</span> <span class="s">"Test Person </span><span class="se">\(</span><span class="n">index</span><span class="se">)</span><span class="s">"</span>
<span class="p">}</span>
</code></pre></div></div>

<p>That’s pretty straightforward as well. As an extension on <code class="highlighter-rouge">NSManagedObjectContext</code>:</p>

<div class="language-swift highlighter-rouge"><div class="highlight"><pre class="highlight"><code><span class="kd">func</span> <span class="n">createTestObjects</span><span class="o">&lt;</span><span class="kt">T</span><span class="p">:</span> <span class="kt">NSManagedObject</span><span class="o">&gt;</span><span class="p">(</span><span class="nv">count</span> <span class="p">:</span> <span class="kt">Int</span><span class="p">,</span> <span class="nv">configuration</span> <span class="p">:</span> <span class="p">(</span><span class="nv">object</span><span class="p">:</span> <span class="kt">T</span><span class="p">,</span> <span class="nv">index</span><span class="p">:</span> <span class="kt">Int</span><span class="p">)</span> <span class="o">-&gt;</span> <span class="kt">Void</span><span class="p">){</span>
  <span class="k">for</span> <span class="n">testNumber</span> <span class="k">in</span> <span class="mi">1</span><span class="o">...</span><span class="n">count</span> <span class="p">{</span>
    <span class="k">let</span> <span class="nv">object</span> <span class="o">=</span> <span class="k">self</span><span class="o">.</span><span class="nf">insert</span><span class="p">(</span><span class="kt">T</span><span class="o">.</span><span class="k">self</span><span class="p">)</span>
    <span class="nf">configuration</span><span class="p">(</span><span class="nv">object</span><span class="p">:</span> <span class="n">object</span><span class="p">,</span> <span class="nv">index</span><span class="p">:</span> <span class="n">testNumber</span><span class="p">)</span>
  <span class="p">}</span>
<span class="p">}</span>
</code></pre></div></div>

<p>Here, the type is inferred from the parameter list in the configuration closure. In the last app I made this was probably the most useful method in there, allowing me to create a reasonable set of test data almost instantly for unit testing and building the UI.</p>

<h2 id="core-data---fetching-objects">Core Data - fetching objects</h2>

<p>Here’s how you fetch objects from a context:</p>

<div class="language-swift highlighter-rouge"><div class="highlight"><pre class="highlight"><code><span class="k">let</span> <span class="nv">request</span> <span class="o">=</span> <span class="kt">NSFetchRequest</span><span class="p">(</span><span class="nv">entityName</span><span class="p">:</span> <span class="s">"Person"</span><span class="p">)</span>
<span class="k">var</span> <span class="nv">error</span> <span class="p">:</span> <span class="kt">NSError</span><span class="p">?</span> <span class="o">=</span> <span class="kc">nil</span>
<span class="k">let</span> <span class="nv">people</span> <span class="o">=</span> <span class="n">context</span><span class="o">.</span><span class="nf">executeFetchRequest</span><span class="p">(</span><span class="n">request</span><span class="p">,</span> <span class="nv">error</span><span class="p">:</span> <span class="o">&amp;</span><span class="n">error</span><span class="p">)</span> <span class="k">as?</span> <span class="p">[</span><span class="kt">Person</span><span class="p">]</span>
<span class="k">if</span> <span class="k">let</span> <span class="nv">error</span> <span class="o">=</span> <span class="n">error</span> <span class="p">{</span>
  <span class="c1">// Better do something about that error...</span>
<span class="p">}</span> <span class="k">else</span> <span class="p">{</span>
  <span class="c1">// Do something with all those people....</span>
<span class="p">}</span>
</code></pre></div></div>

<p>The error checking, while not terribly useful for users of your app, is absolutely essential for you, the developer. But if you have to write all that boilerplate for every fetch request in your app, are you really going to be checking them all?</p>

<p>First of all, there’s that hardcoded string for the entity name. We’ve already solved that problem when inserting objects. The same applies again, in an <code class="highlighter-rouge">NSManagedObject</code> extension:</p>

<div class="language-swift highlighter-rouge"><div class="highlight"><pre class="highlight"><code><span class="kd">class</span> <span class="kd">func</span> <span class="nf">fetchRequest</span><span class="p">()</span> <span class="o">-&gt;</span> <span class="kt">NSFetchRequest</span> <span class="p">{</span>
  <span class="k">return</span> <span class="kt">NSFetchRequest</span><span class="p">(</span><span class="nv">entityName</span><span class="p">:</span><span class="k">self</span><span class="o">.</span><span class="n">entityName</span><span class="p">)</span>
<span class="p">}</span>

<span class="kd">class</span> <span class="kd">func</span> <span class="nf">fetchRequestWithKey</span><span class="p">(</span><span class="nv">key</span><span class="p">:</span> <span class="kt">String</span><span class="p">,</span> <span class="nv">ascending</span><span class="p">:</span> <span class="kt">Bool</span> <span class="o">=</span> <span class="kc">true</span><span class="p">)</span> <span class="o">-&gt;</span> <span class="kt">NSFetchRequest</span> <span class="p">{</span>
  <span class="k">let</span> <span class="nv">request</span> <span class="o">=</span> <span class="nf">fetchRequest</span><span class="p">()</span>
  <span class="n">request</span><span class="o">.</span><span class="n">sortDescriptors</span> <span class="o">=</span> <span class="p">[</span><span class="kt">NSSortDescriptor</span><span class="p">(</span><span class="nv">key</span><span class="p">:</span> <span class="n">key</span><span class="p">,</span> <span class="nv">ascending</span><span class="p">:</span> <span class="n">ascending</span><span class="p">)]</span>
  <span class="k">return</span> <span class="n">request</span>
<span class="p">}</span>
</code></pre></div></div>

<p>The second version allows you to add some sort descriptors by supplying the key and an ascending flag, which is often useful.</p>

<p>The fetch operation itself can be made generic. The context performs the fetch so you can add the following extension to <code class="highlighter-rouge">NSManagedObjectContext</code>:</p>

<div class="language-swift highlighter-rouge"><div class="highlight"><pre class="highlight"><code><span class="kd">func</span> <span class="n">fetchAll</span><span class="o">&lt;</span><span class="kt">T</span> <span class="p">:</span> <span class="kt">NSManagedObject</span><span class="o">&gt;</span><span class="p">(</span><span class="nv">entity</span><span class="p">:</span> <span class="kt">T</span><span class="o">.</span><span class="k">Type</span><span class="p">,</span> <span class="nv">key</span><span class="p">:</span><span class="kt">String</span><span class="p">?</span> <span class="o">=</span> <span class="kc">nil</span><span class="p">,</span> <span class="nv">ascending</span><span class="p">:</span><span class="kt">Bool</span> <span class="o">=</span> <span class="kc">true</span><span class="p">)</span> <span class="o">-&gt;</span> <span class="p">[</span><span class="kt">T</span><span class="p">]</span> <span class="p">{</span>
  <span class="k">let</span> <span class="nv">fetchRequest</span> <span class="p">:</span> <span class="kt">NSFetchRequest</span> <span class="o">=</span> <span class="p">{</span>
    <span class="k">if</span> <span class="k">let</span> <span class="nv">key</span> <span class="o">=</span> <span class="n">key</span> <span class="p">{</span>
      <span class="k">return</span> <span class="n">entity</span><span class="o">.</span><span class="nf">fetchRequestWithKey</span><span class="p">(</span><span class="n">key</span><span class="p">,</span> <span class="nv">ascending</span><span class="p">:</span> <span class="n">ascending</span><span class="p">)</span>
    <span class="p">}</span> <span class="k">else</span> <span class="p">{</span>
      <span class="k">return</span> <span class="n">entity</span><span class="o">.</span><span class="nf">fetchRequest</span><span class="p">()</span>
    <span class="p">}</span>
  <span class="p">}()</span>
  
  <span class="k">var</span> <span class="nv">error</span> <span class="p">:</span> <span class="kt">NSError</span><span class="p">?</span> <span class="o">=</span> <span class="kc">nil</span>
  <span class="k">if</span> <span class="k">let</span> <span class="nv">results</span> <span class="o">=</span> <span class="nf">executeFetchRequest</span><span class="p">(</span><span class="n">fetchRequest</span><span class="p">,</span> <span class="nv">error</span><span class="p">:</span> <span class="o">&amp;</span><span class="n">error</span><span class="p">)</span> <span class="k">as?</span> <span class="p">[</span><span class="kt">T</span><span class="p">]</span> <span class="p">{</span>
    <span class="k">return</span> <span class="n">results</span>
  <span class="p">}</span>
  <span class="k">return</span> <span class="p">[</span><span class="kt">T</span><span class="p">]()</span>
<span class="p">}</span>
</code></pre></div></div>

<p>You can call this like so:</p>

<div class="language-swift highlighter-rouge"><div class="highlight"><pre class="highlight"><code><span class="k">let</span> <span class="nv">people</span> <span class="o">=</span> <span class="n">context</span><span class="o">.</span><span class="nf">fetchAll</span><span class="p">(</span><span class="kt">Person</span><span class="p">)</span>
</code></pre></div></div>

<p>Or, for ordering:</p>

<div class="language-swift highlighter-rouge"><div class="highlight"><pre class="highlight"><code><span class="k">let</span> <span class="nv">people</span> <span class="o">=</span> <span class="n">context</span><span class="o">.</span><span class="nf">fetchAll</span><span class="p">(</span><span class="kt">Person</span><span class="o">.</span><span class="k">self</span><span class="p">,</span> <span class="nv">key</span><span class="p">:</span><span class="s">"name"</span><span class="p">,</span> <span class="nv">ascending</span><span class="p">:</span><span class="kc">true</span><span class="p">)</span>
</code></pre></div></div>

<p>Why it has to be <code class="highlighter-rouge">Person.self</code> for the second example I am not sure. If you know why, please tell me!</p>

<h2 id="summary">Summary</h2>

<ul>
  <li>If you find yourself writing the same code, where only the types are different, consider generics.</li>
  <li>Generics are powered by type inference, and the types can be inferred from arguments passed in, the variable a function’s return value is assigned to, or more complex ways such as the parameter list to a block.</li>
  <li>Generics can be useful for reducing boilerplate code, but always bear in mind future readers of your code (including yourself). Don’t make existing APIs unrecognisable and force maintainers to learn a whole new one without good reason.</li>
</ul>
]]></content>
  </entry>
  
  <entry>
    <title type="html"><![CDATA[Fun with scrollviews]]></title>
    <link href="http://commandshift.co.uk/blog/2015/04/19/fun-with-scrollviews/"/>
    <updated>2015-04-19T19:23:03+00:00</updated>
    <id>http://commandshift.co.uk/blog/2015/04/19/fun-with-scrollviews</id>
    <content type="html"><![CDATA[<p>iOS devices have small screens. Sometimes we want more content to be included on a screen and adding it to a scroll view is a great way of doing this. I’m going to look at the various numbers and measurements that a scroll view uses to do its job.</p>

<!--more-->

<p>##How scrollviews work</p>

<p>A <code class="highlighter-rouge">UIScrollView</code> is a <code class="highlighter-rouge">UIView</code> subclass, so it has a <code class="highlighter-rouge">frame</code> which is, just as with any other <code class="highlighter-rouge">UIView</code>, the position and size of the scroll view in its superview.</p>

<p>The point of a scrollview is to contain one or more subviews, which are too big to fit inside the scrollview and still be completely visible. These subviews, when laid out and sized in the correct fashion, will fill an area the size of the scroll view’s <code class="highlighter-rouge">contentSize</code>. Each subview’s <code class="highlighter-rouge">frame</code> will be in the coordinate space of the scroll view’s <code class="highlighter-rouge">bounds</code> rectangle.</p>

<p>I’ll use an example to spell that out more clearly.</p>

<p>On an iPhone 5 the screen is 320 points wide. We want a carousel view with horizontal scrolling. Each image in the carousel will be 200 x 200 points. The first image view’s frame origin will be at (0,0) in the scroll view, the second will be at (200,0), the third at (400,0) - before any scrolling happens, this third view will be off the edge of the screen.</p>

<p>When scrolling happens, the frames of these subviews <em>do not change</em>. But as a great man once said, “And yet it moves”. What’s happening?</p>

<p>Scrolling affects the <code class="highlighter-rouge">bounds</code> of the scroll view. From the documentation for <code class="highlighter-rouge">bounds</code>:</p>

<blockquote>
  <p>On the screen, the bounds rectangle represents the same visible portion of the view as its frame rectangle. By default, the origin of the bounds rectangle is set to (0, 0) but you can change this value to display different portions of the view.</p>
</blockquote>

<p>By changing the origin of the <code class="highlighter-rouge">bounds</code> of the scroll view, you display different parts of the content:</p>

<ul>
  <li><strong>Increasing</strong> the <strong>origin X</strong> moves the content <strong>left</strong></li>
  <li><strong>Decreasing</strong> the <strong>origin X</strong> moves the content <strong>right</strong></li>
  <li><strong>Increasing</strong> the <strong>origin Y</strong> moves the content <strong>up</strong></li>
  <li><strong>Decreasing</strong> the <strong>origin Y</strong> moves the content <strong>down</strong></li>
</ul>

<p>The size of the bounds rectangle remains the same as that of the frame, because the <em>amount</em> you can see is the same.</p>

<p>The subviews in the scroll view don’t know they are being moved. By scrolling, the user is moving a window around on top of the scroll view’s content view.</p>

<h2 id="but-of-course-it-gets-more-complicated">But of course, it gets more complicated</h2>

<p>When scrolling programmatically or asking for the scroll view’s current scrolling position, we don’t work with the bounds origin. There is a <code class="highlighter-rouge">contentOffset</code> property instead, which is equivalent to the origin of the bounds rectangle. This is more obvious in intent than addressing the origin of the bounds directly.</p>

<p>Driving such features as pull-to-refresh and transparent navigation bars is the <code class="highlighter-rouge">contentInsets</code> property. This takes a <code class="highlighter-rouge">UIEdgeInsets</code> value which affects where the “natural” edges of the content are within the scroll view. It’s not immediately obvious what the implications of this property are, but I find it helpful to think of it as a way of setting where the bouncing effect of the scroll view is anchored:</p>

<p><img src="/images/funwithscrollviews/ScrollBouncing.gif" alt="" /></p>

<p>The blue box represents the edges of the scroll view, the red box indicates the content insets.</p>

<p>For example, take a standard app with a navigation bar and a scrollview. The scrollview extends behind the navigation bar and status bar, so the bounds rectangle is the full screen size, but when you pull down the content and release it to bounce, it bounces back to just underneath the navigation bar. This isn’t because the content starts 64 points down from the top of the scroll view, it’s because the scrollview has a <code class="highlighter-rouge">contentInsets.top</code> of 64. When the scrollview bounces to the top, it comes to rest with a content offset of -64.0 in the Y direction:</p>

<p><img src="/images/funwithscrollviews/Offsets.png" alt="" /></p>

<p>Pull-to-refresh controls work by adding additional values to the top content offset, to hold the scrollview content down while the indicator is showing the activity.</p>

<h2 id="learning-by-fiddling-about">Learning by fiddling about</h2>

<p>That is a whole lot of theory, and reading about scroll views isn’t the best way to understand the mechanics of them. I’ve made a <a href="http://www.github.com/jrturton/funwithscrollviews">demo project</a> which allows you to see and adjust the numbers for a scroll view. I found it very useful when writing this article, hopefully it will aid your understanding as well. The demo project was used to generate the animated screenshot above.</p>

<p><strong>UPDATE</strong>: I’ve amended the sample project to also list all the delegate calls that happen when scrolling occurs.</p>

<h2 id="further-reading">Further reading</h2>

<p><a href="http://www.objc.io/issue-3/scroll-view.html">objc.io</a> has a great discussion of how scrollviews work. In summary, it all comes down to rectangles (doesn’t everything?). <a href="http://oleb.net/blog/2014/04/understanding-uiscrollview/">Ole Begemann</a> has also written a fantastic overview.</p>

]]></content>
  </entry>
  
</feed>