Autolayout in Interface Builder
This post only relates to Xcode 4. For Xcode 5.0 and higher, see here.
Other posts in the Autolayout series:
Pity poor interface builder. It’s only obeying orders. Apple have told it that it must at all times create the simplest set of constraints to unambiguously deliver the layout that you, the user, have decided on by dragging and resizing UI components. Which can leave you with this:

It doesn’t have to be this way.
The secret to happy constraint editing in interface builder is, fortunately, quite simple: tell it what you want. Dragging and dropping labels and buttons isn’t enough.
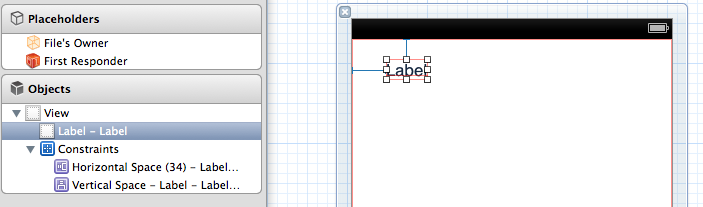
Create a .xib with an empty view in it. (File –> New File –> User Interface –> View). Drag a label somewhere into the top left quarter. IB has created some constraints for you:
Now, move the label to the bottom right quarter:
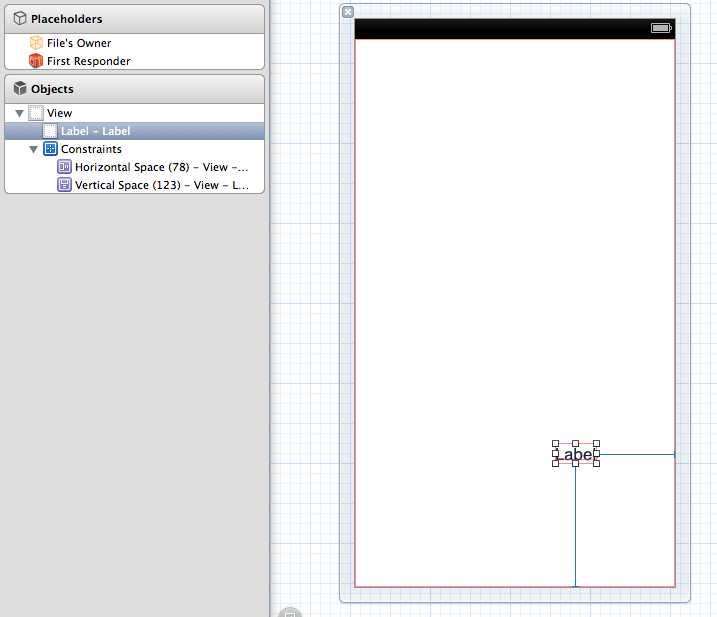
IB has discarded its previous effort and created a brand new set of constraints. This label will now behave differently - for example, between a 3.5 inch and 4 inch iPhone screen, it will remain the same distance from the bottom of the screen, instead of from the top. This may not be what you want.
Move the label back to the top left again, and start to give a little more help to IB. With the label selected, click the size inspector:
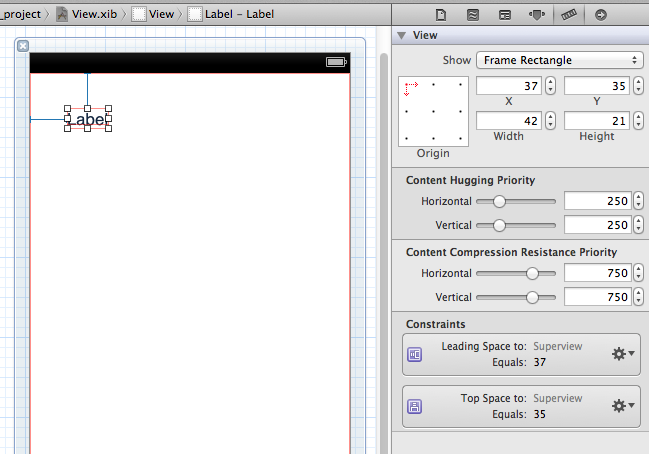
The constraints affecting the label are shown. Click the cog icon on the “Top space to: Superview” constraint and choose “Promote to user constraint”. It changes colour. When you’ve recovered from that excitement, choose “Select and Edit” from the same menu and alter the constant value to, say, 400. The label moves to the bottom of the screen, but its position is now expressed relative to the top of the view, not the bottom.
If you drag and drop this view around again, though, IB assumes you don’t care any more and will go back to inventing its own constraints for you.
Don’t drag and drop views to make adjustments to layout. Edit the applicable constraints instead.
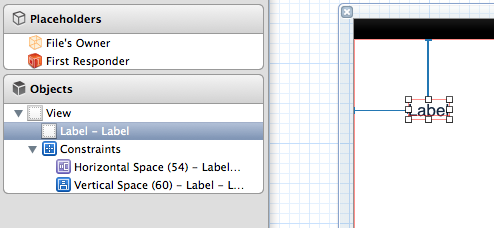
Constraints you’ve promoted or edited are called User Constraints and are shown as blue in the document explorer, and have a slightly thicker appearance when drawn graphically. Constraints added by IB while dragging and dropping are called System Constraints and are purple, with a thinner appearance. You can see the two different types of constraint here:
Dragging and dropping is only one way to make constraints, and it is the worst way, since we are relying on IB to make correct guesses for us about what we want. You can take full control over the creation of constraints by using the Alignment and Pinning menus:
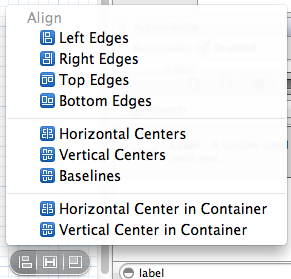
All but the bottom two options on the Alignment menu will be disabled unless you have multiple views selected in the editor. Note the small icons next to each type of constraint - these actually do a pretty good job of describing the constraint and are very useful when looking at a massive list in more complex layouts.
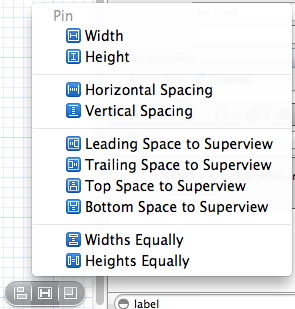
In the Pinning menu, the Horizontal and Vertical Spacing and Widths Equally and Heights Equally are only applicable when multiple views are selected. Again, note the descriptive icons.
You have much more control over creating constraints using the Pinning and Alignment menus that you do by dragging and dropping.
For complex layouts, making your intentions clear early on is vital for success. For example, say you have a set of labels that you wish to be aligned along their left hand edges, and also 10 points in from the edge of the superview. Dragging and dropping will give you the right layout, but there will be no alignment constraint created:
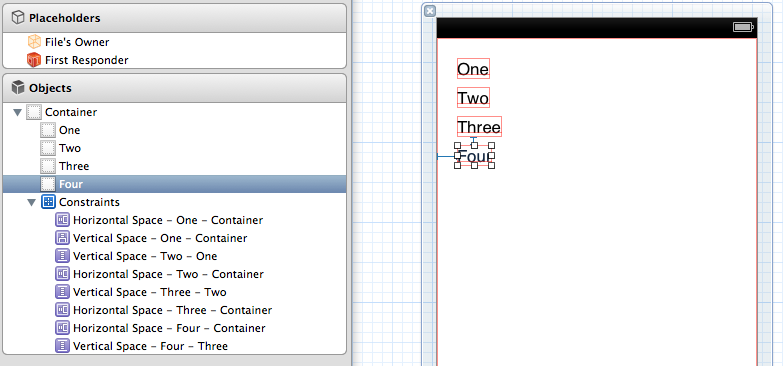
All of the horizontal positioning constraints are against the superview. If you wanted to move these labels together as a group, either in IB or at runtime, you’d need to modify every single constraint. Instead, you can select them all and align the left edges using the menu:
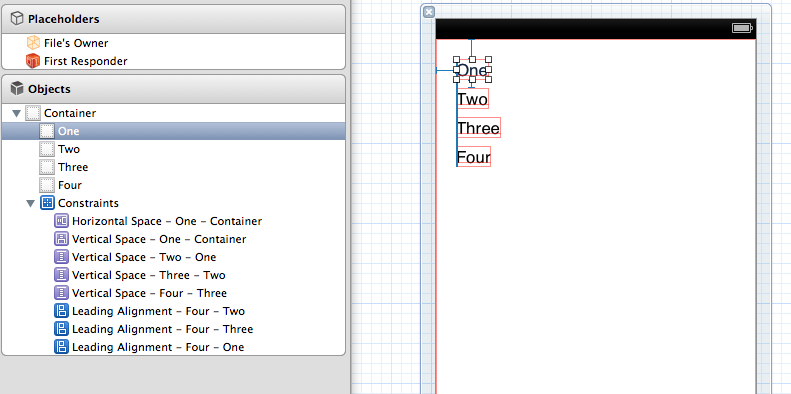
Now there is a single spacing constraint to the superview’s left edge. Editing this constraint will move all of the labels as a group.
Create constraints using the alignment and pinning menus rather than dragging and dropping, for clearer intention.
As well as being clear about what we want, we must also be clear about what we don’t want. After creating or promoting the constraints we care about, ruthlessly remove any that are left over. IB will remove some of yours, but what you want to aim for is a complete list of user constraints that you actively created or promoted, and no system constraints left. If you don’t do this, then changes to your views at runtime may have unwanted side effects as the layout manager tries to take the unwanted constraints into account.
Aim for 100% user constraints - each constraint in your layout should be one that you intended to be there, and that you understand.
Selecting, editing and deleting constraints can be done from three different places:
-
The document navigator
Naming your views is really helpful here. Constraints are found under the view to which they apply. Note that the position of a view is a constraint on that view’s superview (since it affects the frame) and the size of a view is a constraint on the view itself (since it affects the bounds).
Name your views in interface builder to make sense of the list of constraints. This is done in the Label field of the identity inspector.
-
The layout itself
This can be tricky, depending how many constraints are in play. First click the view you are interested in, then the (one or two pixel wide!) indicator.
-
The size inspector of a particular element
This list will include sizing constraints and position constraints. “Select and edit” is equivalent to choosing a constraint from anywhere and opening the attributes inspector.
In the attributes inspector, you will be able to edit the priority, and for sizing and spacing constraints, the relationship type (<=,== or >=) and the constant. What you can’t do is edit the multiplier, which is a shame, but the multiplier is much more use in variable sized layouts, which are usually more suited to building in code anyway.
You should now be able to take control of your constraints using Interface Builder, by following the key tips I’ve highlighted throughout the article. To summarise:
- Don’t drag and drop views to make adjustments to layout. Edit the applicable constraints instead.
- Create constraints using the alignment and pinning menus rather than dragging and dropping, for clearer intention.
- Aim for 100% user constraints - each constraint in your layout should be one that you intended to be there, and you understand.
- Name your views in interface builder to make sense of the list of constraints. This is done in the Label field of the identity inspector.
The next post in the series will deal with the somewhat underdocumented Visual Format Language for creating constraints in code.