Autolayout
Other posts in the Autolayout series:
- Autolayout in interface builder
- Visual format language for autolayout
- Creating individual constraints
##What is Autolayout?
Autolayout is a new concept for OS X and iOS developers, allowing the developer to specify constraints on the size and position of view elements instead of directly specifying frames and autoresizing masks.
At first glance it appears to be of more benefit to OS X developers, where windows are arbitrarily resizable and tend to contain a more complex subview hierarchy. However, it can also be useful for iOS, to support device rotation, ease development for multiple screen sizes and hopefully, as you’ll learn, make common tasks simpler and easier.
Done right, autolayout can save a lot of time and code, particularly when modifying existing interfaces during design changes. Done wrong, autolayout is a nightmarish journey into the very pits of despair.
Let’s try and take the right path.
“I’m scared. I don’t want to use Autolayout and I was happy with springs and struts.”
That’s fine. You can disable it for your xib or storyboard using the file inspector - there is a checkbox called “Enable Autolayout”. But you’re missing out. To emphasise this, I’ll be referring to springs and struts as legacy layout for the rest of the article.
To work well with autolayout you have to change the way you think about your views. You never explicitly set a frame or center property, and very rarely refer to sizes. Once you get over that, it becomes very natural - in fact, when you’re forced to deal with explicit frames and CGRect calculations again, it feels downright dirty.
How does Autolayout work?
Autolayout works by defining constraints, which are instructions to the layout engine on how to position and size views.
There have to be enough constraints in place to be able to unambiguously assign frames to every view and subview. Conversely, there can’t be constraints that contradict each other. You can’t tell a view to be 10 points inset from the edges of its superview, and twice as wide. You’ll get rewarded with a runtime error, though in many cases the layout engine will just throw away constraints until it feels happy.
What is a constraint?
A constraint describes a relationship between two attributes of a view. The attributes are things such as the top of a view, or its centre point along the x-axis. The relationship can be equal, less than or equal or greater than or equal. It can be modified by a multiplier, and amended by a constant:
Attribute = Second attribute * multiplier + constant
For example, if you wanted a view to have its left edge pinned to the left edge of its superview, the constraint would be:
Left edge of view = Left edge of superview * 1.0 + 0.0
Once a constraint is defined and added to a view, the constant property can be modified. This allows changes to the layout to be made at run-time.
Absolute values can be used by having the second attribute to be nil, so the value is derived entirely from the constant.
A simple example
This example is simple to achieve using either legacy layout or autolayout.
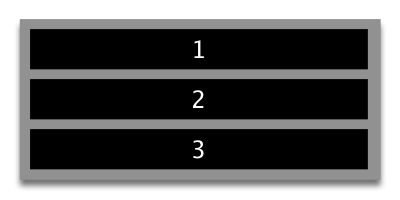
This shows a view with three subviews. Let’s assume we want the black areas to stay the same height as each other, and have the same vertical spacing between them. Horizontally, we want the black views to grow or shrink with the superview, staying the same inset from the sides.
With legacy layout, you’d do it by:
- Fixed left margins on all subviews.
- Fixed right margins on all subviews.
- Fixed height on all subviews.
- Flexible bottom margin on 1
- Setting flexible top and bottom margins on 2
- Flexible top margin on 3.
With autolayout, you have a number of options. The one you’d choose would depend on what you intended to happen to the frame of the superview.
One possible set of constraints would be:
- Left edges of all subviews equal to the left edge of the superview, with a constant of 10.0 for the inset.
- Right edges of all subviews equal to the right edge of the superview, with a constant of -10.0 for the inset.
- Each superview has a specific height constraint.
- 1’s top edge equal to the top edge of the superview, with a constant of 10.0.
- 2’s top edge equal to the bottom edge of 1, with a constant of 10.0.
- 3’s top edge equal to the bottom edge of 2, with a constant of 10.0
- 3’s bottom edge equal to the bottom edge of the superview, with a constant of -10.0.
Hang on, that looks more complicated than legacy layout? Why are we bothering?
What are the benefits?
Imagine for the example above that you wanted to animate a change to the subviews so that any of the views could double in size vertically (say, after the user taps a particular subview). The superview must also expand to accommodate this. How would you do this with legacy layout? It would involve a lot of recalculations and reassignment of frames, and suddenly your central view isn’t in the centre any more, and autoresizing masks start to look a little tricky.
With autolayout, you can simply change the constant of the appropriate height constraint. This resizes both the subview and the superview, since the superview has to grow to satisfy the new constraints.
Since all the constraints you put in place will still apply no matter what else you change, adding new views or altering constraints should, if you’ve set things up right, “just work”, and your layout will still look normal. No more counting subviews and calculating frames to fit items onto the screen.
Particularly for the iPad, this also gives you lots of flexibility during the design stage of your app. You can, for example, decide for a child view controller that 25% of the frame will be taken up by one view, and 75% by another view - set this up once, and subsequent changes to the view controller’s size will be automatically reflected in the layout. Due to the interlinked and cascading nature of constraints, design changes are very simple to implement without having to do a lot of re-coding.
What are the drawbacks?
Unfortunately, there can be some drawbacks, depending on the nature of your app and the types of layout you use.
- Editing constraints in interface builder can be a little frustrating.
- Creating constraints in code is pretty verbose.
- The documentation is not great, particularly for the “visual format language” constraint creation.
- Frames are not available where they used to be. In
viewDidLoad, none of your views will have a frame. This is easily remedied - you shouldn’t be thinking about frames any more, so you don’t need to care about what the frame of anything is. If you are adding subviews at this point, set them up using constraints. - Transformed views don’t just work with autolayout - the transform is applied after the layout has been performed, which, depending on the transform, can cause the view to be out of position.
- Custom table cells laid out in a nib or storyboard are set up with their constraints against the cell, not the content view - this is probably a bug and should be fixed in a future release. It affects the layout of the cell when entering edit mode.
The first three of those drawbacks can be overcome with a little practice and a few category methods. I will be dealing with each in future posts. The fourth is a “simple” matter of changing the way you think. The fifth has been dealt with extensively in this Stack Overflow question. And the last is, hopefully, a temporary aberration.
Sounds good, let’s go!
I’m glad you’re on board. My current project uses autolayout almost exclusively, and I’m a complete convert. Over the next few posts I’ll go over some of the common issues faced when beginning with autolayout. In the meantime, you really should watch the three WWDC 2012 videos on the subject (registration required) : Introduction to Auto Layout, Auto Layout by Example and Best Practices for Mastering Auto Layout.
In those videos the Apple engineers state that the order of preference for creating constraints should be:
- In interface builder
- In code, using the visual format language
- In code, using the single creation methods
The next three posts will cover each one of those.