Understanding UISplitViewController
Over the last few releases of iOS, things got complicated. First, we were able to share storyboards between iPad and iPhone projects, thanks to autolayout and size classes. Next, it turned out that iPad apps could be shrunken down to iPhone size, stretched out and shrunk back again during multitasking. Apps had to adapt themselves to different sizes at runtime, making sure that they displayed relevant content, appropriate to the current size.
Apple’s solution to this is UISplitViewController. On the iPad, this maintains a two-column interface, with a smaller “primary” or “master” view controller on the leading side, and a larger “secondary” or “detail” view controller on the trailing side. On the iPhone, only one view controller is visible. Before multitasking, developers could get away with copy-pasting a delegate method from the template code, maybe checking UIUserInterfaceIdiom in a few places, and the split view would work nicely on both devices without anyone having to think too much. Since multitasking, more thinking is required.
Collapse into now
The split view controller has a Boolean property, collapsed, which indicates which state it is in. The collapsed state is determined from the horizontal size class currently being used:
| Device | Orientation | Multitasking state | Horizontal Size Class | Collapsed |
|---|---|---|---|---|
| iPad | All | Full Screen | .Regular |
false |
| iPad | Landscape | 2/3 | .Regular |
false |
| iPad | Landscape | 1/2 | .Compact |
true |
| iPad Pro | Landscape | 1/2 | .Regular |
false (acts like portrait orientation) |
| iPad | Landscape | 1/3 | .Compact |
true |
| iPad | Portrait | Split | .Compact |
true |
| iPhone 6 Plus | Landscape | - | .Regular |
false |
| iPhone 6 Plus | Portrait | - | .Compact |
true |
| Other iPhones | Any | - | .Compact |
true |
When a split view controller is born, it assumes it is in a non-collapsed state. When it is added to the window, if running in a .Compact horizontal size class, it collapses. If the user rotates their iPhone 6 Plus or changes multitasking mode in their iPad (or rotates their iPad whilst multitasking, the list of testing scenarios goes on and on…) it can transition between the expanded and collapsed states.
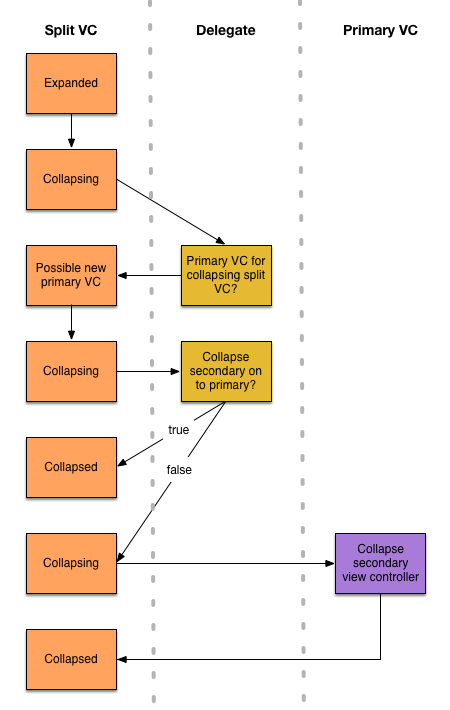
The transition between collapsed and expanded states involves several actors, and requires quite a lot of spelunking through the documentation to understand, so I’ve done that for you. Let’s start with collapsing.
‘Till I Collapse
First, the split view talks to its delegate. It calls primaryViewControllerForCollapsingSplitViewController(_:), which may return a view controller. You would implement this if a completely new view controller was more appropriate to use than the exisiting primary view controller.
After that, the split view controller calls splitViewController(_:collapseSecondaryViewController: ontoPrimaryViewController:) on its delegate. This is the method that’s included in the master-detail sample project. It returns a Boolean.
The split view controller is asking the delegate to do the collapsing for it, and the return value indicates if the delegate has handled the collapse or not. With that in mind, the answer returned means the following:
true: this tells the split view controller not to do anything with the secondary view controller, because the delegate has handled it. In the template project, it’s “handled” by doing nothing, so the secondary controller is discarded. If you have additional requirements you would use this opportunity to configure the primary controller based on the contents of the secondary controller, perhaps to show an expanded table row for the content that was previously displayed in the secondary controller.false: this tells the split view controller that the delegate has not handled the collapse, and the split view controller itself needs to do some work.
Whatever you return from this method, the secondary view controller is going away very soon.
If the method above returns false or is not implemented, then that means the split view controller will attempt to perform the collapse itself.
It does this by calling collapseSecondaryViewController(_:forSplitViewController:) on the primary view controller. This method is implemented by UIViewController but nothing is really done there. UINavigationController overrides this method and will take the secondary view controller and add it to the top of the navigation stack.
Here’s a diagram showing the flow of operations when collapsing:
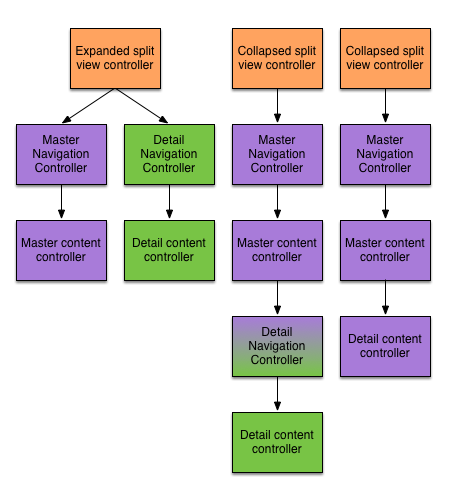
This can be where things get strange. In the template project, the primary and secondary view controllers are both navigation controllers. After collapse, if you investigate the view controller stack, it looks like this:
- Split View Controller (root)
- Navigation Controller (primary)
- Primary Content view controller
- Navigation Controller (secondary)
- Secondary Content view controller
- Navigation Controller (primary)
This doesn’t seem right to me. If you try to push a navigation controller onto a navigation stack, you get an exception. Why is it allowed in this case? If you ask the secondary content view controller for its navigation controller, you get the secondary one, likewise for the navigation bar, which isn’t even on the screen. Any queries about the navigation stack may reveal unexpected answers. Most things seem to work OK, there must be some private UIKit message passing going on in the background, but if you’re experiencing problems with your adaptive app, the wonky navigation stack is worth looking at.
You can straighten things out, either in the split view delegate:
if let
  primaryNav = primaryViewController as? UINavigationController,
  secondaryNav = secondaryViewController as? UINavigationController {
    primaryNav.viewControllers = primaryNav.viewControllers + secondaryNav.viewControllers
    return true
}
Or in a navigation controller subclass:
override func collapseSecondaryViewController(secondaryViewController: UIViewController, forSplitViewController splitViewController: UISplitViewController) {
  if let secondaryAsNav = secondaryViewController as? UINavigationController {
    viewControllers = viewControllers + secondaryAsNav.viewControllers
  } else {
    super.collapseSecondaryViewController(secondaryViewController, forSplitViewController: splitViewController)
  }
}
All you’re doing here is taking the view controller stack from the secondary navigation controller, and adding it in to the stack of the primary controller. Note that if you do this, you’re also responsible for splitting the stack on expand, and wrapping the secondary stack in a new navigation controller.
Here’s a representation of what each version looks like:
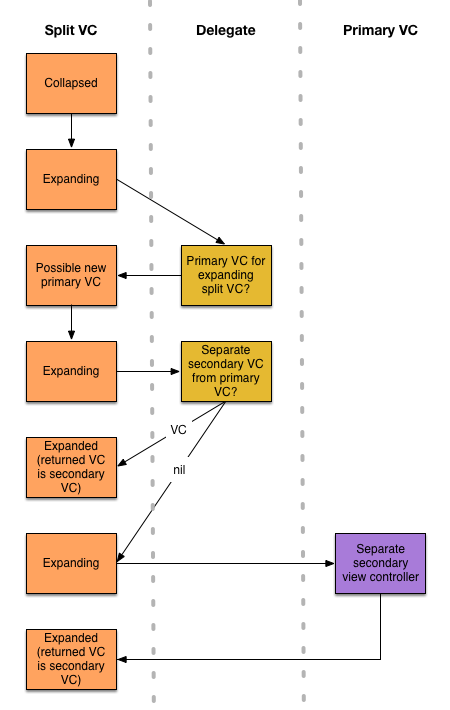
That’s enough collapsing. Time to look at expanding.
Expand your mind
As with collapsing, first the split view controller talks to its delegate, calling primaryViewControllerForExpandingSplitViewController(_:). This is your opportunity to provide an entirely new view controller to be on the primary side. If this is not implemented or you return nil, the existing primary view controller will be used. If you implemented the corresponding method called during collapse, you probably want to reverse whatever you did there.
To tease apart the primary and secondary view controllers, the splitViewController(_:separateSecondaryViewControllerFromPrimaryViewController:) delegate method is then called. This method returns a UIViewController?; if you return something, it will be the new secondary controller. If you don’t, the split view controller will try to handle the separation itself. If you manually combined navigation stacks in the delegate method when collapsing, you will need to separate them yourself at this point, and create a new navigation controller for the secondary view controller.
If you return nil from this method or do not implement it, the split view controller tries to handle the separation itself by calling separateSecondaryViewControllerForSplitViewController(_:) on the primary view controller. Like the corresponding collapse method, this is implemented as (presumably) a stub on UIViewController. UINavigationController overrides this method and will return the top view controller from its navigation stack. If you recall the discussion in the collapse section, this will be itself a navigation controller, if you’re using the unmodified template code.
Here’s a diagram showing the flow of operations when expanding:
The size (class) of a cow
In normal use the split view controller will pass its own horizontal size class to the secondary view controller, and a horizontal size class of .Compact to the primary view controller.
This means that traitCollectionDidChange will not indicate a change in horizontal size class on the primary view controller when the iPhone 6 Plus is rotated, nor will you be able to use the horizontal size class of the primary view controller to implement platform-specific behaviour.
If you want the primary view controller to hold the same horizontal size class as the split view controller itself for whatever reason, you can implement overrideTraitCollectionForChildViewController(_:) in a split view controller subclass:
override func overrideTraitCollectionForChildViewController(childViewController: UIViewController) -> UITraitCollection? {
    guard let collection = super.overrideTraitCollectionForChildViewController(childViewController) else { return nil }
    let overrideCollection = UITraitCollection(horizontalSizeClass: self.traitCollection.horizontalSizeClass)
    return UITraitCollection(traitsFromCollections: [collection, overrideCollection])
}
Split personality
This post should have clarified your understanding of the expanding and collapsing process that occurs with a split view controller, its delegate and its primary view controller. You should have additional insight into things that might be giving you problems, and some useful leads on how to fix those problems.